Pages

5.31.2011

The Grill At The Blue Room

The lunch grill at The Blue Room

If I must go to work (and believe me, my bank account tells me I must), I figure I need to have some things to look forward to, like lunch. While Kendall Square has been steadily filling up with more and more restaurants, one of my favorite lunch spots has always been the grill at The Blue Room. The grill is only open during the spring and summer, so once the weather gets nice, I constantly check The Blue Room's website for those magic words: "The grill is open!"

The lunch grill at The Blue Room

This year the grill opened at the beginning of May, and I convinced my coworkers (who am I kidding, I merely asked and they eagerly agreed) to come to lunch with me that very first week. I shouldn't give away all the tricks, but it's best to get there early to get a table and avoid the line, so we trekked over at 10 of 12.

I was thrilled to see the chalkboard out front listing the day's options (even though I had already checked them out on Twitter). It's there every day the grill is open, and the offerings range from salmon to chicken to pork to steak to something vegetarian. Each dish is usually $7 to $9 and includes two sides of your choice. An extra dollar gets you iced tea or lemonade (or if you mix them, an Arnold Palmer).

The lunch grill at The Blue Room

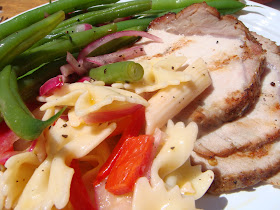
While I always enjoy any of the main offerings, one of my favorite things about going to The Blue Room at lunch is the sides. There's always rice, pasta salad, green beans, salad, black beans, and tomatoes and cucumbers to choose from.

The lunch grill at The Blue Room

The lunch grill at The Blue Room

The lunch grill at The Blue Room

Besides the food and the low price tag, the ambience also brings me to The Blue Room. I like sitting at the outdoor tables and soaking up as much sun as possible before heading back to the sealed window, over-air-conditioned office. For that brief hour, I am completely happy, filled with good food, good conversation with friends and coworkers, and plenty of vitamin D. It's sort of my little oasis.

Do you have a favorite summer lunch spot?

Blue Room on Urbanspoon

5.30.2011

Cheddar-And-Onion Smashed Burgers With Homemade Sesame Buns

Cheddar-and-onion smashed burgers with homemade sesame buns

Happy Memorial Day! Memorial Day usually kicks off grilling season around here. I love being outside and eating hot dogs and hamburgers and grilled chicken, steaks, and salmon. I can't wait until we have a house with a yard so we can have our own grill. Once we do, I look forward to throwing some sort of protein and corn on the cob on the grill all summer long. For now I just relish the times I get to hang out with friends and family who have grills and outdoor space.

Because we can't grill outside, I'm always on the lookout for tasty recipes I can make indoors in a grill pan or using my Cuisinart Griddler. I was pretty excited to see an article in Food & Wine about burgers actually being better on a griddle. Of course, if you read the whole article, you soon find out they want you to put the griddle on the grill. I knew if I followed the recipe without using a grill, my burgers wouldn't get that smoky grill flavor, but I figured they'd at least partially satisfy my craving for grilled foods.

Cheddar-and-onion smashed burgers with homemade sesame buns

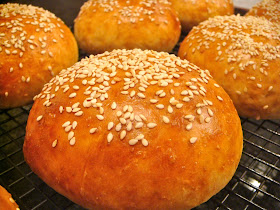
I remembered that Alicia had recently made her own burger buns, so instead of buying some this time, I decided to make my own too. I found a recipe from King Arthur Flour and set to work on the buns about 3 hours before I wanted dinner to be ready. They are so easy to make. As long as I have the time to make burger buns, I'll be doing that as opposed to buying them from now on. They are definitely worth it.

Homemade sesame seed burger buns

Homemade Sesame Seed Buns (adapted from King Arthur Flour)
Print this recipe
Makes 8 buns

Ingredients

3/4 to 1 cup lukewarm water (less in humid environment, more in dry climate)
2 tablespoons butter, softened
1 egg
3 1/2 cups all-purpose flour
1/4 cup sugar
1 1/4 teaspoons kosher salt
1 tablespoon instant yeast
1 egg white, beaten
Sesame seeds, for topping

Preparation

In bowl of stand mixer fitted with dough hook, combine water, butter, egg, flour, sugar, salt, and yeast.


Run mixer on low speed until dough becomes soft and smooth.

Transfer the dough to a large buttered glass bowl, cover it with a towel or plastic wrap, and let it rise for 1 to 2 hours, until it has nearly doubled.


Gently deflate the dough, and divide it into 8 pieces. (To divide it evenly, use a scale. My dough weighed just slightly more than 800 grams, so I divided the dough into 8 roughly 100-gram pieces.)


Roll each piece into a ball. (See this how-to video.)


Space the dough balls out on a sheet pan lined with parchment or a Silpat, and flatten each one to about 3 inches across.


Cover the baking sheet with a towel or plastic wrap, and let the buns rise for another hour. They should look puffy.


Preheat oven to 375 degrees.

Brush the buns with the egg white, and sprinkle sesame seeds on top.


Bake the buns for 15 to 18 minutes, or until golden.

Homemade burger bun with sesame seeds

Transfer buns to a rack to cool.


Cheddar-And-Onion Smashed Burgers (adapted from Food & Wine, June 2011)
Print this recipe
Serves 2

Ingredients

Favorite pickles of your choice, thinly sliced
2 homemade burger buns, halved
2 ground beef patties (or 1/2 pound ground beef)
Salt and pepper
Garlic powder
1/2 Vidalia onion, sliced paper thin
2 slices cheddar cheese

Preparation

Heat griddle to 400 degrees.

Layer pickles slices on the bottoms of the buns.


Place the patties on the grill, press them with a spatula, and cook them for 30 seconds. (Or for ground beef, loosely form the meat into two balls, and place them on the griddle. Cook the meatballs for 30 seconds. Then flatten them with a spatula to make 5-inch patties.)


Season the patties with salt and pepper and garlic powder, and cook for 2 minutes, until well-seared.


Press a handful of onions onto each patty.


Carefully flip the burgers so the onions end up on the bottom.


Season with salt and pepper and garlic powder again, and top each patty with a slice of cheese. Cook for 2 minutes.


Then cover the patties and griddle with a roasting pan turned upside down, and cook for another minute, or until cheese is melted.

Transfer the burgers to the bottom buns.


Cover with the bun tops.

Cheddar-and-onion smashed burgers with homemade sesame buns

A couple of notes on this recipe: I made these twice, and I went through the balling and smashing the first time and skipped it the second time. You could go either way. I added seasoning the burgers on the second side and also using garlic powder because these needed more flavor. (You're really supposed to finish them with umami dust, but I didn't have it or want to buy the ingredients to make it.)

These are definitely the best-tasting burgers I've made indoors. While I love the classic toppings (cheese, onions, and pickles), I know I'll be adding tomatoes to these burgers when I can find ripe ones at the farmers' market this summer. Tomatoes are pretty classic too, I think.

What are your plans for Memorial Day?

I'm in Aruba right now and have no idea how we'll be celebrating. I plan to spend the day on the beach though!

5.27.2011

Fish Tacos

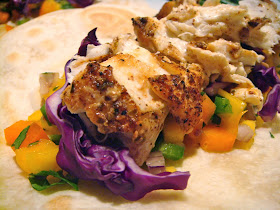
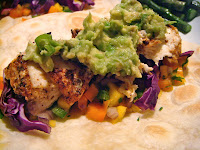
Fish tacos

"The best fish tacos require good fresh fish, good tortillas, and good salsa." - David Tanis

Fish tacos

I promise you won't be reading a million taco recipes here, but as you know, I have quite a few tortillas to get through, thanks to Tortilla Land.

I've been wanting to make fish tacos for a while, as part of my personal goal to cook fish more often and use interesting fish recipes. I think I've seen versions of fish tacos on almost all of my favorite blogs now, so I looked through those recipes and my cookbooks and finally decided on one to try. The recipe I chose comes from David Tanis' A Platter of Figs, and I chose it for its simplicity. (I've mentioned this book in the past and how I love it for its simplicity.) Many of the other recipes I saw called for frying the fish or making fancy sour cream-based sauces. In Tanis' recipe, the fish is rubbed with spices and then broiled. There are a number of basic, fresh accompaniments, and I choose to take inspiration from Tanis' avocado salad and shredded cabbage with lime. Then I also made pico de gallo (for Jeff) and mango salsa (for me).

Fish taco setup

I loved the colorful salsas, crunchy cabbage, chewy tortillas, and spicy fish. Even Jeff, who said he didn't think he'd like fish tacos, really enjoyed these -- though not as much as the steak tacos. I think it's a tossup for me. I love both recipes for different reasons.

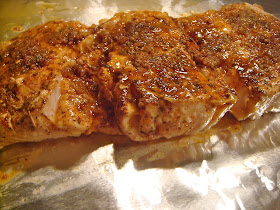
Fish for fish tacos

Fish Tacos (adapted from A Platter of Figs)
Print this recipe
Makes 4 to 6 tacos

Ingredients

3/4 to 1 pound halibut steaks
Salt and pepper
1/2 teaspoon chili powder
1 garlic clove, minced
1/4 teaspoon oregano
1/2 tablespoon olive oil
4 to 6 Tortilla Land flour tortillas
Mango salsa (recipe below) (optional)
Pico de gallo (recipe below) (optional)
Avocado salad (recipe below) (optional)
Cabbage with lime (recipe below) (optional)

Preparation

Season the fish with salt and pepper. Sprinkle the chili powder, garlic, and oregano on top, and then drizzle the olive oil over the fish.


Rub the seasoning into the fish, cover it with plastic wrap, and refrigerate for 1 1/2 to 2 hours. (This is the perfect time to make your salsas.) Bring the fish to room temperature before cooking.

When ready to cook and serve, transfer the fish to a foil-lined sheet pan, and place under the broiler for about 3 to 4 minutes per side, or until fish is cooked through.


Transfer to a serving platter, and cut or break into smaller pieces.


While fish is cooking, preheat griddle to 400 degrees. Once fish comes out of the oven, cook the tortillas on the griddle for 30 to 60 seconds per side, or until they brown in spots.


Serve with mango salsa, pico de gallo, avocado salad, and cabbage with lime, if desired.

Fish tacos Fish tacos

Mango Salsa And Pico De Gallo (my recipes)

It's easiest to make both salsas at the same time since the only difference is mangos in one and tomatoes in the other.


Ingredients

1/2 of an orange pepper, diced
1/4 of a red onion, diced
1/2 of a jalapeno, diced
2 tablespoons cilantro, minced
1/2 lime, cut in half
1/2 mango, diced
2 to 4 Campari tomatoes (or other small, ripe tomatoes), cored, seeded, and diced

Preparation

Divide the pepper, onion, jalapeno, and cilantro evenly between two serving bowls.

Squeeze one lime wedge over each bowl.

Add the diced mango to one bowl and the diced tomato to the other.


Stir both salsas, and leave them out at room temp for an hour or so (as long as it takes the fish to marinate and cook), and serve them with the fish tacos.

Pico de gallo Mango salsa

Avocado Salad (adapted from A Platter of Figs)

This doesn't end up being a salad but more like guacamole.

Ingredients

1 ripe avocado
1 scallion, thinly sliced
Salt
1/4 lime

Preparation

Scoop the avocado into a serving bowl. Stir in the scallion, and season with salt. Squeeze the lime wedge into the avocado mixture, and give it another stir. (Make this about a half an hour before serving the fish tacos. If you make it too early, it could start to brown.)

Avocado salad/guacamole

Cabbage With Lime (adapted from A Platter of Figs)

Ingredients

1/4 of a small red cabbage, sliced
Salt
1/2 lime

Preparation

Place the cabbage in a serving dish. Season with salt. Squeeze lime juice on top, and toss cabbage to coat. (Make this just before putting the fish in the oven, about 10 minutes before serving the fish tacos.)


The tacos and all their toppings were just incredible. It felt like we were eating such a light, healthy dinner too. And I just kept thinking about all the vitamins and nutrients I must have been getting from so many colorful veggies and fruit.

Pico de gallo

Have you ever made fish tacos?