8.27.2009

Daring Bakers: Dobos Torte


Well, I've left the Daring Cooks and joined the Daring Bakers. I think after seeing those milan cookies and chocolate-covered marshmallow ones from the last challenge, I was feeling a little jealous of the great sweets being created. So here I am, baking away!

The August 2009 Daring Bakers' challenge was hosted by Angela of A Spoonful of Sugar and Lorraine of Not Quite Nigella. They chose the spectacular Dobos Torte based on a recipe from Rick Rodgers' cookbook Kaffeehaus: Exquisite Desserts from the Classic Caffés of Vienna, Budapest, and Prague.

The cake traditionally has six layers. Chocolate buttercream is spread between the layers and used to frost the cake and then the top layer is made into caramel wedges.


I first want to thank Angela and Lorraine for hosting the challenge and presenting the recipe with pictures and very detailed and helpful directions. The notes they added were incredibly useful.

It saddens me to say that this cake, besides the amazingly perfect chocolate frosting (which quite possibly will be my new go-to frosting), was nothing special. It was a ton of work, and I wasn't very happy with the final result. Even though it was challenging to make and it didn't end up being one of my favorite desserts, I still had fun with it.

I decided to make two smaller cakes as opposed to one giant cake. I almost wish I had done even smaller cakes. But I just bought mini springform pans at Crate & Barrel and wanted to try them out, so I made the cake to fit them.

After going through and thoroughly following the recipe, I have some suggestions for making this cake a bit easier to make and a bit tastier the next time. The first thing would be to lose the top layer. The caramel didn't taste all that great. I may have burnt it slightly, but I also saw in the comments from many others that they didn't feel too fondly for it either. I've never made caramel with lemon juice in it, and that may have added to the strange flavor it had.

Making this cake starts with drawing circles on parchment paper that are slightly larger than the size you want your actual cake. You then spread your batter on these circles and bake the cake layers. For what reason couldn't you bake the cake in the pan you want to use and then cut it into layers? And if that's not possible for some reason, why not draw the circles the exact size you want so you don't have to go through the trouble of making the circles smaller afterward? It's time-consuming and leaves too much room for error.

Also, I wasn't impressed with this sponge cake. It was kind of dry -- the opposite of what I'd want in a cake. I much prefer the recipe I used from Mastering the Art of French cooking to make layer cakes for Julia Child's birthday.

Alright, complaints are aired. Let's get to the cake...

Dobos Torte (Recipe that follows is from Daring Bakers with my alterations)

Sponge Cake Layers

Ingredients

6 large eggs, separated, at room temperature
1 1/3 cups confectioner's sugar, divided
1 teaspoon vanilla extract
1 cup plus 2 tablespoons sifted cake flour
pinch of salt

Directions

Preheat oven to 400 degrees.

Cut six pieces of parchment paper to fit your baking sheets. It's easiest if you have two baking sheets that you can rotate into and out of the oven. Using a guide (cookie cutter, cake pan, etc.), trace a circle (or your desired shape) 1 inch larger than you want your final cake (this is what I did, but next time I would just make the circles the size of the cake -- so your choice) on each of the papers, and turn them over (the circle should be visible from the other side, so that the graphite or ink doesn't touch the cake batter).


Beat the egg yolks, 2/3 cup of the confectioner's sugar, and the vanilla in bowl of electric mixer on high speed until the mixture is thick, pale yellow, and forms a thick ribbon when the beaters are lifted a few inches above the batter, about 3 minutes.

In another bowl, using clean beaters, beat the egg whites until soft peaks form. Gradually beat in the remaining 2/3 cup of confectioner's sugar until the whites form stiff, shiny peaks. Using a large rubber spatula, stir about 1/4 of the beaten whites into the egg yolk mixture, then fold in the remainder, leaving a few wisps of white visible.


Combine the flour and salt. Sift half the flour over the eggs, and fold in; repeat with the remaining flour.
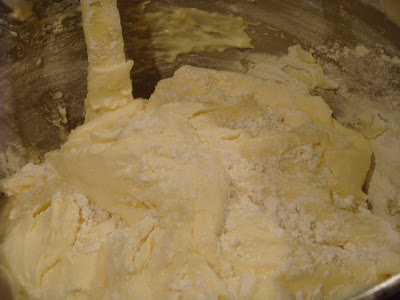

Line one of the baking sheets with a circle-marked paper. Using a small offset spatula, spread the batter, filling in the traced circle on one baking sheet (I used a heaping 1/4 cup of batter for my cakes).


Bake on the top rack for 4-5 minutes, until the cake springs back when pressed gently in the center and the edges are lightly browned. While these layers bake, repeat the process on the other baking sheet. When the first pan is done, remove it from the oven, and insert the second pan.


Invert the first cake onto a flat surface and carefully peel off the paper. Slide the cake layer back onto the paper and let stand until cool.


Rinse the baking sheet under cold running water to cool, and dry it before lining with another parchment. Continue with the remaining papers and batter to make a total of six layers (Since I was doing two small cakes, I had 12 layers total).


Completely cool the layers. Trim each cake layer into a neat round of the size you need (or your desired shape). I found it easiest to use a buttered pizza cutter.


Note: The sponge layers can be prepared in advance. I layered mine with plastic wrap, wrapped them tightly, and stored them in the fridge overnight.

Chocolate Buttercream

Ingredients

4 large eggs, at room temperature
1 cup caster sugar (very fine sugar)
4 oz Scharffen-Berger dark chocolate, finely chopped
2 sticks plus 2 tablespoons unsalted butter, at room temperature

Directions

Fill a large saucepan (that your mixer bowl will fit in -- think double boiler) with an inch or so of water and bring it to a boil.

Meanwhile, whisk the eggs with the sugar until pale and thickened, about five minutes.

Fit mixing bowl over the boiling water in the saucepan (water should not touch bowl), and lower the heat to a brisk simmer. Cook the egg mixture, whisking constantly, for 2-3 minutes until you see it starting to thicken a bit.

Whisk in the finely chopped chocolate and cook, stirring, for a further 2-3 minutes.


Scrape the chocolate mixture into a medium bowl and leave to cool to room temperature.


When cool, beat in the soft butter. Make sure to cut it into small pieces to add it to the chocolate. You should end up with a thick, velvety chocolate buttercream (Mine was a bit runny but fine after it was chilled). Chill while you make the caramel topping.


I made my sponge layers and buttercream the night before I did the caramel topping and assembled the cake. This is a good idea if you don't have time to do it all at once.

Caramel Topping (highly recommend doing without this)

Ingredients

1 cup caster sugar
12 tablespoons water
8 teaspoons lemon juice
1 tablespoon neutral oil (e.g., grapeseed, rice bran, sunflower) (I purposely bought a bottle of this for the recipe and then realized it was just used to oil the knife -- skip it and use butter to cut cost if you don't have it on hand.)

Directions

If you refrigerated your cake layers, take them out so they can come to room temperature. Choose the best-looking cake layer for the caramel top.

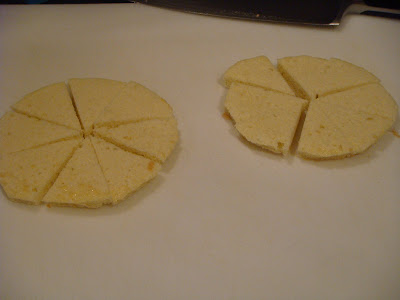
Line a jellyroll pan with parchment paper, and butter the paper. Place the reserved cake layer on the paper. Cut the cake into equal wedges (like you'd cut a pie), but keep them together. I put my springform pans around the cake wedges, as I thought this would work best for holding the caramel in.


Lightly oil a thin, sharp knife and an offset metal spatula.

Stir the sugar, water, and lemon juice in a small saucepan. Bring to a boil over medium heat, stirring often to dissolve the sugar. Once dissolved into a smooth syrup, turn the heat up to high and boil without stirring, swirling the pan by the handle occasionally and washing down any sugar crystals on the sides of the pan with a wet brush until the syrup has turned into an amber-colored caramel.


Immediately pour all of the hot caramel over the cake layer (or layers if making more than one cake). Using the offset spatula, quickly spread the caramel evenly to the edge of the cake layers.


Let cool until beginning to set, about 30 seconds. Using the tip of the hot oiled knife (keep re-oiling this with a pastry brush between cutting), cut through the scored marks to divide the caramel layer into equal wedges. Cool another minute or so, then use the edge of the knife to completely cut and separate the wedges using one firm slice movement (rather than rocking back and forth which may produce toffee strands). Cool completely.


Finishing touches

12 whole hazelnuts, peeled and toasted
½ cup peeled and finely chopped hazelnuts

Assembling the Dobos

Place a dab of chocolate buttercream on the middle of the bottom of each springform pan or whatever you'll be assembling the cake on (a cardboard round is fine too). Press a layer of cake on top.

Spread the layer with chocolate icing. Repeat with 4 more cake layers. Spread the remaining icing on the sides of the cake.

Optional: press the finely chopped hazelnuts onto the sides of the cake.


Here I highly recommend putting the cake back in the fridge for a while so the buttercream can harden. If you don't, your wedges may slide right off, and you'll be left with a big chocolatey mess. Trust me -- I know!

Once buttercream has hardened, prop a hazelnut under each wedge so that it sits at an angle, arrange the wedges on top of the cake in a spoke pattern.


Refrigerate the cake until the icing is set, and then wrap it if not using it right away. Let slices come to room temperature for the best possible flavor.

Phew! And that's how it's done.


Don't forget to check out the Daring Kitchen and see what the other Daring Bakers came up with!

8.25.2009

Chicken Quesadillas


I love reading food blogs not only because I get to know so many great people but also because I get to benefit from the wonderful recipes they share!

The other day I saw a recipe for crockpot chicken tacos on Beantown Baker, a blog I recently started reading. I immediately bookmarked the recipe.

By now you know that my boyfriend and I can always agree on Mexican dishes -- whether fajitas, tacos, or quesadillas -- although mine are always loaded with much more stuff.

I love that these dishes are usually quick to make and easy to get on the table. And if you're using a crock pot/slow cooker for the bulk of the work, that's even better!

Truth be told, my slow cooker hasn't gotten much use, if any, this summer. It seems silly since it's so easy to use and doesn't heat up the whole house like the oven does, but I usually only think of using it in the winter for stews, soups, and chili. Turns out it works really well for summer recipes too!

Head over to Beantown Baker for the complete recipe, which starts with making a taco spice mix. I think this is such a great idea. I'm always buying taco seasoning packets, but now I know I can effortlessly mix up a batch of my own that tastes just as good -- if not better! I even have some leftover for the next time I make this chicken... or for use in some other Mexican dish I decide to make.

Then it's as simple as throwing the chicken (I used 4 chicken breasts), spice mix, some broth, and diced tomatoes in the slow cooker. One change I made since this was an after-work undertaking was to set the slow cooker on high and let it do its thing for about 3.5 hours. (If you have 6 hours to spare or know you can start your slow cooker, head out, and be back within a 6-hour time frame, then you can follow the Beantown Baker recipe exactly.) I also rubbed the slow cooker with a little oil instead of using non-stick cooking spray.

During that 3.5 hours, there's plenty of time to whip up some quick guacamole. I simply mashed an avocado with some lemon juice, salt and pepper, and garlic powder. I have to have guacamole with my Mexican food!

When time was up, I pulled out my indoor grill and started preheating it while I removed the chicken from the slow cooker and shredded it. The chicken stayed super-moist from the broth and tomato juices.


Then I took flour tortillas, sprinkled a mix of cheddar and Monterey Jack cheese on them, scooped on some of the chicken (avoiding tomatoes for the boyfriend and heaping extras on mine), sprinkled more cheese on top, and then tucked in the ends and folded the tortillas up.

I melted some butter on the hot grill, placed the quesadillas on it, and closed the cover, so they would be nicely pressed and brown all over.


I love how this gets the cheese all gooey and makes the outside of the quesadilla look so enticing!


We enjoyed this feast with some corn on the cob, and of course, I heaped guacamole on my plate.


Note: If you have extra chicken leftover, it still makes great quesadillas the next night. When you store the leftovers, just make sure to add a lot of the juices from the slow cooker to the chicken. Then when you're ready to reheat the leftovers, spread the chicken, tomatoes, and juices on a sheet pan lined with foil, and pop it under the broil for a little bit. I assembled our "leftover" quesadillas the same way as the originals, this time using broiled chicken.

Do you use your slow cooker/crock pot during the summer? What do you make in it?

8.20.2009

Prosciutto And Summer Veggie Orzo


Remember those pork chops stuffed with prosciutto and sage that I made not too long ago? Well, after I made them, I had a bit of sage and prosciutto leftover and thought I could turn them into something flavorful and creative for lunch for the rest of the week.

Following a quick scan of the pantry and fridge, I knew I could whip up some sort of orzo and summer veggie mixture that the prosciutto and sage would complement well.

I tend to make a lot of pasta (or Israeli couscous) dishes whenever I have fresh veggies and leftover dinner ingredients hanging around.

This is a pretty rough recipe because I didn't write down exactly what I did. Sorry about that! But you can definitely throw in whatever you're in the mood for... and use amounts that work for you. It's basically sauteeing veggies and cooking up some orzo! Super quick and super easy.

Prosciutto And Summer Veggie Orzo

Ingredients

1/4 to 1/2 cup orzo, depending how hungry you are (or how many lunches you want), cooked according to package directions, mixed with a little olive oil to keep it from sticking, and set aside
olive oil
small onion, diced
1 yellow squash, halved and thinly sliced
a few thin slices of prosciutto, cut into about 1-inch pieces
a few leaves of sage, cut into small pieces
one ear's worth of corn kernels, stripped off the cob
1 medium tomato or half large tomato, diced and seeds removed
salt and pepper

Preparation

Heat a tablespoon or so of olive oil in a large skillet over medium-high heat. Add onions. Saute for about 5 minutes and then add your squash. Mix well so onions aren't all on the bottom. Cook until squash and onions soften and start to brown (or to your liking). Feel free to add more olive oil if you need it.

Add the prosciutto and sage, and saute for about a minute.

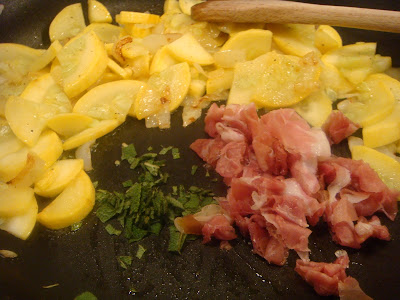
squash, sage, and prosciutto in pan
Then mix everything well. You just want to get the prosciutto and sage to get hot.


Then toss in your corn kernels and diced tomato, and give everything another good stir.


Next take the orzo that you set aside earlier, and stir it into the mixture. Season to taste with salt and pepper.


And voila! Lunch for two days is all set and ready to be packaged up and refrigerated. You can either eat this cold like a pasta salad or rewarm it in the microwave for a minute or two.

I really enjoyed all the veggies in here and loved having the saltiness of the prosciutto and the sweetness of the near-caramelized onions.

Remember, you don't have to follow this recipe exactly. Look through your fridge, pantry, and leftovers, and pick your favorite veggies, herbs, and meat (if you're a meat eater). Follow the basic guidelines and create a dish you love!

8.18.2009

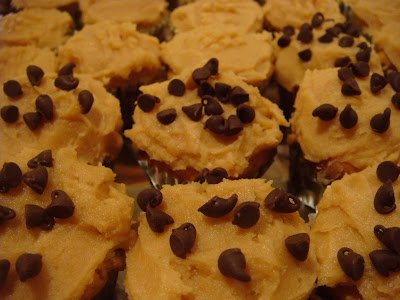
Mini Peanut Butter Cookie Cupcakes With Chocolate Chips


What's better than peanut butter cupcakes? Well, for starters, peanut butter cupcakes with chocolate. And then for good measure, miniature peanut butter cupcakes with chocolate. In my opinion the best desserts are small and chocolate-laden.

As you know from seeing my ladybug cupcakes, I recently bought Martha Stewart's Cupcakes. Every time I flip through the book, I am tempted to make something. These peanut butter cookie cupcakes caught my eye because I wasn't quite in the mood for a cupcake, but the idea of cookie cupcakes intrigued me. A nice cross between a cookie and a cupcake, they came out a bit more dense than normal cupcakes.


The cupcakes are modeled after those peanut butter cookies we've all seen, had, or made in our lives -- the ones with the fork marks on top. I thought they looked adorable.


You can find the recipe on Martha's Web site, but she did forget one very important ingredient, so toss in a couple handfuls of chocolate chips after you mix in the sour cream. I used semisweet, but I'm sure milk chocolate or even bittersweet would be delicious as well.

And if you want to go real crazy, make minis instead of regular size muffins. And while you're thinking mini, tossing some mini chips on top of your frosted cookies (un-fork-marked ones) is quite delicious and looks really good too.


I actually did these cupcakes three ways: some frosted with the fork marks, some frosted with the mini chips, and some unfrosted.


All went over really well with the boyfriends' softball team and with my coworkers, as well as with the two of us. I mean really, can anyone resist the combination of peanut butter and chocolate in a nice bite-size portion?

Oh, and if you're a milk drinker, have a glass ready to go with these. The frosting is quite sticky!

8.15.2009

Happy Birthday, Julia Child!


I made a cake for Julia Child -- well, you know, not really for her, but something like that. I knew her would-be 97th birthday was coming up (today!), so it seemed like the perfect time to make a cake from Mastering The Art of French Cooking.

I chose the biscuit au beurre (butter spongecake) and layered it with chantilly aux fraises (strawberry cream). (These are two separate recipes in the cookbook.)

I love the fancy individual cakes you can find at restaurants and bakeries that have layers of cake and filling. They always look so elegant. But sometimes I find that the spongecake in these actually has the texture of a thin, dry sponge. It's a disappointing result from a promising-looking cake. I really hoped that mine would not turn out like that.

I started by making the strawberry cream so it would have time to chill while the cake baked.

strawberry chantilly cream
Then I prepared the cake batter. While in the midst of making it, I realized I didn't have any vanilla. I must have forgotten to put it on the shopping list after using the last drops in a previous recipe. Fortunately, I had just won some vanilla beans and vanilla bean paste from Jamie at My Baking Addiction, so I had the paste for this recipe! It was the perfect stand-in for vanilla extract -- although I figured it was more concentrated than extract and used less than the recipe called for.


Instead of using a traditional cake pan, I poured the prepared spongecake batter into a sheet pan lined with buttered and floured parchment. I wanted a very thin sheet of cake that I could then cut into small circles (using a cookie cutter) for the cake layers. All of this would be much easier if I had small cake pans or cake rings, but as my bakeware collection is not that extensive yet, I improvised.


I assembled the cakes in small ramekins lined with plastic wrap. I hoped the sides of the ramekins would keep the cream from oozing out from between the cake layers, and it did, for the most part. I stuck the cakes in the freezer to keep them fresh and for more precaution against oozing filling.


I left some like that and then coated some with chocolate ganache.


They don't look as pretty as I hoped they would. I'll get better at it (and eventually get the right equipment). But believe me when I tell you they were absolutely delicious. The cake was super moist, not dry and sponge-like at all. The cream tasted like sweet, ripe strawberries, and the chocolate ganache tied the whole thing together for me.


The un-ganached versions were made for the boyfriend. Given the choice between a chocolate and non-chocolate dessert, nine times out of ten, I'll opt for chocolate!