1.29.2009

Weeknight Cooking: Spaghetti Alla Carbonara

plate of spaghetti carbonara
Sometimes you don't have time to put together a whole meal, but you also don't want to order from one of the same three takeout places yet again: That's when a simple meal like spaghetti alla carbonara comes into play. Most people have the ingredients for this quick, tasty dish on hand. All you need is pasta, eggs, olive oil, bacon, cheese, salt, and pepper.

If you have time to go grocery shopping or happen to keep it around, pancetta is also used instead of bacon in some recipes. I'm more likely to have a half-used package of bacon hanging around from the weekend's leisurely breakfasts.

There are a ton of recipes for spaghetti carbonara out there. I've even made one with red wine before. The thing to watch out for is any recipe calling for cream. True spaghetti carbonara is devoid of it. And to be honest, the way the cheese and egg coat the pasta, it becomes so creamy that more cream would be overkill.

I choose a version from a little booklet Saveur sent me when I became a subscriber, and I cut it down to two servings, which actually ended up being the perfect amount. No leftovers, and we were sufficiently full. I reordered the recipe a little to replicate how I made it and how I think it works best as far as timing everything so it's all done at the right time and ready to be mixed together.

Spaghetti alla Carbonara (adapted from Saveur's Italian Classics, Volume 2, supplement)

Ingredients
1 TBS extra virgin olive oil (I never measure. Just pour a little in the pan.)
5 strips of bacon, cut into into 1/4-inch- to 1/2-inch-wide pieces
1 egg plus 1 yolk
1/2 lb of spaghetti (You can really use any pasta. I used specialty pasta called spaghettoni, which is a bit thicker than regular spaghetti.)
1/2 cup grated parm
salt
pepper

Preparation
1. Put a pot of salted water on to boil for the pasta.
2. Heat the olive oil in another pan at medium-high, and add the bacon strips. Cook until almost crisp then turn off the heat and leave them in the pan.
3. Once your water is boiling, add your pasta to it. Follow the cooking time for al dente.
4. While the pasta is cooking, mix your egg and egg yolk with 1/8 cup of water (I just eyeballed half of 1/4 cup). Set this aside.
5. Remove half of the bacon to a paper towel, and set that aside.
6. When the pasta is ready, drain it, and dump it back in the pot.
7. Immediately add your eggs, half the cheese, and the bacon left in the pan with its oil and fat. Stir this around until well mixed and eggs have become creamy.
8. Divide between two plates. Sprinkle remaining cheese over each pile of spaghetti, season with salt and pepper, and top with reserved bacon.
9. Dig in!

1.28.2009

Trials In Blondies Continued


So after I made my first batch of blondies, those chocolate chip walnut ones, I was inspired to make more to see if I could find my ideal blondie. I came across this recipe from Martha Stewart, which I thought would be more blondie-like because instead of chocolate, it calls for toffee bits. I just so happened to have some of those in the freezer.

Brown Butter Toffee Blondies (from Martha Stewart's Cookies)

Ingredients
1 1/4 cups (2 1/2 sticks) unsalted butter, plus more for pan
2 1/4 cups all-purpose flour, plus more for pan
1 1/2 teaspoons baking powder
1 1/2 teaspoons salt
2 cups packed light-brown sugar
1/2 cup granulated sugar
3 large eggs
2 1/2 teaspoons pure vanilla extract
1 cup chopped walnuts (about 4 ounces)
1 cup toffee bits

Directions
Preheat oven to 350 degrees. Butter a 9-by-13-inch baking pan. Line bottom of pan with parchment paper; butter and flour parchment paper.
In a saucepan over medium heat, cook the butter until it turns golden brown; remove from heat, and let cool. Whisk together flour, baking powder, and salt.
In the bowl of an electric mixer, combine browned butter and both sugars; stir with a wooden spoon until combined. Attach bowl to mixer; add eggs. Using the paddle attachment, beat on medium-high speed until light and fluffy, about 3 minutes. Add vanilla, and beat to combine. Add flour mixture, walnuts, and toffee bits. Mix until thoroughly combined, and pour into prepared pan.
Bake until a cake tester inserted in the center comes out clean, 35 to 40 minutes (do not overbake). Transfer to a wire rack to cool completely before turning out of pan onto a cutting board. Peel off parchment paper; cut blondies into 3-inch squares. Blondies can be stored in an airtight container at room temperature up to 3 days.


This recipe was a little more complicated than the last one, using both the stove and the KitchenAid and dirtying more than just a mixing bowl. If you're looking for something quick and easy, the other recipe is better, but if you want something that seems like a more traditional blondie and you aren't afraid to put in a little more time and wash a few more dishes, then you'll want to give this one a try.

The blondies came out very buttery, mostly in a good way, a little on the verge of too buttery though. But this did help them to retain their chewiness and fresh taste the next few days. I like the addition of toffee, but this still wasn't quite what I wanted. Maybe it's butterscotch I'm looking for?

At any rate, that's all for blondies for now. I still want to try some other recipes, but I don't want to make myself sick of blondies in the process. It's time for a little break.

In the meantime, if you have a great blondie recipe and want to share it, please do! Also, if you have an opinion on what constitutes the perfect blondie, I'd love to hear that too!

P.S. If you have a Facebook account, you can join my network and become a fan!

1.27.2009

Trials In Blondies


I'm in search of the perfect blondie recipe. But one thing I've been considering is what exactly is a blondie? Is it just a chocolateless form of a brownie, and hence, you can put whatever you want in it and still consider it a blondie? Or does adding certain things to the batter, such as nuts, chips, and coconut, make it, say, a congo bar or some other treat?

This all started with a chocolate cake craving. Now, blondies are a far cry from chocolate cake, so it took a strange thought process getting here. Chocolate cake -- the kind I would want -- seemed a little too extravagant and over the top to make for a small craving on a weeknight, so I began looking for brownie recipes. Brownies are typically quicker and easier, and I can eat them without any sort of frosting or ganache, which I would require on chocolate cake -- unless it's a fudgy cake like flourless chocolate cake. But back to those blondies...

While I was flipping through books and magazines looking for any sort of recipe that might not take too long to make but still hit the spot, my boyfriend commented that he liked blondies. Hmm... they're not chocolate based, but I could go for something with a chewy, buttery texture, I reasoned. Within minutes, my craving changed -- well sort of: I picked a recipe with chocolate chips.

Blondies with Chocolate Chips and Walnuts (from Everyday Food, September 2007)

Ingredients
8 tablespoons (1 stick) unsalted butter, melted, plus more for pan
1/2 cup packed light-brown sugar
1/3 cup granulated sugar
1 large egg
1 teaspoon pure vanilla extract
1 cup all-purpose flour (spooned and leveled)
1 teaspoon salt
1 cup semisweet chocolate chips
1 cup chopped walnuts

Directions
Preheat oven to 350 degrees. Brush an 8-inch square baking pan with butter; line pan with a piece of parchment paper, leaving a 2-inch overhang on two sides. Butter paper.
In a large bowl, whisk butter and sugars until smooth. Whisk in egg and vanilla. Add flour and salt; mix just until moistened (do not overmix). Fold in 1/2 cup each chocolate chips and walnuts. Transfer batter to prepared pan; smooth top. Sprinkle with remaining chocolate chips and walnuts.
Bake until top is golden brown and a toothpick inserted into the center comes out clean, 40 to 45 minutes. Set pan on a wire rack, and let cool completely. Using parchment overhang, lift cake from pan and transfer to a cutting board; cut into 16 squares. Store blondies in an airtight container at room temperature, up to 2 days.


chocolate chip and walnut blondies
These were incredibly easy to make -- I didn't even need the KitchenAid -- and quite tasty too. But were they the perfect blondie? Not quite. I didn't think there was enough of the chewy part, which is what I love most. Too many chips and walnuts got in the way. When I make these again, I'm going to double the batter, so I'll get a thicker blondie but still plenty of crunch and chocolate. Don't get me wrong though: They are absolutely delicious and when eaten warm with the chocolate still gooey, they satisfied my chocolate-cake-turned-blondie craving (perhaps a chocolate blondie craving?) with the first bite.

See Trials In Blondies Continued for my next blondie test.

1.26.2009

Want: Monkey Measuring Spoons

I saw these in the premiere issue of Food Network Magazine and immediately fell in love with them. Monkeys are my favorite animal, especially when they're this cute!


These measuring spoons are supposed to get kids into the kitchen and interested in cooking, but really, do you have to be a kid to like these? I don't think so!

You can get them -- for yourself or your kids -- from Gooseberry Patch.

1.22.2009

Sea Bass With Lemon-Basil Vinaigrette


This was supposed to be halibut with lemon-basil vinaigrette, but for some reason, it's always my luck that Whole Foods never has the kind of fish I'm looking for on the night I'm looking for it. Nor did they have the recommended backup fish selections. So I went out on a limb and, with consensus from my boyfriend, chose sea bass to fill in.

This recipe comes from The Bon Appetit Cookbook: Fast Easy Fresh. I recently got this cookbook and already have several recipes on my "to make" list. My favorite thing about it is the serving size index. If I want to make dinner for two, I can turn to the Two Serving heading and find all the recipes meeting my need. This recipe below was actually for four but I altered it, using less vinaigrette ingredients and only two pieces of fish. Sea bass is quite expensive!

Grilled Sea Bass With Lemon-Basil Vinaigrette (adapted from Bon Appetit and made for two)

Ingredients
1 1/2 tablespoons fresh lemon juice
1 tablespoons olive oil (preferably extra-virgin)
1 garlic cloves, crushed
1/4 teaspoon grated lemon peel
1 1/2 tablespoons thinly sliced fresh basil or 3 teaspoons dried
1 teaspoons drained capers

2 5- to 6-ounce sea bass steaks (about 3/4 inch thick)

Preparation
Whisk lemon juice, olive oil, crushed garlic clove and grated lemon peel in small bowl to blend. Stir in 1 tablespoon fresh basil and capers. Season vinaigrette to taste with salt and pepper. (Can be prepared 1 hour ahead. Let stand at room temperature.)

Season sea bass steaks with salt and pepper. Brush fish with 1 tablespoon vinaigrette, dividing equally. Grill steaks in grill pan over medium-high heat until just cooked through, about 4-6 minutes per side. Transfer fish to plates. Rewhisk remaining vinaigrette; pour over fish. Garnish fish with remaining basil and serve.


The only strange part was that I wasn't sure whether brushing the fish with the vinaigrette included getting some of the basil and capers on it. I decided to try to add these chunky elements to the fish, but it would have been easier to cook it without them. And the basil did get a little brown, and some of it stuck to the pan.

We enjoyed the fish with some leftover potatoes, but we both decided it was just a little too lemony. Next time, I'll cut back on that.


Note: Using my new book Knives Cooks Love, I learned a great way to cut herbs. For something like basil, you stack the leaves on top of each other, roll them lengthwise into a tight cocoon, and then slice the roll so you have nice shreds.

1.21.2009

Cutting Back On Red Meat

Eating less red meat is an interesting, and presumably healthy and environmentally helpful, concept but not something I can wholeheartedly commit to. I work some fish and poultry into my diet here and there, but I can't see myself giving up a juicy steak or a luscious beef stew any time soon. I know it's supposedly wrong on so many levels, but at the same time, I've been eating meat my whole life. It would be a tough habit to kick. Plus, I already don't eat meat at every meal, so to eat less meat than I already do would be a real challenge.

However, I thought it might be nice to round up some non-meat recipes I've made and present them here. If you're trying to cut meat -- even a little bit -- from your diet or you already eat a lot of meatless meals and want some new dishes to add to that repertoire, these are some meatless recipes I've made and enjoyed. I have to remind myself to return to them from time to time when I feel like having something meatless.

Fish


Chicken


Pasta, Veggies, Etc.

1.20.2009

Honest Scrap Blog Award

I just got my first blog award -- from Ally at Life's A Beach. Thank you, Ally!


And now I'm going to pass this award on...

The rules of the award:
1) Choose a minimum of 7 blogs that you find brilliant in content or design.
2) Show the 7 winners' names and links on your blog, and leave a comment informing them that they were prized with "Honest Scrap." Well, there's no prize, but they can keep the nifty icon.
3) List at least 10 honest things about yourself.


I read a lot of blogs. My Google Reader is always overloaded. I'm subscribed to blog communities like Cookthink and Serious Eats and also to blogs written by individual bloggers or a small team of bloggers. I think it takes a lot to get a blog started and keep it running, especially with just one or two writers, and to have that blog be well written and useful, so those are the blogs I want to bestow this award upon...

Aambrosia
Bread and Honey
Niiicola
Rosaroo
The Function Key
The Life and Loves of Grumpy's Honeybunch
We Are Not Martha

    10 Honest Things About Me (mostly narrowed down to food and cooking)

  1. I should have gone to culinary school. The problem is that I didn't figure this out until I was halfway through grad school. I can't even think about more school while I'm still paying off grad and undergrad loans. I am also somewhat of a wimp and not sure I can endure being yelled at by a chef (then again... my dad is a chef, and he did his fair share of yelling whenever I got out of line when I was younger!).


  2. On that same track, I would really like to take some cooking classes, but I am a bit too nervous to do it on my own. How silly, right?


  3. I am incredibly hard on myself. I'm not sure that I'll ever think anything I do is ever good enough. This is bad because it causes me to get stressed out and worried, most times over nothing. But it's also good because it means I'm constantly pushing myself to do better. I guess this one goes beyond the realm of food.


  4. I like mini things. Any time I see anything tiny, I get all excited. The Crate & Barrel down the street from me is closing, and it took all my restraint not to buy some mini spoons just because they were mini... and on clearance. I bake mini things pretty often because I think people are more likely to take a small cookie or mini cupcake (or a few) over a large one.


  5. I used to complain about getting pizza from Papa Gino's. It's convenient because they deliver, but I'd rather have Emma's or Upper Crust any day. Because of that convenience, my boyfriend and I order from there at least twice a month, if not more, and I've actually started to get cravings for the cheesy breadsticks.


  6. I wish I had the energy to revisit my thesis. I spent months researching the food publishing industry and putting together my thoughts about where it's been and where it's heading. Unfortunately, I'm still a little burnt out from that. But I do want to get past the burnout and re-evaluate what I've written and post manageable chunks of it here to get discussion going about cookbook and other food book and food magazine futures.


  7. I'm willing to try just about anything when it comes to food, and I get offended when other people aren't. What's the harm in taking a little taste?


  8. For as much as I cook, it may surprise you to learn that I can be completely happy with a dinner of fresh bread, olive oil, good cheese (like piave or robusto), and rosy grape tomatoes.


  9. I never should have bought that first box of mini Saltines. Now I will never be able to live without them. This rivals and may have topped my Cheez-it addiction.


  10. If I didn't have people to cook for and eat with, I would still cook, but I would not enjoy it nearly so much. I love the conversations that happen around food and the way food brings people together. I cook for more than the final outcome on the plate.

1.19.2009

Homemade Ravioli With Chicken Marsala Filling


As I mentioned in a previous post, I received a pasta maker and ravioli attachment for Christmas. The time had come to unbox these and put them to work -- or as it turned out, put me to work.

For my first attempt, I wanted to stick with a regular egg pasta dough, no spinach or anything fancy, and I wanted to make some sort of meat filling. The pasta maker included recipes for the dough and a couple different fillings but not one I was in the mood for.

I searched around a bit for filling recipes but just wasn't finding any that struck my fancy. So I posted a want ad on Serious Eats and got some great ideas there (thank you to those who responded!). I finally chose Tyler Florence's chicken marsala filling.

I read through the recipes for the filling and for the dough. The dough needed to rest for about 20 minutes, and the filling needed to cool before it could be used. Taking these things into account, I decided I would make the dough first to the point where it needed to rest, then make the filling and let it chill, and then go back to the dough. Cooking always requires this balance of time. You don't want to be sitting waiting for two things when you could be waiting on one and working on another.


Pasta Dough (adapted from Imperia recipe and Williams-Sonoma Pasta)
There are many recipes out there for pasta dough. They all basically call for flour and eggs. Some, like the one I found in Williams-Sonoma Pasta, also call for olive oil. I took the recipe that came with the pasta maker and the one from the Williams-Sonoma book and used ideas from both. The one that came with the pasta maker said I could put the flour and eggs in my KitchenAid and mix it on a low speed. It then said to moisten the dough with water if necessary. This is where I borrowed from the Williams-Sonoma recipe and moistened the dough with olive oil instead.

Ingredients
2 1/4 cups flour
3 eggs, lightly beaten
olive oil, as needed

Method
Combine eggs with 2 cups flour in bowl of electric mixer. Using paddle, on low speed, combine until dough comes together and is no longer sticky. Add more flour as necessary. If dough gets too dry, moisten with olive oil.

fresh pasta dough
Knead dough by hand until it's smooth and not sticky. Wrap with plastic wrap and let sit about 20 minutes.

smooth ball of fresh pasta dough
While the dough rested, I moved onto the filling as planned...

Chicken Marsala Ravioli Filling (from Tyler Florence)

Ingredients
8 ounces chicken breast, cut in strips
4 tablespoons olive oil, divided
1 shallot, chopped
1 garlic clove, chopped
1/4 cup Marsala wine or chicken broth
4 thin slices prosciutto, sliced
4 bay leaves
Fresh thyme and parsley leaves
2 tablespoons bread crumbs
2 tablespoons Parmesan cheese, grated, divided
Salt and pepper
1 egg
1/4 cup heavy cream

Directions
Brown chicken in 2 tablespoons of olive oil over medium-high heat. Add shallot and garlic. Deglaze with Marsala. Take pan away from heat source and flambe. Return pan to stove, flame will go out in about 1 minute. Add prosciutto and herbs. Sprinkle in bread crumbs and 1 tablespoon Parmesan. Drizzle in 1 tablespoon of olive oil to keep moist. Discard bay leaves. Pulse together all ingredients in a food processor. Add egg, cream, remaining Parmesan and olive oil. Pulse again. Chill before filling ravioli.


First, I made sure I had all my ingredients prepped and ready to go. Those cute little prep bowls are from Pampered Chef, and they really do make me feel quite pampered. Also, it's fun to just toss your ingredients into the pan as if you're cooking on the Food Network instead of in a little apartment kitchen. They held chopped garlic and shallots, grated cheese, breadcrumbs, and fresh thyme (I skipped the parsely). I also sliced the prosciutto and chicken, and with all of that done, I turned on the stove and placed a pan with oil on the burner. Now, let the cooking begin!

ingredients for chicken marsala ravioli filling
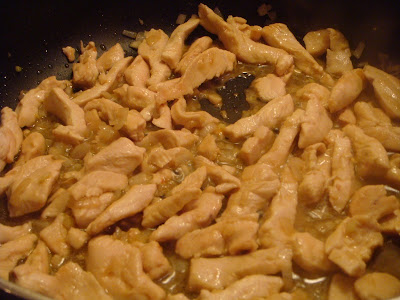
Step 1 - Brown the chicken in the olive oil.

chicken
Step 2 - Add the shallot and garlic. And for me, deglaze with marsala and flambe was simply add marsala. I wasn't about to try lighting alcohol on fire today. Maybe another day.

chicken in marsala
Step 3 - Add prosciutto and herbs.

chicken in marsala with prosciutto and herbs
Step 4 - Add cheese and breadcrumbs. I think I might go a little less on the breadcrumbs next time. While a runny mixture is a definite no, the filling seemed a little on the dry side, even with the addition of olive oil.

chicken with marsala, herbs, cheese, and breadcrumbs
Step 5 - Remove the bay leaves, put the rest in the food processor, and process away. I did this in batches, but once everything was ground up, it could all fit in the processor bowl at the same time. And I was able to add in the remaining ingredients (egg, heavy cream, parmesan, and olive oil).

Step 6 - Cool the filling and then put it in the fridge to chill further.

chicken marsala ravioli filling after food processing
With the filling all set to go, I could return to pasta making. This didn't turn out to be as difficult as I thought it would, once I got the hang of it. I had to divide the dough ball into pieces, take each piece and run it through the pasta machine several times -- starting with the thickest setting and then going thinner and thinner, until I got to the second-thinnest setting, which is recommended for meat-filled ravioli.

pasta maker
fresh pasta dough draped over my hand
fresh pasta sheet

With the pasta sheets laid out and ready to go, it was time to put the ravioli attachment on. Because the sheets might spread out farther than the width of the ravioli attachment, it comes with a cutter that is as wide as the opening. I had to cut each sheet of pasta with this before I could feed it through the machine.

I folded the pasta sheet down the middle, making a soft crease. The crease should go into the middle of the machine. Then I simply followed the directions to place about 2 1/2 tablespoons of filling into the middle of the pasta sheet.

ravioli maker
I slowly turned the crank, fixing the alignment of the pasta and smoothing and adding to the filling as necessary. And the machine sealed off perfect little ravioli packets. I have to admit I ruined one whole sheet because it caught in the machine. You have to be careful that no little bits of pasta or filling get stuck to the machine because it can cause your next batch to jam or tear.

I laid each set of ravioli on a sheet of floured parchment and waited the recommended 10 minutes before separating them.

uncooked ravioli
After that I added them to a pot of boiling water. They really do cook quite quickly. Within minutes the ravioli were floating to the top of the pot, a sign they are ready.

cooked ravioli
One small afterthought was the sauce. I didn't want to use a tomato sauce with the marsala filling, so I threw together a quick marsala sauce, consisting of heavy cream, marsala wine, lemon juice, and salt and pepper. I thickened this with a little flour. I really should have made a roux, but I was in too much of a hurry to taste my little ravioli creations, so we did have a few flour clumps in the sauce.

marsala sauce
ravioli with sauce
Even though this meal took a lot of work, it was worth it, and I highly recommend making your own pasta. It was delicious, and the texture is nicer than storebought. Plus, with your own filling, you know what's going into it. You don't have to worry about any preservatives or other additives.

The ravioli outsides were chewy and tender, and the insides were a teeny bit dry, but the cream sauce helped to balance that. I can't wait to make some other pastas and raviolis. I do have a whole book full of ideas to get through!

plate of ravioli

1.16.2009

Snowed In With A Slow-Cooked Chicken Dinner


So this post is a bit behind schedule, but even though I've let so much time lapse, I couldn't not tell you about this recipe.

When we had that first big snow storm, back on December 19, I was actually really excited for it. I thought it would be fun to get snowed in with my boyfriend (who jokingly rolled his eyes at the idea), some movies, and a nice slow-cooked meal.

The night before the storm was expected, we went food shopping and got all the ingredients for Andrew Schloss' slow-cooked chicken dinner. Schloss is the author of Art of the Slow Cooker. I've heard some negative feedback on this book -- about how it's not really a slow cooker cookbook because the recipes entail so much prep work. It certainly is not Fix-It And Forget-It, but I have been pleased with the results of recipes I've tried from it, even though they involve some upfront work and post-slow-cooking work. My one complaint is that I can't really make any of these recipes on a week day -- throwing everything in the crockpot on my way out the door to work. But they are good on a day off -- or an afternoon off, as was the case for me on snowstorm Friday.

After I finished working and as the first flakes were making their way to the ground, I began preparing this recipe. First, the spice rub for the chicken -- a nice mixture of brown sugar, salt and pepper, paprika, dry mustard, thyme, and garlic powder. There's also supposed to be dried sage and rosemary, but I didn't have those and forgot to pick them up at the store.

With the rub prepared, I turned to the next task: the chicken itself. I stood there looking at the whole chicken we had bought and looking at the part of the recipe I skipped over before that says to cut the chicken into parts, and then I looked at the chicken again. I groaned, thinking I would have bought chicken parts if I had paid better attention initially. No chance of that now.

Well, this was something new for me, so I took out Joy of Cooking and turned to the section on butchering a chicken. I read the text, examined the diagrams, and still felt lost.

My boyfriend convinced me I could do it. And I, knife in hand, went to work. In the end, I think I did alright. I didn't cut the wing tips off. And I didn't separate the drumsticks from the thighs, but I ended up with four nice chicken pieces.


When we were done, I swore I would never buy a whole chicken again if I needed to cut it prior to cooking, but my boyfriend recently surprised me with a copy of Knives Cooks Love, and it just might be enough to inspire me to try again.

With the chicken cut up, I next had to remove the skin from all of the pieces except the wings, combine the spices with flour, and rub the chicken with this mixture. The remaining flour mixture helps thicken the sauce later. Then I put some potatoes on the stove to boil. After they boiled for about 5 minutes, I moved them to the slow cooker, as the recipe instructed.


And then I browned the seasoned chicken on both sides.


Next: all the veggies. Chopped onions, carrots, and celery get sauteed in a little oil...


...and the remaining flour mixture.


After that I poured in some wine, which added liquid -- pretty important when it comes to slow cooking -- and also great flavor. And then some chicken broth goes in, for a little more liquid and flavor. Because of the seasoned flour, the broth and wine thicken to a thin gravy.


I poured the vegetables and sauce over the potatoes and placed the chicken pieces on top. Then it's 3 to 4 hours on the high setting, during which time the whole place smelled so good!


When time was up, I took the chicken out of the slow cooker and scooped out the veggies. To the leftover gravy in the pot, I added potato flakes. The recipe calls for them to thicken the gravy even more.


Then I poured that gravy over the chicken and veggies I had arranged in a serving dish, and we were ready to eat.


This was the perfect meal, warm and comforting, to eat while watching the snow fall and pile up. The chicken came right off the bone, and the sauce complemented it well. I liked it so much I even used my biscuit to wipe up what was left on my plate.


The leftovers were just as good. I simply put the whole pan, covered with foil, into the oven at 350 degrees for about a half hour and then uncovered it and cooked the chicken until it was piping hot, about another half hour.

Don't forget to check out Art of the Slow Cooker for the complete recipe!

1.14.2009

Cream Puffs


Is there anything you dread learning how to make? Maybe because you've heard it's difficult and time-consuming? For me, cream puffs planted themselves somewhere on that list and stayed there for years.

I got quite good at making anginetti cream puffs. You buy Stella D'oro anginetti cookies, which coincidentally are cream puff shaped, slice the tops off, add filling, and replace the tops. You can find the simple recipe here. I planned to make these for a Christmas party I went to, oh gosh, about a month ago now.

I bought Cool Whip, cream cheese, and crushed pineapple for the filling and then went to a few different stores looking for anginetti cookies, only to find there were none. The shelves where Stella D'oro cookies can usually be found looked as though they had been ransacked.

I didn't have any other recipes with me and really had it in my head that I wanted to make these simple cream puffs. I hadn't had them in years and once I started thinking about them, I was actually craving them. I was disappointed I couldn't find the cookies and annoyed with myself for not having a backup plan.

So I went home, looked around the cabinets a little, and finally decided that if I had all the ingredients to make real cream puff shells, then that is what I'd do. I looked in some of my cookbooks and finally decided on a recipe from Joy of Cooking. It was the most clearly written and seemed easy to follow.

I didn't know the first thing about making pate a choux, like, for starters, that you make it on the stove. Stephanie Jaworski explains this well on JoyofBaking.com:

"Choux pastry or pate a choux is an unusual pastry in that flour is added to a boiled mixture of butter and water (like a roux) and then this mixture is cooked until it forms a smooth ball of dough. After cooling the dough to lukewarm, eggs are slowly added and the dough is beaten until it becomes a smooth thick paste."

With the choux pastry all prepared, I just needed to make the little spoonfuls of it I was putting on the cookie sheet turn magically into cream puffs. And even though I thought it would take several tries, they came out perfectly the first time. They didn't deflate or do anything else catastrophic.

The only problem now was that I had these light, airy, upscale puffs and a Cool Whip-based filling. I'm not knocking Cool Whip or anything, but these cream puffs deserved better. Unfortunately, I didn't have the right ingredients on hand to make a traditional filling and party time was approaching.

I used the Cool Whip-pineapple filling anyways, sprinkled the puffs with a little powdered sugar, and they were actually a big hit.

And just like that, I got over my fear of making cream puffs. I almost can't wait to make them again, using real filling, and maybe I'll make eclairs as well.

1.12.2009

Pizza Two Ways: Part 2

So the other night, my roommate and I had a couple of friends we went to high school with over to visit. My roommate was making dinner, a real treat for me, because if you've read any of my other posts, you know I'm always cooking.

She had a lush salad and a veggie pizza planned. I opened up a bottle of sauvignon blanc to go with it.

She used a whole wheat pizza crust, something my boyfriend, whom I had made pizza with the previous night, never would have gone for. My roommate and I don't mind experimenting with things like whole wheat or cornmeal crust, and our friends weren't opposed either. Whole wheat is healthier.


We still warmed the pizza stone ahead, but she doesn't pre-bake her crust or pre-saute her toppings like I do. She covered the crust with some sauce and fresh spinach.


And then she added mushrooms and fresh mozzarella.


And to top it off, she decorated with some yellow pepper strips and rounds of zucchini. It looked perfect to me!


She also taught me something new. Remember I had been complaining about my lack of skill with a pizza cutter in the last post? She uses kitchen shears to cut the pizza instead.


While I really enjoyed the previous night's pizza, laden with sausage, I also really liked this pizza, with it's garden fresh appeal, not to mention that someone else cooked it!

How do you like your pizza? What are your favorite toppings? Do you prefer the usual white crust or something less typical?

1.08.2009

Pizza Two Ways: Part 1

slice of sausage and onion pizza
On Tuesday night I made pizza with my boyfriend; last night I made pizza with my girl friends. I have to say that "guy pizza" differs quite a bit from "girl pizza." Now, I'm an omnivore in every sense of the word. I'll eat a rare steak as readily as a pile of sauteed brussels sprouts. I find that guys, at least the ones I spend some time with, tend to be more carnivorous. And most of my girl friends, if they're not already vegetarians, at least tend more toward being herbivores. I'm not saying this is true all the time of all people, but it's interesting when I think about it and see it in action in certain situations... like pizza dinners.

My boyfriend and I picked up a package of white bread pizza dough (had it been a weekend I would have made the dough myself, but please don't judge me for taking the easy way out here), a package of sausage, a can of sauce, an onion, and a whole lot of mozzarella cheese. And we didn't waste any time on formalities... like salad.

Usually, I cook dinner and let my boyfriend lounge on the couch watching Bruins games, but this time I thought it would be fun to cook together. Pizza is simple, and it's not something that would rile my perfectionist side if we messed it up... which we sort of did.

The dough rolling and stretching didn't go as smoothly as we had hoped, but with a little effort and a lot of olive oil, we got it looking somewhat normal, flat, and tear-free (the dough and me). While we stretched and fought the dough, I warmed my pizza stone in the oven at 350 degrees. The bottom of the crust tends to cook better if the stone is hot to start.

With the dough whipped into submission, I sauteed the sausage and sliced the onion. I know that you can put the toppings on raw, but I prefer to cook them ahead. I just like the final result better: The sausage gets more brown and has a bit of a crunch, and the onions get all sweet and caramelized.

I removed the pizza stone from the oven after about 20 minutes, sprinkled a little corn meal on it to prevent any sticking, and smoothed and shaped the dough over it. Then I returned it to the oven. I like to precook the dough because I don't mind a gummy middle, but I don't want a raw middle. This takes a good 10 to 15 minutes, depending on personal doneness preference. During that time I sauteed the onions, opened the sauce, and took out the cheese.


With everything lined up and ready to go, I called my boyfriend back to the kitchen (I swear that couch must have some sort of magnets in it) and took the crust out of the oven.

I left him in charge of sauce because he doesn't like his pizza very saucy. I'm easygoing with the sauce. I don't want too little of it -- or sauce soup -- but other than that, any amount is fine. He spooned sauce over the dough with the back of a spoon, covering it moderately. When he was satisfied with the sauciness level, he sprinkled cheese on top.


Then I did the sausage and onions. For some reason I had to do the part that involves getting your hands dirty... hmm. We used almost the whole package of sausage. Left up to me, the carnivorous omnivore, I would have used it all. My boyfriend had a legitimate reason though; he wanted to be able to pick up the pizza and eat it. I have to cut my pizza anyways, so I don't think about those things.


For good measure, and because that's how I like my pizza, my boyfriend sprinkled a bit more cheese over the rest of the toppings. Then back into the oven went that pizza, and we were both drawn to the couch to relax a bit while it cooked. I think I cooked it 10 minutes at 350 degrees and then another 10 at 400 degrees.


When the cheese was melty and the sausage had that nice brown edge, our pie was ready. The bottom was sufficiently crispy for me -- but maybe a little underdone for my boyfriend's tastes. I think if we had been able to get the dough a little thinner, the crust would have been perfect in every way. But who can really complain when there's a hot, steamy pizza in front of them?


On to the cutting... I always struggle with my pizza cutter. I'm not sure why (could be that I need to hit the gym to build my pizza slicing muscles). It seems like a simple enough concept: run the blade across the pie and end up with slices. It never works that way for me though -- the pizza slides all over the place -- so I handed off this chore to my boyfriend too. He quickly and easily sliced the pie into wedges, and we were good to go.


Up next: Girl Pizza

LinkWithin

Related Posts with Thumbnails