As the year winds down, I can't help thinking about all that I've accomplished in 2009 and all that I hope to accomplish in 2010. I started this blog a little more than two years ago as a place to share my incessant ramblings about food. Over time I think my writing, my pictures, and my thoughts about food in general have all evolved. I'd like to thank all of you for coming along for the ride, for coming back day after day to read and comment on my thoughts, recipes, and ideas. I think of so many of you as friends -- even though we've never met. I love reading your blogs, and I love that we can bounce ideas off of each other and be there to support each other -- through our blogs, email, and Twitter. If you asked me 15 years ago if I thought I'd be doing this today, I would have had to ask you what a blog is. And let's not even get started on Twitter! It's funny how life goes, isn't it?
Before I move ahead to what I'm thinking for 2010, I wanted to do a quick recap of the past year... in food.
In January I made fresh pasta for the first time. It was delicious, and in true Megan fashion, I went all out and didn't just make pasta but ravioli.
I also worked with choux pastry for the first time and made some adorable, last-minute cream puffs.
Later in the year, I joined the Daring Cooks (for a brief few months -- I'm a Daring Baker now) and made potstickers from scratch. They're so much easier than you'd think, and I'm suddenly wishing I'd made a triple batch so I'd still have some left in the freezer.
In July I started working at a bakery, and I'm hoping all that I'm doing and learning there is bringing me a step closer to figuring out what I want to be when I grow up. I always thought that was something I needed to know back in high school, but I've learned that what we think we want to do is not always what we really want to do... and it's okay to change things and not always take the direct path.
In September I made apple cider doughnuts that were out of this world! And it seems like all of you loved them too because that post has been super-popular.
I also made puff pastry for the first time for a Daring Bakers' Challenge. While I'll still buy it at the store because it's more convenient, I love knowing that when I have a little extra time, I can make it completely from scratch.
In November I made my favorite dinner of the whole year: herb-crusted beef tenderloin and potato latkes from Cook's Illustrated.
I also made a mini Thanksgiving dinner for two as practice for hosting a real Thanksgiving dinner someday. The best part after the flavorful brined turkey? The pecan-caramel bars I made for dessert!
For another Daring Bakers' challenge, I made cannoli. I never imagined I could make cannoli at home. I always just figured I'd have to find them at an Italian bakery.
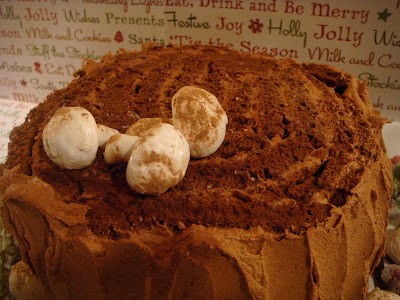
In December I made my very first bûche de Noël, complete with meringue mushrooms, chocolate splinters, and sugared rosemary and cranberries... and it was a hit!
And I closed out the year with a dessert I think is the best one I made all year: peppermint meringue cake with chocolate buttercream. Seriously. Make it.
So that's 2009 in a nutshell!
My thoughts about what I want to accomplish in 2010 were actually spurred by a recent conversation I had with my dad when I was home for Christmas. He told me if I made a list of things I wanted to know how to cook or cooking-related things I wanted to know how to do, he would teach me. If a professional chef offered to teach you anything, what would you want to know?
The first thing that popped into my head was knife skills. I've always felt that if I knew how to properly use a knife and which knives serve which purposes, I could be more efficient and less accident prone. My boyfriend bought me a great book called Knives Cooks Love: Selection. Care. Techniques. Recipes., which is really helpful for this, but I think I would learn better by being taught by someone first and then practicing what I'm taught, using the book to reinforce my skills. And also, maybe when faced with a raw, whole chicken, I could know exactly what to do and not confront it with a look of complete bewilderment if I need to cut it into pieces.
Secondly, my dad can simply touch a roast or other peice of meat and know whether it's still raw or what temperature it's at. I'd love to be able to do that. I use the knife-slit method -- you know, when you make a small cut and check to see if something's done. It works, but it's not so pretty when it comes time to serve the dish.
I would also want him to teach me how to make a good hollandaise. Eggs Benedict is my favorite breakfast -- when the hollandaise is made right and not fake or broken and the eggs are poached properly, with runny rather than hard yolks.
And when something tastes kind of blah or just mediocre, I want to know what I'm supposed to add to perk it up. Is that something that can be taught?
I'm still putting together the rest of my list. There are tons of things I want to know, but I feel like I should streamline myself and just list the basics because once I know the basics, I hope I'll be able to apply them to more advanced projects.
And here's one last list... aside from what I want my dad to teach me, these are the food- and cooking-related things I want to accomplish in 2010.
Make stock. I made a vegetable stock a long time ago, but I haven't tried to make any others since then, so in 2010, I want to make a chicken stock and a beef stock.
Be more creative. I always say this, but I have a hard time doing it: I'd like to try to come up with dishes and ideas on my own, rather than using recipes so much. I'm hoping that I can use The Flavor Bible: The Essential Guide to Culinary Creativity, Based on the Wisdom of America's Most Imaginative Chefs (which I got for Christmas) and Ratio: The Simple Codes Behind the Craft of Everyday Cooking as guides to help me stop relying on recipes all the time. That doesn't mean I'll stop using recipes, but for those times when I have random things in the house, I'd love to be able to throw together a great meal or incredible dessert without running to the grocery store for all the ingredients listed in a particular recipe.
Make more homemade bread. We love eating fresh bread and always buy a loaf when we're at the store. With a little advanced planning, I could easily make us some warm-from-the-oven bread at home.
Oatmeal bread
Cinnamon bread
Monkey bread
Pretzel rolls
Make more homemade soup. I love soup and now have two great books with tons of soup ideas. No more excuses.
Lentil soup
Chicken soup
Bacon, zucchini, tomato soup
Hearty, herby minestrone
Conquer gnocchi. Remember this gnocchi? And this gnocchi? I do. They haunt me! I know I can do better.
Make ice cream! I got an ice cream maker for Christmas, and I can't wait to use it. I can't tell you how many times I've seen recipes for ice cream and then gotten bummed out when I read the line that says to put the mixture in an ice cream maker. I'm hoping this will help with my whole creativity goal too. I have a feeling it will be pretty easy to combine ingredients and flavors when making ice cream.
Strawberry ice cream
Vanilla ice cream
Mixed berry sherbet
Coffee ice cream
Hazelnut gelato
Cake batter ice cream
Basil ice cream
Pumpkin ice cream
And now some questions for you...
What are your food-related goals for 2010?
If a professional chef offered to teach you anything, what would you want to learn?
What would you like to read about on Delicious Dishings? What do you come here looking for?
12.28.2009
12.23.2009
Peppermint Meringue Cake With Chocolate Buttercream
We had another fun holiday party to attend this past weekend, and I decided to make a cake I couldn't get out of my head since I first saw it gracing the December 2009 cover of Bon Appetit: peppermint meringue cake with chocolate buttercream.
Layers of light, crisp but chewy peppermint meringue alternate with moist peppermint syrup-soaked chocolate cake and dark chocolate buttercream.
It reminds me of stirring a candy cane into hot chocolate with marshmallows, one of my favorite things during winter and the holidays. And it might just be the best cake I've made all year.
Topped with After Eights, bright red raspberries, and sprigs of green mint, it's incredibly festive and the perfect dessert for any holiday gathering.
You can find the recipe on the Bon Appetit website.
Happy Holidays!
12.18.2009
Onion Soup Gratinee
As I do with any new cookbook, I immediately flipped through looking at all the pictures and recipe titles. The pictures are gorgeous, and there's quite a variety of different soups! I have another soup cookbook, but the pictures and recipes in this one easily blow it away. After being awed by the many delicious bowls of soup before me, I went back and read through the book more closely. It's divided into chapters (following the first one on soup basics) by soup type, moving from broths, hearty soups, stews, and cream soups to pureed soups, bisques and chowders, and, finally, cold soups. The last chapter is about soup accompaniments.
In the soup basics chapter, I learned that soup pots should be taller than they are wide. This is so less of the soup evaporates. I also learned some time-saving tips, one of which I employed below. And I found a great chart on soup ingredients. I couldn't wait to delve right into the recipes after preparing by reading the soup basics chapter.
There's not much that can beat a hearty, warm bowl of a soup on a cold winter's night. I don't know about where you live, but here, the temperatures have been dropping quickly, too quickly if you ask me. But cold weather also means soup weather, so that's definitely some consolation.
While I considered making the classic lentil soup or the minestrone for my first recipe from The New Book of Soups, I knew what I really wanted was onion soup with a hunk of bread and cheesy topping. The onion soup gratinee can be found in the broths chapter.
Really, I should have made my own beef broth because The New Book of Soups includes a basic method for broths and broth recipes, but since I saw that using prepared broth was an acceptable time-saver, I cheated and bought the prepackaged stuff. I also took another shortcut and used a premade bouquet garni from O&Co. It contained thyme, bay leaves, savory, and oregano, which I thought would work as a substitute for the herbs called for in the recipe. And the last difference between my soup and the recipe below is that I thought I had brandy at home so I didn't pick any up. I was mistaken, but I made the soup anyways, sans brandy. I think the brandy would help to add another layer of flavor. Next time I make a soup, I'm definitely going to do it completely from scratch using the guidance in this book.
Makes 8 servings
Ingredients
1/4 cup olive or vegetable oil
5 cups thinly sliced onions
1 tsp minced garlic
1/2 cup brandy1 1/2 qt Beef or Chicken Broth, heated (page 16, 15)
Sachet: 3 to 4 parsley stems, 1/2 tsp each dried thyme and tarragon, 1 bay leaf enclosed in a large tea ball or tied in a cheesecloth pouch
Salt as needed
Freshly ground black pepper as needed
8 slices French bread
1 cup grated Gruyere cheese, or as needed
Preparation
- Heat the oil in a soup pot over medium-low heat. Add the onions and cook without stirring until the onions begin to brown on the bottom. Raise the heat to medium, stir, and continue to cook, stirring occasionally, until the onions are deeply caramelized (dark golden brown). The total cooking time will be 40 to 45 minutes. If the onions begin to scorch, add a few tablespoons of water and continue cooking.
- Add the garlic and continue to cook for an additional minute. Add the brandy and simmer until the liquid has nearly evaporated, 2 to 3 minutes.
- Add the broth and sachet. Bring to a simmer and cook, partially covered, for 45 minutes to 1 hour, skimming the surface as necessary and discarding the fat. Remove and discard the sachet. Season to taste with salt and pepper.
- When ready to serve the soup, preheat the oven to 350°F and bring 2 quarts of water to a boil. Ladle the soup into individual oven-proof crocks. Top each with a slice of bread and sprinkle with the grated cheese, covering the bread completely and allowing the cheese to touch the edge of the crock.
- Set the soup crocks in a baking dish and add enough boiling water to the baking dish to reach two-thirds up the sides of the crocks. Bake until the soup is thoroughly heated and the cheese is lightly browned, 10 to 15 minutes. Serve immediately.
Soup ingredients
Sliced onions
(It's best to employ a boyfriend who is surprisingly skilled at using a mandoline for this part. Even though he'd never used it before, he was 10 times faster than me and never came close to losing any fingers. Slicing by hand would take quite a while. And me using a mandoline is out of the question -- my mandoline and I have had way too many close calls!)
(It's best to employ a boyfriend who is surprisingly skilled at using a mandoline for this part. Even though he'd never used it before, he was 10 times faster than me and never came close to losing any fingers. Slicing by hand would take quite a while. And me using a mandoline is out of the question -- my mandoline and I have had way too many close calls!)
Finished soup
Soup ladled into bowls
Bread and cheese
Soup topped with bread and cheese
All toasty and ready to be eaten!
(Even though the recipe doesn't suggest it, I had to turn on my broiler in the end to get the cheese browned and melted the way I like it.)
(Even though the recipe doesn't suggest it, I had to turn on my broiler in the end to get the cheese browned and melted the way I like it.)
I'm thinking about making a stew this weekend -- we're expecting snow!
What is your favorite kind of soup?
What is your favorite kind of soup?
12.16.2009
Bûche De Noël, Or Rather Stump De Noël

Bûche de Noëls (or is it bûches de Noël?) are stunning, versatile holiday desserts, and I happen to be obsessed with them this year. This out-of-the-blue desire to craft and eat bûche de Noëls would not be suppressed: Every food magazine I opened stoked that desire. Entertaining from Cook's Illustrated (Holiday 2009) features a simple roulade, Bon Appetit (December 2009) offers a super quick and easy no-bake Yule log, Martha Stewart Holiday has roulades ranging from pistachio to cranberry to peppermint, and Food & Wine (December 2009) exhibits what I consider the most impressive: the stump de Noël.
So being the ambitious baker I am, I started at the top with the stump de Noël featured in Food & Wine. The recipe comes from the owners of Baked (a Brooklyn bakery), who make the stump for an annual holiday potluck for staff who have to work during the holidays.
Their version, which is on Food & Wine's Web site, calls for malt powder and crushed malt balls, but because I couldn't find malt powder, I improvised and made chocolate buttercream for both the filling and the frosting.

Chocolate Stump de Noël (adapted from Baked and Food & Wine, December 2009)
Ingredients
1 cup all-purpose flour, plus more for dusting
1/4 cup unsweetened cocoa powder, sifted
1/4 teaspoon salt
12 ounces bittersweet chocolate, melted and cooled
2 tablespoons instant espresso powder dissolved in 1/4 cup of hot water
1 dozen large eggs, at room temperature, separated
1 1/3 cups sugar
1 tablespoon plus 1 teaspoon pure vanilla extract
1/4 teaspoon cream of tartar
6 tablespoons unsalted butter, melted
Chocolate buttercream (recipe below)
Meringue mushrooms (recipe below)
Sugared cranberries and rosemary sprigs (recipe below)
Chocolate splinters (recipe below)
Directions
Preheat the oven to 350°. Butter two 12-by-17-inch rimmed baking sheets and line them with parchment paper, leaving a 1-inch overhang on all of the short sides. Butter the paper and dust with flour.
In a small bowl, whisk the 1 cup of flour with the cocoa and salt. In another small bowl, combine the chocolate and espresso. In the bowl of a standing electric mixer, combine the egg yolks with 2/3 cup of the sugar. Set the bowl over a pan of simmering water and whisk until the sugar is dissolved. Transfer the bowl to the mixer fitted with the whisk and beat at high speed until the yolks are pale and thick, about 5 minutes. Beat in the melted chocolate mixture along with the vanilla. Transfer to a large bowl.

Thoroughly wash and dry the mixer bowl and the whisk. Beat the egg whites with the cream of tartar on moderately high speed until soft peaks form. Gradually add the remaining 2/3 cup of sugar and continue beating at high speed until the whites are glossy, about 2 minutes longer.

Whisk one-fourth of the egg whites into the cake batter, then fold in the remaining whites until no streaks remain.
In a small bowl, whisk the melted butter with 1/2 cup of the batter; fold this mixture into the batter. Working in 2 batches, sift the cocoa powder mixture over the batter and gently fold it in.

Divide the batter between the prepared pans, spreading it out to fill the pans.
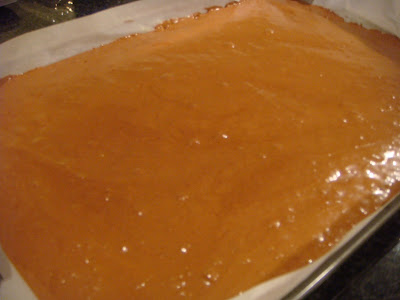
Bake for about 18 minutes, until the cake feels springy and dry; shift the pans from top to bottom and front to back halfway through baking. Transfer the pans to racks to cool completely.
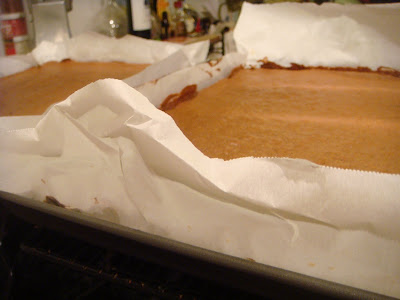
Run the tip of a knife around the edges, cover with parchment paper and a baking sheet and invert; peel off the parchment on top.
Spread the chocolate buttercream over the cakes, reserving about 1 1/2 cups for frosting.

Using a ruler, cut each cake precisely in half lengthwise, cutting through the paper; you should have four 6-by-17-inch strips of cake.

Roll one strip into a tight coil, leaving the paper behind. Roll the 3 remaining cake strips around the coil in the same way to form a very wide, short jelly roll. Set the cake on a large plate, spiraled end up.

Frost the outside of the cake with the remaining chocolate buttercream.
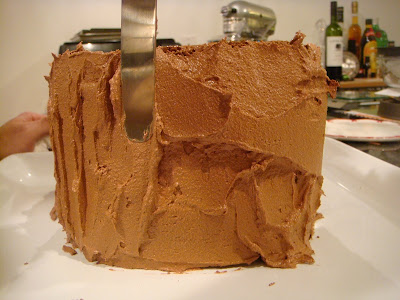
Refrigerate until set, at least 8 hours.
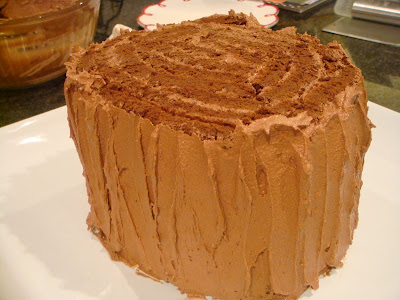
Decorate the cake with meringue mushrooms, cranberries and rosemary sprigs and serve, cutting the cake into wedges or horizontal slices.

Make Ahead
The chocolate stump cake can be refrigerated for up to 4 days. Let the cake stand at room temperature for 1 hour before serving.
Chocolate Buttercream
Ingredients
5 large egg whites, at room temperature
1 1/2 cups sugar
1 teaspoon pure vanilla extract
4 sticks (1 pound) unsalted butter, at room temperature
16 ounces bittersweet chocolate, melted and cooled
Directions
In the bowl of a standing electric mixer, combine the egg whites and sugar. Set the bowl over a pot of simmering water and whisk until the sugar is dissolved and the egg whites are just warm to the touch. Return the bowl to the mixer fitted with the whisk. Add the vanilla and beat the egg whites at high speed until firm and glossy, about 5 minutes. With the machine on, whisk in the butter a few tablespoons at a time. If the mixture begins to look curdled, continue to beat until smooth before adding more butter. Whisk in the melted chocolate.
Make Ahead
The chocolate buttercream can be refrigerated, covered, overnight. Let the frosting return to room temperature before using.
Garnishes

Meringue Mushrooms (adapted from Martha Stewart's Cupcakes)
Ingredients
Swiss Meringue
- 4 large egg whites, at room temperature 1 cup sugar 1 pinch cream of tartar 1 teaspoon pure vanilla extract
3 ounces, white chocolate, chopped finely
Directions
Combine egg whites, sugar, and cream of tartar in the heatproof bowl of electric mixer, and set over a pan of simmering water. Whisk constantly until sugar is dissolved and whites are warm to the touch, 3 to 3 1/2 minutes. Test by rubbing between your fingers.
Transfer bowl to electric mixer fitted with the whisk attachment, and whip, starting on low speed, gradually increasing to high until stiff, glossy peaks form, about 10 minutes. Add vanilla, and mix until combined.

Preheat oven to 200 degrees. Line rimmed baking sheets with parchment paper; set aside.
Place meringue in a pastry bag fitted with a small plain tip (#6). Pipe domes, 1/2 inch to 2 inches in diameter, onto prepared baking sheets, and flatten the tips with a damp forefinger. Pipe stems onto baking sheets, releasing pressure halfway and pulling up to form a peak, making one to go with each "cap."

Bake the meringue shapes for 1 hour, rotating baking sheets halfway through. Reduce oven temperature to 175 degrees. Continue baking until completely dry to the touch but not browned, 45 to 60 minutes.
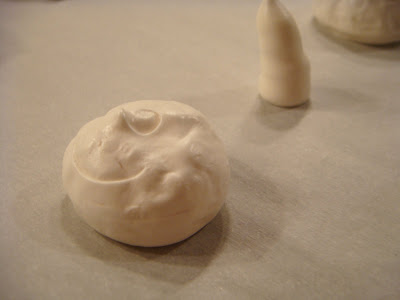
Melt white chocolate in a small bowl (in microwave or use double boiler). Using a paring knife, make a small hole in center of each cap. Dip one end of each stem in white chocolate, and insert into a hole; let set.


Store in airtight containers in a cool, dry place up to 1 week. When ready to use, sprinkle with cocoa powder, if desired.
Sugared Cranberries And Rosemary (adapted from Martha Stewart Holiday)

Ingredients
1 1/4 cups sugar
1 cup water
1/2 cup (or more) cranberries
5-12 rosemary sprigs
Preparation
In a small saucepan, bring water and 1 cup sugar to a boil over medium-high heat, and stir until sugar dissolves. Pour simple syrup into a bowl.
Pour remaining 1/4 cup sugar into another bowl.
Drop a handful of cranberries into the simple syrup. Remove cranberries with a slotted spoon, letting excess simple syrup drain off. Drop cranberries into bowl of sugar, and toss with a fork. Place sugared cranberries on parchment. Repeat until all cranberries are sugared.
Dip rosemary sprigs in simple syrup and then in sugar. Place on parchment to dry.
Chocolate Splinters (adapted from Martha Stewart Holiday)
Melt 4 ounces of finely chopped bittersweet chocolate in small bowl in microwave. Spread the melted chocolate 1/8-inch thick over parchment-lined baking sheet. Chill 10 to 15 minutes. Cut hardened chocolate into splinters.
And now for my notes on the whole process...
I didn't have any 12-by-17-inch baking sheets. I'd never seen a recipe call for that size pan before and thought they might be difficult to find, but Macy's carries Calphalon and Martha Stewart brand ones, so that problem was easily remedied.
We didn't think to match up the edges of the cake, so there were ends and middles together and the top looked a little sloppy. We just sliced horizontally through the cake removing the top inch. This is also a great way to get to taste the cake since you can't really cut into it before serving it to people.

For the meringue mushrooms, I used the recipe from Martha Stewart's Cupcakes, which was almost the same as the one in the Martha Stewart Holiday magazine except it called for 1/2 teaspoon more of vanilla and said the mushrooms could be stored longer. So much for consistency, Martha. I did not spread chocolate under the mushroom caps to make them look more like real mushrooms as the recipe instructed -- I was already spending a ton of time on this dessert. When piping the mushrooms, do not worry about making the stems dainty. Many of my mushrooms did not stand up because I didn't pipe the stems thickly enough.
For the sugared cranberries, Martha Stewart says to put one cranberry at a time on a toothpick, dip it in simple syrup, roll it in sugar, remove it from the toothpick, and then move on to the next cranberry. If I didn't work 56 hours a week, maintain a blog, and attempt to maintain a life, perhaps I would have tried to do it that way. I think you'll find the method I've given you above to be much more efficient! (By the way -- these are delicious!)
For timing purposes, I made the meringue mushrooms on Wednesday night and the buttercream on Thursday night and stored it in the fridge. I baked and assembled the cake (with a lot of help from my boyfriend) on Friday night -- I took the buttercream out of the fridge before starting the cake so it could soften. Finally, I made the sugared cranberries and rosemary on Saturday night while my boyfriend chopped chocolate shards for me, and then we decorated the stump and plate.
I happen to be pretty clumsy and cut my finger while chopping some scallions for dinner the night I planned to assemble the cake. I wasn't doing much better later that evening when it was time to roll the cake into a stump. Luckily, my boyfriend swooped in, finished making dinner, and helped me roll and frost the stump de Noël. I would probably still be sitting in a pile of broken cake, tears streaming down my face, if he hadn't been there to help.
All in all, I was incredibly happy with the way the stump turned out. I loved making all the garnishes, trying my hand at the different decorations. Besides that I thought the cake was a smidge too dry (I'm a very touch critic when it comes to my own baked goods), it was delicious. I brought it to a friend's holiday party. She cut tall, thin slivers of cake for everyone. I wish I had an inside picture to show you -- the slices had a sort of wood grain to them that was really cool.
If you're looking for a great dessert to bring to an upcoming holiday party and you have a little time on your hands, I think this one is incredibly festive and perfect for such an ocassion.
Have you ever made a bûche de Noël?
12.15.2009
MSC: Gingerbread Mini Cupcakes

Today I'm treating you to another fabulous cupcake idea from Martha Stewart's Cupcakes: 175 Inspired Ideas for Everyone's Favorite Treat. I can't say it enough how much I love this book. It's full of the cutest ideas and plenty of tasty cupcake recipes too. I especially love the holiday ideas like this one.
December's MS: Cupcakes Club choice, from Kayte of Grandma's Kitchen Table, was gingerbread cupcakes (p. 246, for those who have the book).

I'm not a big fan of gingerbread cookies, as in the rolled-out ones usually cut into the shape of gingerbread men -- I find that they're often dry, hard, and too strongly flavored, as if their purpose is more for decoration than eating.
I do like chocolate chip gingerbread drop cookies and ginger molasses cookies though, so I figured I'd give these cupcakes a shot and hoped they would have a less intense gingerbread flavor and be more moist than the cutout cookies. Luckily, they did turn out moist and had a pleasant gingery taste, and I'd definitely make them again any day.

I halved the recipe and, as is typical for me, made minis. We had the option of making the gingerbread cookie cutouts that were part of the recipe or decorating these cupcakes some other way. Because I usually don't like the cookies, I skipped those and just made the fluffy vanilla frosting. I piped it on the mini cupcakes, trying a few different looks until I found the one I liked.

And then I decorated them with little gingerbread men sprinkles.

These would be the perfect dessert to bring to a holiday party!
12.11.2009
Potato Latkes
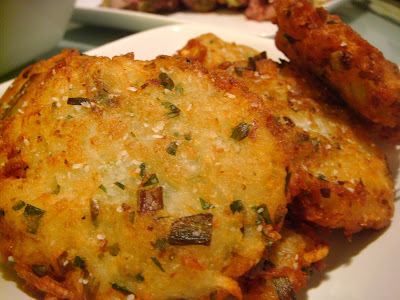
I grew up calling these potato pancakes and eating them for breakfast with a small puddle of applesauce. It wasn't until I was older that I learned of their other name -- latkes -- and found out that eating them for dinner is completely acceptable too. It doesn't matter what you call them or when you eat them, as long as you enjoy them!

Back when I made that incredible herb-crusted beef tenderloin, I also made my very first batch of potato latkes and served them as a side. The only disappointment I encountered was that the recipe didn't make more! Next time I'm definitely doubling it. I thought we'd have plenty of extra latkes to keep in the freezer -- but we barely had any leftover.
I'm sure they'll disappear just as quickly at your dinner table!
Potato Latkes (adapted from Entertaining from Cook's Illustrated, Holiday 2009)
Makes about 12 pancakes
Ingredients
2 pounds russet potatoes, peeled
1 medium onion, peeled and cut into eighths
1 large egg
4 medium scallions, white and green parts, minced
3 tablespoons minced parsley
1 1/2 teaspoons salt
Black pepper
1 cup vegetable oil for frying
Preparation
Using food processor with grating blade attached, grate potatoes.
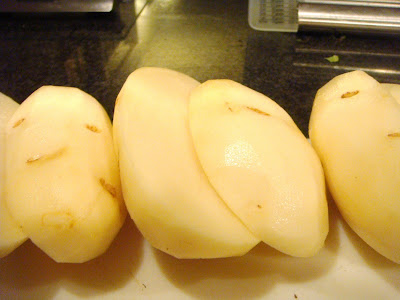
Place half of the grated potatoes in a sieve set over a medium bowl. Switch to normal food processor blade and process remaining potatoes with onions until onions appear coarsely chopped.

Add potato and onion mixture to potatoes in sieve.
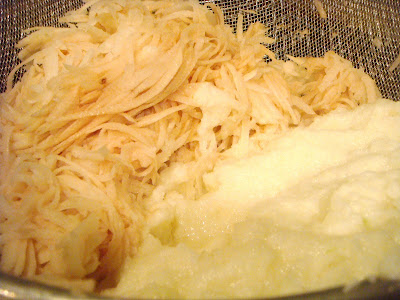
Press mixture against sieve and squeeze out as much liquid as you can. Let potato liquid stand until starch settles to the bottom. Pour off liquid on top, leaving starch in the bowl.
Beat egg, potato mixture, scallions, parsley, salt, and pepper into starch.

Set up a sheet pan with a cooling rack inside it. Place three layers of paper towels on the cooling rack.
Heat oil (make sure it's about 1/4-inch deep) in 12-inch skillet over medium-high heat until shimmering.
Shape potato mixture into patties. Take about 1/4 cup (more or less depending what size latkes you want) of batter in your hands and pat into a disk while squeezing out excess moisture. Place patty in pan. Repeat until you have 5 patties in the pan. (That little one is my tester patty. I used it to make sure my oil was the right temperature. I think next time, I'll make all of the latkes that size though!)

Fry potato patties until they are golden brown on the bottoms and edges, about 3 minutes.

Flip and fry for about 3 more minutes.

Transfer patties to prepared paper towel-lined cooling rack to drain. If desired, sprinkle with salt while still hot.

Repeat until you have used up all of the potato mixture.
Serve immediately.
To store: If you don't plan to eat all of the latkes when you make them, you can let them cool and then place them in a freezer bag and freeze them until you want them. Reheat them in a 375 degree oven for 8 minutes on each side.
They came out crunchy on the outside and creamy on the inside -- just the way I like them! The scallions and onions added a lot of flavor too. And don't they look pretty with the flecks of green from the parsley and scallions?
We ate almost all of these for dinner that night, and I was able to freeze four of them, which we reheated and ate the following night. They're best the day they're made, but the reheated ones were really good too. As I mentioned above, next time I'll make a double batch so I can fill the freezer with them and have them on hand to eat whenever we crave them!
What do you call these, and how/when do you eat them? Do you like them crunchy and hashbrown-like, or do you prefer them creamier (like those made with leftover mashed potatoes)?
Subscribe to:
Posts (Atom)


