
10.06.2011

Boston Bruins Black And Gold Hockey Puck-Cakes

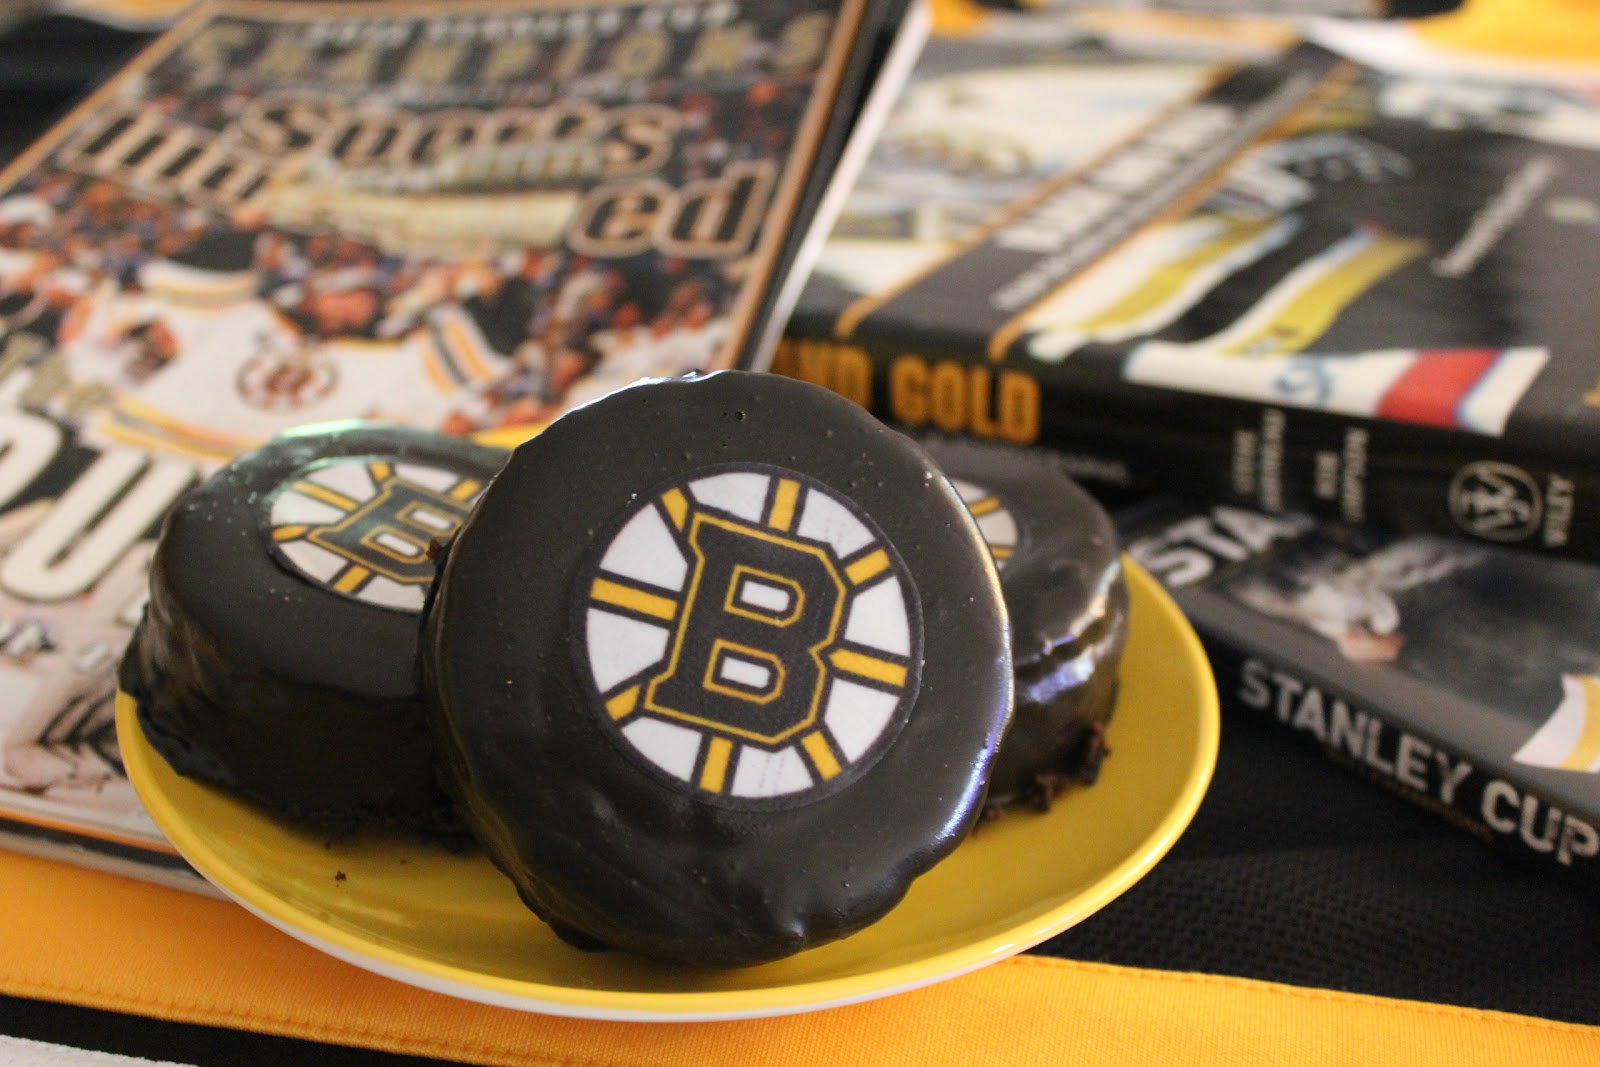
Boston Bruins black and gold hockey puck-cakes

The Boston Bruins are hitting the ice tonight for the first game of the season! What better way to celebrate than with some Bruins-themed treats?! If you're a Bruins fan, these are a must-make this season.

After I made those Boston Bruins cupcakes last year, I started to think about what other black and gold treats I could make, and I came up with some really delicious ideas. The first of which is these hockey puck-cakes -- really homemade Ring Dings, but I think they look like hockey pucks.

I found a recipe in Art & Soul of Baking and made some changes to it to fit the theme. I used double-Dutch dark cocoa to darken the cake, added black food coloring to the glaze, added yellow and red food coloring to make a gold filling, and ordered edible Bruins cupcake toppers to decorate the "pucks."


You can order the double-dutch dark cocoa from King Arthur Flour and the edible cupcake toppers from Fun Toppers 4 Cakes.


The cupcake toppers come with a white border because they are meant to top white-frosted cupcakes. We decided to trim the white border off so they would look better on the black glaze. Jeff used a circle cutter and traced around it with a razor. Then he used the razor to lift the decals off the paper and a baby offset to help place them on the puck-cakes.

Boston Bruins black and gold hockey puck-cakes

Boston Bruins Black And Gold Hockey Puck-Cakes (adapted from Art & Soul of Baking)
Print this recipe
Makes 8 puck-cakes

Ingredients

Cake
1/2 cup double-Dutch dark cocoa
1 1/2 cups water
2 cups cake flour
1/4 cup all-purpose flour
2 teaspoons baking powder
1/4 teaspoon salt
3 eggs
2 teaspoons vanilla extract
1 1/2 sticks unsalted butter, softened
1 cup sugar
3/4 cup packed light brown sugar

Filling
1/3 cup heavy whipping cream
1 teaspoon sugar
1/2 teaspoon vanilla extract
Yellow food coloring paste or gel
Red food coloring paste or gel

Glaze
8 ounces bittersweet chocolate chips (preferably Ghirardelli)
1 cup heavy cream
Black food coloring gel or paste
Boston Bruins edible cupcake toppers

Preparation

To make the cake: Preheat oven to 350 degrees. Butter a 9- by 13- by 2-inch pan and line the bottom of the pan with parchment paper.

Heat 1/2 cup of the water in the microwave in a 2 cup-capacity measuring cup (or bowl) on high for 1 minute. Whisk cocoa into water.


Add the remaining 1 cup water, and stir until smooth. Let cool to room temperature.


Sift flours, baking powder, and salt together into a medium bowl, and set aside.


Mix the eggs and vanilla together in a small bowl, and set aside.


In bowl of stand mixer fitted with paddle attachment, beat butter and sugars on medium-high speed until light in color, 4 to 5 minutes.


With mixer on medium speed, add the egg-vanilla mixture to the butter-sugar mixture about 1 tablespoon at time. About halfway through, turn off mixer, and scrape down bowl. Then resume adding eggs, and scrape down bowl again.


With the mixer on low, add the flour mixture and cocoa water alternately, starting with one-third of the flour mixture and half the cocoa water, finishing with the flour mixture. Scrape down bowl, and finish mixing batter by hand if necessary.

Scrape batter into prepared pan, spreading evenly.


Bake for 40 to 45 minutes, until firm to the touch and toothpick inserted in center comes out clean. Transfer to rack to cool completely.

Make the puck-cakes: Use a 3-inch (or similar-sized) cutter to cut eight rounds from the cake. (Save scraps for another use or for snacking.)


Place a wooden spoon next to a cake round, and slide a paring knife over it partway into the cake horizontally.


Push a 2-inch (or similar-sized) cutter into the center of the cake round until it hits the knife. Twist the cutter (and wiggle the knife) to loosen the circle of cake.


Remove knife and cutter with cake in it. Pop the piece of cake out of the cutter, and slice off a 1/4-inch-thick round. (Save scrap for snacking.)


Repeat with remaining cake rounds.

Make the filling: In bowl of stand mixer fitted with whisk attachment, whip cream, sugar, and vanilla on medium speed until soft peaks form. Gradually add a couple squeezes of yellow food coloring and just a touch of red to make the Bruins gold, and continue whipping until stiff peaks form.


Transfer filling to pastry bag fitted with round tip, and pipe filling in center of each cake round.


Press reserved cake circles on top.


Place the cakes on a wire rack set inside a sheet pan.


Make the glaze: Place chocolate chips in large measuring cup. Warm cream in saucepan, and remove from heat as soon as it starts to bubble. Pour the cream over the chocolate, and let stand 1 to 2 minutes. Whisk cream and chocolate together until smooth. Whisk in two generous squeezes of black food coloring to darken the glaze. Let glaze cool for about 5 to 10 minutes, until it is the consistency of heavy cream or honey but is still pourable.


Pour the glaze over each cake, using a baby offset spatula to smooth the glaze off the top and around the sides of the cakes. (If you run out of glaze, you can scoop it out of the baking sheet, reheat it, strain it, and reuse it.)


Let glazed cakes stand for about 5 minutes, and then apply the edible toppers using a baby offset spatula. (You can transfer the cakes to a parchment-lined sheet pan first if you like.) Refrigerate until ready to serve. (Puck-cakes can be stored on parchment paper in airtight container in refrigerator.)


Boston Bruins black and gold hockey puck-cakes

Boston Bruins black and gold hockey puck-cakes

Boston Bruins black and gold hockey puck-cakes

Serve to Bruins fans.

Boston Bruins black and gold hockey puck-cakes

Go B's!

10.04.2011

Fun With Fondant Plus A Giveaway

Fall fondant cake

Have you guys ever worked with fondant? Emphasis on the word worked!

Jen from Beantown Baker and I got together a couple weekends ago to work on some fondant-based projects. King Arthur Flour happily supplied us with the fondant. We decided to tackle a couple different projects, and we have some Halloween treats in store for you soon, but meanwhile I want to share the cake I decorated with you.

Jen made the cake layers, and I whipped up some buttercreams for us. I wanted to do a fall cake, so I chose the caramel-apple cake recipe in Baked Exporations for the cake layers and its accompanying caramel buttercream for the filling and crumb coat.

We each assembled our cakes and spread a thin layer of buttercream over them (the crumb coat), and then we dove right into covering them with fondant. I kneaded the fondant for a bit to make it more pliable and workable, and then I rolled it out into a large circle (using confectioners' sugar to keep it from sticking to the counter).

Rolling out fondant


In order to move the fondant circle over the cake, I thought it would make sense to fold it in half like I would to move a pie crust. While the fondant didn't tear, this did leave a crease in it. (I probably should have done some research before taking out the fondant because I learned afterwards that a little shortening would have solved this problem.)


Covering a cake with fondant

I carefully smoothed the fondant over the top of the cake and down the sides with my hands, and then I trimmed the excess fondant from the bottom of the cake and the excess that collected at the back of the cake and made a seam in the back.

Fondant-covered cake

With my cake decently covered, it was time to get to work on decorations. I thought it would be fitting to do a fall theme, so I broke out my fall cookie cutters and some food color pastes. I dyed some of the fondant red and some of it yellow, and then I twisted some of the red and yellow together to swirl the colors.

Colored fondant

I rolled out the colorful fondant, cut out some leaves, and then kneaded the scraps of fondant into orange fondant.

Fondant cutouts

Then I twisted orange, red, and yellow fondant together and rolled it out for even more color variation.


In addition to the leaves, I cut out a few pumpkins, acorns, and apples and made a band to wrap around the bottom of the cake.

Decorating with fondant

To adhere my decorations to the cake, I just dabbed a little water on the back of each one. I was pretty happy with the final product, considering I'd never worked with fondant before, but I know it will take a lot more practice to get something close to perfect.

Fall fondant-covered cake

I love when Jen and I get together to do baking projects because we both challenge each other and teach each other. It's much easier to tackle something like this with a friend!

So I did mention a giveaway... I bet you can guess what it is. One of you can win your own tub of fondant from King Arthur Flour and try decorating a cake yourself, or maybe hold onto it until Jen and I post our Halloween treats, which also use fondant.


To enter to win, please like King Arthur Flour on Facebook and follow them on Twitter. Then leave a comment on this post telling me anything about fondant -- a time you saw it on a cake that really impressed you, something you made with it, something you would make with it...

You have until October 7, 2011, at 11:59 p.m. EST to enter. (You must live in the U.S. or Canada.)

10.03.2011

Amuse-Bouche: Caramelized Onion And Goat Cheese Vol-Au-Vents

Caramelized onion and goat cheese vol-au-vents

I was invited to join in a Kitchen PLAY Progressive Party this month. Six bloggers are invited to participate in the party, and each blogger is responsible for a creating and writing about a different course (cocktail, amuse-bouche, salad, appetizer, entree, or dessert). I was delighted when I found out I had the amuse-bouche course. You know how I love to make mini things.

This month's Progressive Party is sponsored by the National Onion Association, and we all had to incorporate storage onions into our courses. Storage onions are typically available from August to May and have thicker skins and lower moisture levels than their spring counterparts. I chose yellow storage onions, which do well with caramelizing, baking, and roasting. (Most storage onions work well in dishes that require a longer cooking time.) They are also known for having strong onion flavor but only a mild aftertaste. While onions seem like an easy ingredient to an incorporate into a dish, the difficulty I had was in narrowing down what to make!

I finally decided I wanted to do something with puff pastry and caramelized onions. From there, the idea evolved into vol-au-vents (or puff pastry cups) filled with caramelized onions and goat cheese, topped with fig slices, and drizzled with black currant vinegar.

I made the smallest puff pastry cups I could, as an amuse-bouche should be bite-size. And because an amuse-bouche is just a small bite, I wanted to pack it with flavor. The buttery puff pastry provided a background for the sweet caramelized onions, tangy goat cheese, and fresh figs. The acidity of the sweet berry-flavored vinegar tied the little bite together.

These caramelized onion and goat cheese delights can be served at the start of a meal to rouse the palate or even as a little party hors d'oeuvre.

The National Onion Association is also sponsoring a wonderful giveaway at Kitchen PLAY. Simply recreate any one recipe from this month’s Progressive Party, post about the experience on your blog and provide a link to your post on Kitchen PLAY to enter.  All qualifying bloggers in each course will be entered to win $100 (6 prizes total). The deadline is October 31, 2011. Please review the complete contest rules before entering. Good luck!

This post was sponsored by the National Onion Association, and I was compensated for creating this original recipe.

Caramelized onion and goat cheese vol-au-vents

Amuse-Bouche: Caramelized Onion And Goat Cheese Vol-Au-Vents
Print this recipe
Makes 16

Ingredients

1 tablespoon olive oil
1 large storage onion, halved and thinly sliced
2 teaspoons brown sugar
16 vol-au-vents, prebaked and frozen (see below)
1.5 ounces goat cheese
1 to 2 Black Mission figs, quartered lengthwise and then each quarter thinly sliced
3 tablespoons Cassis (black currant) vinegar

Preparation

In a medium skillet, heat olive oil over medium-low heat. Add onions and stir in brown sugar. Cook, stirring occasionally, until onions are golden brown, about 40 minutes. (Can be made up to 3 days ahead.)


Preheat oven to 350 degrees.

Line a large sheet pan with a Silpat mat, and place vol-au-vents on mat, spaced evenly.


Divide the caramelized onions among the puff pastry cups.


Top the caramelized onions with goat cheese crumbles, dividing the goat cheese evenly among the cups.


Place a slice of fig on top of the goat cheese in each cup.


Bake the vol-au-vents until the layers are golden and cheese is melted, about 15 to 20 minutes.


Transfer sheet pan to wire rack to cool slightly.

Pour vinegar in a small saucepan. Bring vinegar to a boil over medium-high heat. Reduce heat to medium-low, and simmer vinegar until thickened and reduced by half.

Drizzle a little of the reduced vinegar over the figs topping each cup.


Serve warm or at room temperature.


Vol-Au-Vents (adapted from a Daring Bakers’ Challenge)

Ingredients

7 ounces chilled puff pastry dough (1/2 pkg. of Dufour Classic Puff Pastry)
1 egg
1 teaspoon water

Preparation

Line a baking sheet with parchment.

On a lightly floured surface, roll the puff pastry dough into a rectangle about 1/8 to ¼ inch thick. Transfer the dough to the baking sheet, and refrigerate for about 10 minutes.


Using a 1 3/4-inch round cutter, cut out 32 rounds.


Half of the rounds are for the bottoms, and half are for the sides. Using a smaller round cutter (about 1 ¼-inch wide or a little smaller), cut the centers out of half of the rounds to make rings. (Stack the centers and any scraps. These can be re-rolled and used if you need extra dough. If you do need to re-roll scraps to get enough disks, be sure to use any rounds cut from the re-rolled dough for the bases, not the ring-shaped sides, as they will not puff as high. If you don’t need the scraps, freeze them for another use.)


In a small bowl, lightly beat the egg and water together to make an egg wash.

Place the bottom rounds on a sheet pan lined with a Silpat mat or parchment paper. Prick the solid bottom rounds with a fork (this is called docking, which will help keep them from puffing), and lightly brush them with egg wash.


Place the rings directly on top of the bottom rounds and very lightly press them to adhere them to the bottoms. Brush the top rings lightly with egg wash, trying not to drip any down the sides (which may inhibit rise).


Refrigerate the assembled vol-au-vents on the lined baking sheet while you pre-heat the oven to 375 degrees. (You could also cover and refrigerate them for a few hours at this point.)

Once the oven is heated, remove the sheet from the refrigerator and place a Silpat mat (preferred because of its weight) or another sheet of parchment on top of the shells. This will help them rise evenly. Bake the shells until they have risen and begin to brown, about 15 minutes.


Transfer sheet pan to wire rack, and remove the Silpat mat or parchment sheet from the top of the cups. If the centers have risen up inside the vol-au-vents, you can gently press them down. (The side of a tart tamper works well for this.)


Let cool for 10 minutes on pan, and then transfer vol-au-vents to wire rack to cool completely.

Place cooled vol-au-vents in freezer-safe bag, and freeze until ready to use in above recipe. (If you want to make everything in one day, you can skip this freezing step, fill the vol-au-vents as instructed above while they are still warm, and return them to a 350-degree oven for 15 to 20 minutes.)

What's your favorite dish featuring onions?