10.31.2009

Halloween Candy Cookies


I used to love Halloween when I was a kid. My older brother and I had a paper route with 150 customers in our neighborhood, starting when we were 8 and 9 years old, so we knew a lot of people -- a lot of people whose doors we could knock on on Halloween night and who would be handing out candy. We'd head out with our parents and baby sister (yes, Lindsay, you were the baby then) and fill up pillow cases two or three times, returning to the house on occasion to unload them onto the dining room table. Once we visited every possible house we could, we'd head back home and begin the candy sorting.

That's right. We sorted the candy. We'd stake claim on the king-size bars we had collected and then everything else would be shared. We'd stack the candy by type. Reese's PB cups always won. Snickers were pretty high up there too. I wonder what would win nowadays. My two youngest siblings are pretty much too old to go trick-or-treating anymore. If you have children or siblings who still go trick-or-treating, I'd love to hear what they collect the most of.

I wonder if I call home on Halloween night if my mom will be making a pot of hot dogs and beans, just like she always did on Halloween night when I was little. It probably depends on what my siblings are doing. I bet my 17-year-old sister will dress up as something silly and go to a Halloween party with her friends (they were colors one year -- she was orange -- and Christmas elves another year -- people asked them to sing carols). My little brother, who just turned 14, is a bit less predictable when it comes to this sort of thing.

We always had to have a hearty meal of hot dogs and beans to fill us up before we headed out, and we always had to dress warmly enough for the weather. This really put a damper on my style as I usually wanted to be a princess or a fairy, and I didn't know any princesses or fairies who wore cable-knit tights and sweaters. While I may have fought against the warm clothing, I was secretly thankful to have it once we got out into the chilly October air.

Halloween isn't the same for me now. It lost that magic that a lot of childhood things lose over the years. I don't enjoy dressing up now, and I rarely accept invites to Halloween parties that require costumes. In the places I've lived for the past 6 years, I haven't gotten any trick-or-treaters. And I've noticed that a lot of towns will plan a night for trick-or-treaters to go out that isn't necessarily October 31, which is just so strange and scheduled to me. It doesn't seem like it could hold the same magic and excitement for children now as it did for me when I was little, but I'm not a child anymore, so I could be wrong about that.

At any rate, I hope all of you and your families have a happy and safe Halloween. And if you want to do something will all of that candy besides just eat it -- which is perfectly acceptable -- I recommend taking your favorite candy, putting it in the freezer for a bit, chopping it up, and adding it to your favorite chocolate chip cookie recipe in place of chocolate chips.


Reese's PB Cup Cookies (adapted from the NY Times chocolate chip cookie recipe)

Ingredients
3 2/3 cups minus 2 tablespoons all-purpose flour
1 1/4 teaspoons baking soda
1 1/2 teaspoons baking powder
1 1/2 teaspoons coarse salt
2 1/2 sticks (1 1/4 cups) unsalted butter, softened
1 1/4 cups (10 ounces) light brown sugar
1 cup plus 2 tablespoons (8 ounces) granulated sugar
2 large eggs
2 teaspoons vanilla extract
10 or more large Reese's PB cups, frozen (I only had 10, but I think 20 would be better!)

Preparation

Sift flour, baking soda, baking powder and salt into a bowl. Set aside.

Coarsely chop PB cups, and set aside.

Using a mixer fitted with paddle attachment, cream butter and sugars together until very light, about 5 minutes. Add eggs, one at a time, mixing well after each addition. Stir in the vanilla. Reduce speed to low, add dry ingredients and mix until just combined, 5 to 10 seconds.

Add chopped Reese's PB cups and stir gently until mixed.

Press plastic wrap against dough and refrigerate for 24 to 36 hours. Dough may be used in batches, and can be refrigerated for up to 72 hours. You can also form the dough into balls, ready for baking, place them on cookie sheets, and freeze them. Once the balls of dough have hardened, scoop them into freezer bags, and take them out and bake them whenever you want warm cookies.

When ready to bake, preheat oven to 350 degrees. Line a baking sheet with parchment paper or a nonstick baking mat.

Place frozen cookie balls or freshly formed balls of dough (any size you like -- I like mini cookies so I form mine into about 1/2-inch balls) on prepared baking sheet. Bake for 10 to 12 minutes (or longer depending on the size), until light golden brown but still soft in center. Let rest for 1 minute, and then transfer cookies to cooling rack. Repeat with remaining dough for as many cookies as you want to make.

10.30.2009

Chocolate With Francois: Chocolate Cremes Brulees


I joined a new baking group! I'm really quite excited about this particular group. It's called Chocolate With Francois, and we'll be making recipes from Francois Payard's Chocolate Epiphany: Exceptional Cookies, Cakes, and Confections for Everyone. You may have heard me mention this book before. It contains recipes for the most amazing chocolate granola and the most wonderful flourless chocolate cake I've ever made or eaten. The recipes range from fairly straightforward to quite elaborate, so I was relieved to see that our first recipe was one of the less complicated ones.

Julie from Little Bit of Everything created the group and chose the first recipe: chocolate cremes brulees.

I had never made creme brulee before now, let alone chocolate creme brulee. I was really excited to try, as it is one of my favorite custard-style desserts (though I admit I like panna cotta just a little better).

The custard is made with just four ingredients: 72% chocolate, sugar, egg yolks, and heavy cream.


The custard is baked just until set and then refrigerated until it is completely set.

chocolate creme brulee
Then comes the fun part -- or in my case, the difficult part. I had originally planned to make the creme brulees in shallow 4-ounce ramekins, but as I was drying them off after rinsing them I noticed the writing on the bottom: "no broiler." I needed to use the broiler because I don't yet own a blow torch (it's moved up on the list of must-have kitchen items now). Once I realized that I couldn't use the shallow dishes, I swapped them out for some taller ramekins, not thinking at the time of the implications this would have on the sugar caramelizing process.

Halving Payard's recipe, I ended up with 4 ramekins. The day after I made these, I took two of the chilled ramekins out of the fridge and, following the recipe, topped each with 2 tablespoons of sugar. This looked like way too much sugar to me.


And it was.


When I finished caramelizing the sugar, which took a lot longer than it should have given the tall ramekins and the lack of a blow torch, my creme brulees were thickly layered with hardened sheets of sugar -- sugar that would hurt your teeth if you bit into it but was wonderful when you let it melt in your mouth with a bit of the chocolate custard.


The following night, I tried using less sugar but ended up nearly burning the topping. I couldn't get it right, but the dessert was still delicious.

Payard recommends using brown sugar to "fancy up" the dessert, so I tried that as well. He explains that brown sugar is too moist to caramelize, so I had to dry it in a 200-degree oven for an hour first. Once it was dry, I crushed up any clumps with the back of a spoon and sprinkled the dried sugar over the remaining custard.

I put this one under the broil as well. I probably pulled it out a little prematurely, but I didn't want to risk burning another. Some of the brown sugar caramelized and some stayed on top adding an extra crunch. I liked the combination of the more complex brown sugar flavor with the chocolate.


I really look forward to making these cremes brulees again (and trying to make some other flavored ones) when I own a blow torch.

Check out Chocolate With Francois to see how the other members did!

10.27.2009

Daring Bakers: Macarons


You win some, and you lose some. I lost this one.

The 2009 October Daring Bakers’ challenge was brought to us by Ami S. She chose macarons from Claudia Fleming’s The Last Course: The Desserts of Gramercy Tavern as the challenge recipe.

I was really hoping I'd be able to master this challenge. I'm absolutely fascincated by macarons (which are made with almond flour and are not to be confused with macaroons, which are those coconut cookies). They come in so many different colors and flavors. I figured the possibilites were endless, and I'd be able to make something really spectacular for this challenge.

Then I learned that the color and flavor has to be added in powder form because the macarons cannot contain too much moisture. I did a little research and kept up with the Daring Bakers' forum discussion to try to figure out how I could add color and flavor to my macarons.

It seems that I shouldn't even have bothered, considering that I couldn't get the plain almond-flavored macarons to come out right. In addition to trying to make the plain macarons, the other flavors I attempted were pistachio with a pistachio white chocolate ganache, pumpkin spice latte (which should have had a cinnamon whipped cream filling), and cinnamon mocha (meant to have a chocolate ganache filling). I didn't even make the fillings for the last two flavors because the cookies came out looking like flat wafers.


The plain macarons tasted great, and I filled them with chocolate ganache, but they never grew feet. And macarons are supposed to have feet. Compare my pictures to those of the Daring Bakers who had success with this challenge, and you'll immediately see what I'm talking about. (Oh, and in case you're wondering, I did make mini macarons, just like I make mini everything else. These were a little smaller than a penny.)


The pistachio ones, which I flavored with pistachio pudding powder were pretty tasty as well but a bit on the soft side.

While this challenge didn't go so well, I plan to try out some other macaron recipes in the future to see if I can find a recipe and system that works for me.

I made Francois Payard's chocolate macarons a while ago and loved them, but this was before I knew that macarons were supposed to have feet. Now I realize those didn't come out right either.

So how about you... have you made macarons? Were you successful?

If you want to see my most successful Daring Bakers' Challenge, check out last month's!

10.23.2009

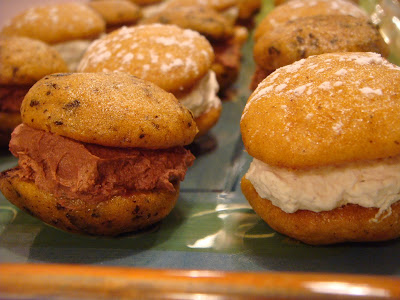
Mini Pumpkin Whoopie Pies

pumpkin whoopie pies
I'm not sure why, but for some reason I thought I would be the only person to make pumpkin whoopie pies this fall. I turned my back for a second, likely to scour the supermarket shelves for pumpkin, and suddenly pumpkin whoopie pies were everywhere! I couldn't believe how many people had not only heard of them but gone ahead and made them too. Wasn't I a bit naive?

A little late in the game, here are mine. There are a few variations out there, and this recipe is a bit different from the others I've seen. Most have had a cream cheese-based filling, but these sandwich a light cinnamon whipped cream instead.

pumpkin whoopie pies
I also added chopped chocolate to half of the batter and filled those whoopie pies with whipped chocolate ganache. This is a great option if you're looking for something a bit more decadent. Chocolate and pumpkin actually work really well together, although I guess chocolate combines pretty well with just about anything, so this shouldn't be too much of a surprise.

pumpkin whoopie pies
Oh, and also, these are mini pumpkin whoopie pies, so they just ooze cuteness, right?

pumpkin whoopie pies
This pumpkin whoopie pie recipe comes from Fresh & Honest: Food From the Farms of New England and the Kitchen of Henrietta's Table. Henrietta's Table is one of my favorite restaurants in Cambridge, Mass. I actually haven't had the pumpkin whoopie pies there (too busy eating the granola I suppose), but when I do, I'll have to see how close mine came to the original.

On a side note, while I love that this cookbook contains recipes from one of my favorite restaurants, the recipes don't seem like they were tested or copyedited. For instance, the whoopie pie one says to preheat the oven, mix the dough, and then put the dough in the fridge for at least an hour to set. Is one supposed to leave the oven on doing nothing for an hour? There are also some issues with the yield, and I've encountered confusion and inconsistencies in some of the other recipes as well.

That said, I've rewritten the recipe here, along with some of my own additions (such as the chocolate and ganache), so that it's easier to follow.

pumpkin whoopie pies
Mini Pumpkin Whoopie Pies 
(adapted from Fresh & Honest)

Printable version

Ingredients

Cakes
1 1/4 cups sugar
1/2 cup oil
3 eggs
2 cups all-purpose flour
1 1/2 teaspoons baking soda
1/4 teaspoon baking powder
1/2 teaspoon cinnamon
1/4 teaspoon ground cloves
1/4 teaspoon nutmeg
1/4 teaspoon salt
1 cup pumpkin puree
3 oz. of your favorite chocolate, chopped (or mini chips) (optional)

Whipped Cream Filling
1 cup heavy whipping cream
1/2 tablespoon confectioners sugar
1/4 teaspoon cinnamon

Whipped Ganache Filling (optional)
1 cup heavy whipping cream
4 oz. of your favorite chocolate, chopped

Preparation

Sift flour, baking soda, baking powder, spices, and salt together in a medium-sized bowl. Set aside.

Mix sugar and oil in bowl of electric mixer until well combined. Add eggs one at a time, beating after each addition.

Add the flour mixture to the sugar mixture and beat on low until combined. Mix in the pumpkin.

pumpkin whoopie batter
Chocolate version: Divide batter between two medium bowls. Add the chopped chocolate to one bowl and mix until combined.

plain and chocolate pumpkin whoopie pie batter
Place batter in fridge for at least 1 hour (I left mine overnight).

Prepare the whipped chocolate ganache. In a small pot over medium-high heat, bring heavy cream to a boil. Remove from heat, and stir in the chopped chocolate. Place in refrigerator for a couple of hours.

When you are ready to bake your whoopie pies, preheat the oven to 325 degrees. Line sheet pans with parchment paper, and remove batter from the fridge.

Using a round measuring spoon or ice cream scoop, scoop rounded spoonfuls of batter onto prepared sheet pans. (You can make the pies whatever size you want, but I used a round measuring teaspoon to scoop the batter so I could make minis.) Leave space between the scoops. Use your fingers to round out the batter a little.

chocolate pumpkin whoopie pies ready for baking
pumpkin whoopie pies ready for baking

Bake each tray for about 7 to 8 minutes for minis (10 to 12 minutes for larger pies), or until toothpick comes out clean.

baked chocolate pumpkin whoopie pies
baked pumpkin whoopie pies
Let cool on pan for about a minute, and then move pies off pans to cooling racks. (You'll have to keep reusing trays until you run out of batter. I had three trays, and I think I filled each twice.)

Once you're done baking off all of the batter and your pies are cooling, make the whipped cream filling.

In bowl (preferably a chilled bowl) of an electric mixer fitted with wire whip, whip cream until stiff peaks form, adding in confectioners sugar and cinnamon while mixer is running. Move the cream to another bowl, and clean the mixing bowl and whip attachment.

At this point, the chocolate ganache should be firm enough to whip. Place ganache in bowl of electric mixer fitted with wire whip, and whip until light and fluffy.

Try to match up the pies so you sandwich the ones that are closest in size and shape.

whoopie pie tops and bottoms
Fill your pies. I used the whipped cream filling for the plain pies and the whipped chocolate ganache filling for the chocolate speckled pies. (You may need to make more of the fillings, depending how thickly you fill the pies. I had plenty of chocolate ganache but cut it close on the whipped cream.) I just used a small offset spatula because I didn't have a ton of time and I'm not really bringing these anywhere, but I think piping the filling would look much more elegant.

whipped cream filled pumpkin whoopie pies
whipped chocolate ganache filled pumpkin whoopie pies
Dust the pies with confectioners sugar if desired.

One of the things I liked best about making these is that you could pretty much smell when they were done. I'd start to catch a whiff of baked pumpkin and spices in the air and quickly run over to check them with a toothpick, and without fail they'd be ready. The whole kitchen smelled like fall.

These would be perfect for a light party dessert.

pumpkin whoopie pies

Have you jumped on the whoopie pie bandwagon, pumpkin or otherwise? Do tell!

10.22.2009

Apple Crisps


I know you've got more apples hanging around your kitchen, taking up space that wants to be filled with squash and pumpkin. You're thinking you're bored with the usual run-of-the-mill apple pie. You want something crunchy, but you still want that soft apple filling, and you also want something effortless, something as good as, but not nearly as labor-intensive as, say, a Dutch apple pie.

You want apple crisp. That's right. I'm talking about that perfect fall dessert, hinted with cinnamon, covered with crisp topping, and maybe even a little citrusy.

Convinced? Then grab those apples and get baking!


Warm Individual Apple Crisps (adapted from Everyday Food, October 2009)
Printable version

Ingredients

Crisp Topping
6 tablespoons cold unsalted butter, cut into small pieces
2/3 cup all-purpose flour
2/3 cup oats
3/4 cup light brown sugar, packed
1/2 teaspoon ground cinnamon
1/4 teaspoon salt

Apple Filling
2 1/2 to 3 pounds firm apples
1/2 cup sugar
3 tablespoons all-purpose flour
1 teaspoon vanilla extract
1/4 teaspoon grated orange zest
1 tablespoon fresh orange juice

Preheat oven to 375 degrees. Butter several au gratin dishes or small ramekins. (You can also make one large crisp, but I liked using an assortment of small baking dishes.) Place the dishes on foil-lined sheet pans.

Place all ingredients for crisp topping in the bowl of an electric mixer, and beat on low until coarse crumbs form. Set aside.

Peel, core, and cut apples into about 1/2-inch cubes.


Combine apples, sugar, flour, vanilla, orange zest, and orange juice in medium bowl.


Divide apple mixture among baking dishes.


Sprinkle crisp topping evenly over apples.


Bake in preheated oven for about 30 minutes, or until topping is golden brown and juices get thick and bubbly. If the juices start oozing over the sides, even better.


Serve warm, with ice cream or whipped cream if desired.

To store: Cover cooled crisps with plastic wrap and keep in fridge.

For a delicious breakfast, rewarm crisps in the microwave the next day!

10.19.2009

Dutch Apple Pie, Almost

Dutch apple pie slice
I've been wanting to tell you about this delicious pie I made after my recent apple picking trip, but I'm writing this post with mixed emotions after having read Christopher Kimball's "Gourmet to All That" Op-Ed piece.

I admit I'm only a recent fan -- I've been subscribing to Entertaining for about a year now -- but I absolutely love what Cook's Illustrated/America's Test Kitchen does: tests recipes in every which way using all different ingredients by different manufacturers to find the best possible outcome for the home cook.

But I also believe there is value to be gained from reading food blogs too. And it bothers me a bit that someone who inspires me could be so harsh. There's a difference between people who post recipes that they haven't actually made and haven't bothered to vet and people like me (and so many of the bloggers I read) who actually make recipes and give our feedback on them. There's a difference between those first people I mentioned and the people who take the time to cook a recipe for their friends or family and then share it with their readers, perhaps along with a story.

I admit I'm not a big fan of Yelp or huge recipe databases with a mishmash of entries. I love Epicurious, but Epicurious has editors. And maybe that's what it comes down to. I'll read and trust blogs whose bloggers edit their own work, just like I'll read and trust food magazines that I consider to be well written. I don't think you can lump the whole foodie blogosphere together.

And that is why I have mixed emotions. I wanted to come here and tell you how amazing this pie I made from the Fall 2009 issue of Entertaining from Cook's Illustrated is, but I wonder, would Kimball look down on that? Would he say my thoughts about this Cook's Illustrated tested and approved recipe are null? Would you say that?

The only thing that makes me feel a little better is that as he responds to comments on his blog post addressing what he wrote in the New York Times, he sort of contradicts himself (is having a blog not a contradiction in itself anyways?) and doesn't seem like he feels as harshly about the blogosphere as he first claimed.

I hope that you, readers, like me, find value in both food magazines and blogs, especially those that are well edited and well thought out. And now on to that pie. It was amazing. And it is so worth telling you about.

You must first know that I'm not big on pie crust, so a lot of the reason I liked this pie so much is the streusel topping. And then I call this Dutch apple pie, almost, because according to Cook's Illustrated, a true Dutch apple pie has raisins, and no raisins were getting anywhere near my pie. They belong in my oatmeal cookies, not in my pie. The other things that make the pie worthy of the name Dutch apple pie are dairy in the filling (check), a streusel topping (check), and no lemon juice (check).

The bottom crust is made using Cook's Illustrated's foolproof pie dough, which I had never made before, and which, oddly enough, contains vodka. My concern about tasting vodka the vodka in the finished product was unnecessary. You don't even know it's there.

pie crust
The crust must be prebaked because the apple filling is essentially already cooked, as is the streusel. This type of dough needs to be weighted down or it will puff too much in the oven and be unusable as pie crust. Because I don't have pie weights or dried beans, I used rice to keep the dough from puffing.

pie crust weighted with rice
The filling is apples cooked in butter with cinnamon, salt, and sugar.

apples for pie
The apples are strained before being placed in the prebaked pie crust.

apples in pie crust
The juice is combined with heavy cream, reduced, and then poured over the apples.

apple pie
It forms a silky, creamy layer, which the streusel is then sprinkled over.

apple pie before streusel is baked
Then the pie simply needs to be baked for about 10 minutes to brown the streusel.

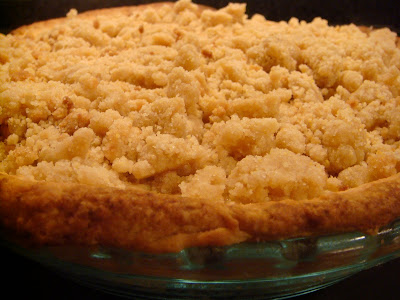
finished apple pie
It's delicious. The apple filling is soft and flavorful. The pie crust is good. I'm not sure it's phenomenal, but you can't really trust my opinion anyways because I'm not a lover of pie crust. And let me tell you, pie with streusel is the way to go. You get that nice crunch and extra sweetness.

apple pie with slice removed
You can find the recipe in the Fall 2009 issue of Entertaining by Cook's Illustrated or on the Cook's Illustrated Web site.

Hope you've been making lots of fabulous things with apples this fall!

10.15.2009

MSC: Pumpkin Patch Cupcakes


It's fall! The mornings and evenings have been cold and blustery, and I've traded in shorts and t-shirts for Uggs, sweaters, and fleeces. I've even heard the leaves are peaking up north. Hopefully that will happen soon here too.


If you don't know it by now... fall is my favorite season. The reasons are endless, but many of them have to do with food. I've already made apple cider doughnuts, apple pie, apple crisps, apple-walnut crescents, and an apple tart. I've roasted a butternut squash with butter and brown sugar. I made a slow-cooked pot roast dinner with carrots and potatoes. I have soups, stews, chili, and other comforting meals in mind for the days ahead.

And now, I've started cooking with one of my favorite fall foods: pumpkin!

I didn't pay much attention when my boyfriend casually mentioned reading about a pumpkin shortage because it didn't register at the time that the shortage might affect my fall baking. But when I decided to shop for ingredients for this recipe and some upcoming recipes, I was shocked to find empty the shelf where all the Libby's pumpkin cans belong.

Luckily, I had a little time to check around and found some cans of pumpkin at Stop & Shop when I went to the Cape this past weekend. I stocked up, just in case I'm not able to find some close to home (Boston area) again. The small cans were even on sale: 2 for $3. But on to the recipe...


I was so happy when I saw that Kim from What the Whisk had picked the pumpkin patch cupcakes for October's MS: Cupcakes Club cupcake from Martha Stewart's Cupcakes: 175 Inspired Ideas for Everyone's Favorite Treat. Not only had I been wanting to make them because they have pumpkin in them, but it's also been a while since I made those ladybug cupcakes, and I wanted to try working with marzipan again.

These cupcakes can definitely be classified as cupcakes, even if they seem more like muffins, because they're just so light and fluffy. And they're vaguely reminiscent of pumpkin pie, being chock-full of some of pumpkin's favorite spices: cinnamon, ginger, cloves, and nutmeg.


A little too plain for me on their own, the cupcakes are perfectly complemented by a sweet cream cheese frosting.


And now for the fun part: makin' the pumpkins (or punkins, as I like to call 'em). I enlisted a little help from my boyfriend for the kneading and dying of the marzipan. He took care of finding the right shade of orange for the pumpkins...


...while I turned one portion green for the leaves.


After a whole lot of kneading and color adjusting, we ended up with bold orange and green.


I took the green and rolled it out for the leaves. (The stems are crafted by winding and rolling together orange and green scraps.) Hard as I tried, I could not find a mini leaf-shaped cookie cutter. I even checked the sources Martha supplied in the back of her cookbook and had no luck. Left with no other options, I printed a picture of a leaf and then used it as a guide as I cut the leaf shapes freehand with a sharp steak knife. I'm pretty artistically challenged -- when it comes to crafty things -- so I was ecstatic that my little cutouts came anywhere close to resembling leaves.


The pumpkins were much easier to make. They're just 3/4-inch balls of orange marzipan. I gently pressed a toothpick into the sides of each ball to create lines that would transform the simple orange balls into pumpkins.


I didn't make pumpkins for every cupcake because it is really time-consuming, especially trying to cut out leaves without a cutter. But I made enough to refresh my marzipan molding skills, and I have the leftover marzipan in the freezer for some future project.


I'm no Martha, but I'm close, right? Well, it was fun anyways!


Check out the Martha Stewart Web site for a similar recipe to the one in the book. (I halved it and ended up with 24 cupcakes.)

Also, head over to the MS: Cupcakes Club Web site to see how the other members did with this recipe!


Looking for something savory? Try this amazing pumpkin recipe for dinner!