Showing posts with label Guest posts. Show all posts

10.21.2012

Guest Post: Tiramisu

From Bianca of Confessions of a Chocoholic...

It's no secret that Megan and I both love desserts and that we are both chocoholics. So when she asked for guests bloggers for while she is getting married and honeymooning in Italy, I was thrilled at the chance to indulge my (and her) sweet tooth and whip up an Italian dessert that's finished with a feathery dusting of dark chocolate: tiramisu.

I love all the components of tiramisu -- the soft sponginess of the espresso and liqueur-soaked ladyfingers, the creaminess of the mascarpone cheese mixture, and the light sweetness from the shaved chocolate. Some recipes call for zabaglione, an Italian custard made with egg yolks, sugar, and a sweet wine (usually Marsala wine) that is then folded in with mascarpone cheese and espresso for the filling. However, I didn't have any Marsala wine so I tried a recipe that just had egg yolks and sugar. But don't worry, I didn't skip on the alcohol completely - I soaked the ladyfingers in espresso mixed with plenty of Kahlua (coffee liqueur).


If you don't have Kahlua, you can substitute Frangelico (hazelnut liqueur), rum, brandy, or even Cointreau (orange liqueur). This is a very adult dessert recipe, not just because of the liqueur but also because it calls for raw egg yolks. Use the freshest eggs you can find and don't be intimidated -- I've made other chilled desserts (like dark chocolate ganache cups) with raw egg yolks and they really end up so creamy and velvety.


I used a Microplane to shave some good-quality dark chocolate (Valrhona 71%) on top and also in between the layers. I also modified the original recipe to cut it in half, because one small slice tastes pretty indulgent already . . . and I don't need a giant pan in my apartment.


Ingredients

3 egg yolks
2 tablespoons sugar
8 oz mascarpone cheese
2/3 cup strong espresso, cooled
1/4 cup Kahlua
1 3.5 oz box of ladyfingers (about 20 ladyfingers that are less than an inch wide)
1/4 cup dark chocolate shavings

Preparation

In a large bowl,  beat egg yolks and sugar until thick and pale, about 5 minutes. Add mascarpone cheese and beat until smooth. Add 1 tablespoon of espresso and mix until thoroughly combined.

In a small shallow dish, add remaining espresso and Kahlua. Dip each ladyfinger into espresso for only 5 seconds. Letting the ladyfingers soak too long will cause them to fall apart. Place the soaked ladyfinger on the bottom of a baking dish (I used a 9x7 dish), breaking them in half if necessary in order to fit the bottom.

Spread evenly 1/2 of the mascarpone mixture over the ladyfingers. Sprinkle half of the shaved chocolate on top. Arrange another layer of soaked ladyfingers and top with remaining mascarpone mixture.

Cover tiramisu with plastic wrap and refrigerate for at least 2 hours, up to 8 hours. Before serving, sprinkle with the remaining chocolate shavings.


I had a wonderful time when I went to Italy two years ago, but I actually didn't get to try tiramisu (I was too busy eating gelato!). I hope Megan and Jeff are able to enjoy a slice during their honeymoon there, but if not, they can just re-create this recipe and bring a sweet taste of Italy back home. Congratulations again, Megan and Jeff!

10.19.2012

Guest Post: Pizza Dough Recipe From Italy

From Shannon of Tri to Cook...

When Megan asked for a guest post while she and her husband are off on their honeymoon in Italy, I knew exactly what I wanted to make.  There's a pizza dough recipe from my boyfriend's trip to Italy that I've been meaning to make ever since he told me about it.  I mean, if he liked it enough to ask for the recipe, it's gotta be good, right?


There's just one catch.  It was in Italian.  Luckily I've got some amazing friends who were able to translate it for me (thanks Michelle and Luca!).  The original recipe called for 1kg of flour...  which I'm pretty certain would make 3-4 pizzas, so I scaled it down.  I also kept the toppings simple- just as I had them when I was in Italy, hand crushed tomatoes, buffalo mozzarella and torn basil.  Buon appetito!


Pizza Dough

roughly translated/adopted from Dany House Hostel

yield: 1 pizza (serves 2-3)


250kg Italian-style 00 flour

1/2t sea salt

pinch sugar

6g beer/brewers yeast (I used an English Ale yeast from our local brew shop)

lukewarm water (6-8oz)


Add flour to a bowl and make a well in the middle.  Add salt, sugar and yeast to the well in the flour.  Start adding water to the flour, about 1/2c at first and stir well.  Add water, ~2T at a time, until the dough starts to come together (there shouldn't be any loose flour nor should the dough seem too wet).

Turn the dough onto a lightly floured surface and knead until the dough is homogenous, soft and not sticky.  Transfer to a bowl that has been sprayed with nonstick spray and cover with a towel.  Keep in a warm place for 1-1.5hrs (mine had doubled).

Preheat oven to 350deg.

Transfer dough to a baking sheet greased with olive oil.  Depending on your preference, either press the dough out to fit your pan (a rectangular cookie sheet, resulting in a thin crust), or very lightly until it's an even layer of dough (for a thicker, doughier crust).  The dough is pretty fragile, so work carefully.  Any holes that form can be pinched back together.

Season to your liking and add your favorite toppings.  This time I went with some hand-crushed heirloom tomatoes and sliced buffalo mozzarella.  Bake for 20-25min, until browned and crispy.  I also added some torn basil once the pizza came out of the oven.  Slice and serve!


Congrats Megan and Jeff!!  May you have many years filled with love, happiness and pizza :)

10.17.2012

Guest Post: Pumpkin Risotto With Seared Sea Scallops

From Jen of Beantown Baker...

When Megan said she wanted guests posts to be Italian themed, I was stumped. You see, I don't generally like Italian food. I realize that makes me kind of a weirdo, but I'm ok with that. But then I remembered that risotto is Italian, so I was in the clear. I'm sure Megan is off enjoying some delicious cheese, wine, and gelato with Jeff right about now. Everyone I know who has been to Italy said they ate each of those things every day.


I blame lack of enthusiasm toward Italian food on my lactose-intolerance. While I can eat most aged cheeses like cheddar or parmesan, I can't come anywhere close to fresh mozzarella. And gelato? Forget it.

The other cheese I can eat is goat cheese. It pairs so nicely with sweet squashes in the the fall. I decided to make this meal on a week night, which was probably a mistake. Risotto always takes more time than I think it will. But this dish was definitely worth the wait.


First you cook a pumpkin puree risotto. The risotto gets topped with crumbled goat cheese, fresh thyme, and some candied bacon. And last, but definitely not least, seared sea scallops.

Every time we make sea scallops at home, I am reminded how easy they are and wish that we did it more often. Hopefully I follow through on that wish this time around!


Congrats again to Megan and Jeff! Hope you guys are having a blast in Italy.

Ingredients (Serves 6)

For the Pumpkin Risotto

  • 1 1/4 cups pumpkin puree
  • 2 Tbsp heavy cream
  • 2 Tbsp light brown sugar
  • 3/4 tsp ground cinnamon
  • 1/4 tsp ground nutmeg
  • pinch ground clove
  • 1/4 cup hot vegetable broth
  • 6 Tbsp (3/4 stick) unsalted butter, divided
  • 4 to 5 cups low sodium chicken broth
  • 2 Tbsp extra virgin olive oil
  • 1 medium yellow onion, diced
  • 1 clove garlic, minced
  • 2 cups Arborio rice
  • 2 Tbsp goat cheese
  • 1/4 cup parmesan cheese, grated
  • 1 Tbsp fresh thyme, minced
  • salt and pepper to taste

For the Seared Scallops

  • 2 Tbsp extra virgin olive oil (plus more, if needed)
  • 18 large scallops, cleaned
  • salt and pepper to taste

For the Confetti Candied Bacon

  • 4 ounces bacon, diced very small
  • 2 Tbsp light brown sugar

Instructions

For the Confetti Candied Bacon

  • Heat a heavy bottom skillet, over medium high heat.
  • Add the bacon to the pan and cook until the fat has rendered off and the it has become crispy.
  • Drain all but 2 teaspoons of grease from the pan and return to the stove, over medium heat.
  • Sprinkle sugar over the pancetta and stir until the sugar melts and had coated the bacon.
  • Spread the candied confetti bacon onto a sheet pan lined with parchment and allow to cool and slightly harden.

For the Pumpkin Risotto

  • Stir together the first six ingredients for the risotto into a small pot and bring to a simmer.
  • Simmer for about 5 minutes. Remove mixture from the heat and pour into a blender with the broth, season with salt and pepper and blend.
  • With the motor running, add 1/4 cup of butter into the blender, 1 tablespoon at a time. Blend until smooth, about 3 minutes.
  • Pour the mixture into a bowl and set aside until ready to use.
  • Pour the chicken broth into a medium pot and warm over low heat.
  • Place a large pan over medium heat and melt the remaining butter and olive oil.
  • Add the onion and garlic and sauté for about 3 minutes.
  • Add the rice and sauté for 3 to 5 minute or until each grain of rice is coated in oil and there is a white dot in the center of each grain.
  • Begin adding the warm broth to the rice, one ladle full at a time, stirring frequently.
  • Each time the liquid evaporates, add another ladle of broth and continue to stir.
  • Continue to add liquid and stir until the rice is al dente, 20-25 minutes.
  • Stir in the pumpkin puree until completely combined.
  • Stir in the goat cheese and parmesan until smooth. Fold in the thyme and season with salt and pepper.

For the Seared Scallops

  • Heat the oil in a heavy bottom skillet, over medium-high heat.
  • Season each scallop with salt and pepper.
  • Sear the scallops, in batches, for 3-4 minutes on each side.

To Serve

  • Fill six bowls with risotto. Sprinkle on some crumbled goat cheese and fresh thyme. Top each with three scallops; finish each bowl with a sprinkle of bacon. Serve immediately.

Recipe adapted from Spoon Fork Bacon

10.16.2012

Guest Post: White Fish Piccata

Hi Delicious Dishings readers! I am so so so excited for Megan and Jeff and, since my husband and I went to Italy for our honeymoon as well, I should say that they have exceptionally good taste for picking their travel destinations ;)

By the way, I’m Elina. You may know me from my little old blog, Healthy and Sane. Or maybe you don’t, it’s cool. I no longer write H&S but my life is still centered around food since earlier this year I turned my passion for healthy food into a healthy cooking coaching business. Yup, I’m living the dream since all of my days are spent testing recipes and teaching private custom cooking lessons and hosting custom cooking parties right here in Boston. In Megan’s absence, I thought I’d share one of the most popular recipes with my clients who are afraid of cooking fish at home – white fish piccata.

Are you afraid of cooking fish? It’s actually crazy easy once you know what you’re doing. The thin cuts of fish cook incredibly fast making for a super healthy and speedy weeknight dinner. The thicker cuts are a little trickier but I have a trick – a meat thermometer. The fish is ready when it’s flakey but sometimes it’s hard to tell whether the outside is flakey but the inside is still raw… and you don’t want to keep stabbing the poor fillet every minute to see if it’s ready. So yes, invest in an instant meat thermometer (this is my favorite one, worth every penny!) and cook meats and fish fearlessly! 140* is what you’re looking for – once it’s there, it’s safe to eat. If you keep cooking it, it’s just going to dry out so take it off. Last thing, a flavorful (yet quick!) sauce never hurt anyone.


Ingredients (serves 4):

  • 4 portions of white fish (5-6 ounces per person) – any white fish works beautifully with this recipe
  • 1/4 teaspoon salt
  • 1/4 teaspoon black pepper
  • 3 tablespoons whole wheat flour
  • 2 tablespoons butter
  • ½ cup reduced-sodium chicken broth
  • juice from 1 lemon
  • 3 tablespoons capers
  • 1 tablespoon fresh thyme
  • 8 oz (dry) whole wheat orzo

Directions:

  • Cook orzo according to package instructions.
  • Blot fish with paper towels; sprinkle evenly with salt and pepper.
  • Place flour in a shallow dish (such as 9” cake pan or pie plate); dredge fish in flour, shaking excess flour off.
  • Melt butter in a large nonstick skillet over medium- high heat. Add fish to pan; cook thin fillets for 2-3 minutes or thick fillets for 5-6 minutes. Turn fish over.
  • Reduce heat to medium; add broth, juice, and capers and simmer approximately 4 minutes, basting fish occasionally with sauce.
  • Sprinkle with thyme; cook 1 minute. Remove fish from pan; keep warm on a plate covered with foil.
  • Bring sauce to a boil; cook 2 minutes or until thick.
  • Serve fish over a bed of orzo, drizzled with sauce, aside your favorite vegetables.
  • Enjoy! :)

Make this soon and let me know how it went over on my Satisfied Cravings facebook page or maybe shoot an email to elina at satisfiedcravings dot com. Hope to hear some success stories soon! For more info on me and my biz, check out the Satisfied Cravings website.

Thanks Megan for this space and I hope you are having a crazy fabulous time right this very minute (I have no doubt you are).

10.15.2012

Guest Post: Italian Easter Bread

From Erica of In and Around Town...

At this point, Megan is somewhere in Italy drinking amazing wine and cappuccino and indulging is loads of pasta!  In honor of her Italian trip and her amazing baking, I wanted to share a post on Italian Easter Bread (even though we are nowhere near Easter!).  When I traveled through Italy in 2002, it was Easter time and I ate delicious Easter Bread with almost every meal.  I remember it fondly and find myself craving it from time to time.

Easter Bread
Family Cook Book
Growing up, my best friend was Italian and I was jealous -- I wanted to be Italian since they have the best food!  I am Swedish, Irish, Welsh and a bunch of other things, and sadly have no Italian in me.  Luckily, Nick is half Italian.  His grandfather tells stories of growing up in the North End in Baker's Alley and helping his father out with his push cart in the Haymarket area.  Over time, all of his relatives have made some great, traditional dishes.  Fortunately, a few years back Nick's family had the idea to collect and organize his Great Grandmother's recipes into a family cookbook.  One of the dishes they memorialized is Easter Bread, so here is my first attempt at the family recipe!

The Necessities:
  • 2 1/2 pounds flour
  • 2 packages instant active yeast
  • 1/2 pound soft butter
  • 1 cup warm milk
  • 6 eggs
  • 2 cups plus 2 tablespoons sugar
  • 2 tablespoons vanilla
  • 2 teaspoons salt
The Ingredients
I had to break out the scale to measure out the 2 1/2 pounds of flour - much easier than trying to somehow convert the amount to cups!  Then I went ahead and added the rest of the dry ingredients to a very large bowl.

Flour
Dry Ingredients
 In a smaller bowl I combined the wet ingredients.

Wet Ingredients
Ages ago (as in second grade maybe), someone recommended I create a well in the dry ingredients to pour the wet ingredients into, which I did here.  I added about half of them and stirred them together before adding the second half.

Wet Ingredients in the Well
Using my hands and one of my favorite kitchen tools - the pastry blender - I combined the ingredients until the dough was formed.

Formed Dough
Once the dough formed, I covered it with a dish towel and let it sit and rise overnight.  This recipe makes enough dough for two loaf pans, so in the morning I split it into two equal parts, placed them in loaf pans and allowed them to sit and rise a bit more.  After a short resting time, I placed the pans in a 350 degree oven for 30 minutes.  Just before the bread was done (about 25-28 minutes into the cooking), I brushed the bread with egg whites and sprinkled it with colored beads.

Next-Day Steps
I actually found that this made pretty heft loaves, and they actually needed about 10 minutes more than the suggested 30 minute baking time.  I think if I had divided the dough into three different pans rather than the two, I might have been more on target (maybe they had bigger pans then?!)

Fresh out of the oven
Ready to cut
This bread was sweet and delicious.  It's definitely a bit dense but does not sit in your stomach like some can.  The Easter Bread really could be breakfast or dessert.  I loved the sentiment behind this family recipe and can't wait to make it each Easter and continue to pass the tradition down to future generations.

10.13.2012

Guest Post: Breakfast Pizza With Artichokes

From Olga of Mango & Tomato...

I've known Megan for over 2 years thanks to our passion for food. We met virtually because of our blogs but luckily got to meet in person and share an amazing meal at Toro during my trip to Boston. When Megan asked me to do a guest post while she's honeymooning in Italy, she suggested I keep to an Italian theme and possibly include a recipe with artichokes.

What's more Italian than pizza? Fortunately, I have a recipe for breakfast pizza that has artichokes on it! I hope you make this for your loved ones.

Here's what I did:

I preheated the oven to 525.

I then took a half of Boboli original Italian pizza crust and cut it into two pieces.

Each piece got a bit of roasted garlic tomato sauce, Monterey cheese, fresh arugula, and a border of artichoke hearts.

I then plopped an egg inside of the artichoke boarder, seasoned it with salt and pepper, added more cheese, and the pizza was ready to be baked.


I baked this breakfast pizza on top of parchment paper in a 525 degree oven for 15 minutes. I kept on waiting for the white of the egg to set.

Look what happened!!! The parchment turned completely black (luckily it did not catch on fire), the egg white finally set, but alas the egg yolk was no longer runny.


What did I do wrong? Well, I obviously had my oven set to too high of the temperature. I think something around 400 would have worked much, much better.


Although this wasn't the result I was hoping for (the egg yolk was cooked through), the rest of the pizza (and the idea itself) was rather successful. I think I shall try this technique again.

Congratulations to Megan and Jeff: wishing you many happy years together.

10.12.2012

Guest Post: Italian Wedding Bubbly


My name is Lin, and I write for the Boston-based food and drink website, BeantownEats. I was very honored when Megan asked me if I'd be interested in doing a guest post while she's busy over the next few weeks doing some errands getting married! Judging by the amount of cooking and baking talent within the list of others writing, I decided to stick to something we do a lot of on our website: a drink recipe! When Megan said the theme was Italian, I immediately thought Aperol.

Aperol was introduced to Italy back in 1919 at the International Fair of Padua. Its bittersweet flavor is versatile: light enough on its own, perhaps with a simple twist of orange, combined with seltzer for a refreshing summer Aperol Spritz, or as a bitter agent in a cocktail. Its low alcohol content was used to encourage women in the 1930s to consume Aperol, and a trend I'd like to see make a comeback. [source]

Knowing Megan's affinity for prosecco, another Italian delight, I thought it would be fun to create a simple prosecco-based cocktail with Aperol. Thinking about a third ingredient to balance some of the Aperol's bitterness, I thought what better than another of Megan's favorites, St-Germain.


Megan's Wedding Bliss

Ingredients

  • 1/2 oz Aperol
  • 1/2 oz St-Germain
  • Prosecco

Pour Aperol and St-Germain into a champagne flute. Top with Prosecco. (Garnish with a lemon twist if you want to be fancy!) Doesn't get much easier than that!

Campari is another Italian apertif, and just was delicious and versatile as Aperol. The mouthfeel is a little but thicker, and I find that Campari lends itself more as a digestif. Two of my go-to cocktails involve Campari. The Negroni is an Italian classic gin-based cocktail served up (my preference) or on the rocks (Jon's preference). Although you might find variation in this recipe, the standard (and easiest to remember) is equal parts. My second go-to if I'm in the mood from brown liquor is the 1794. I really like how the rye is mellowed out by the Campari and vermouth, and I really enjoy a hint of vanilla with this drink, especially with Ryan and Wood rye.

Negroni

Ingredients

  • 1 oz gin (a dry fin like Beefeater works best, avoid floral American gins like Deaths Door for this drink)
  • 1 oz Campari
  • 1 oz sweet vermouth

Chill glass by filling with ice cubes and water. Use a cocktail glass if serving up, or an old-fashion glass if on the rocks.  In a mixing glass, combine all ingredients over ice and stir. Garnish with an orange peel.

1794

Ingredients

  • 2 oz Rye Whiskey
  • 1 oz Campari
  • 1 oz Sweet Vermouth

Combine all the ingredients into a shaker filled with iced and stir with a bar spoon. Strain into a chilled Manhattan glass or a rocks glass. Garnish with a lemon twist or an orange peel.

There you have it! A tribute glass of bubbly to toast Megan on her wedding day, and a few of my personal favorites that are easy to make at home and require few ingredients (they will also impress your guests). To Megan, I raise my glass and toast to long life of love and happiness, Cheers!

10.11.2012

Guest Post: 5 Tips For A Stress-Free Wedding

Hello Delicious Dishings readers! My name is Michelle Collins, and I blog over at The Economical Eater. I was very excited when Megan asked if I’d be interested in writing a guest post pertaining to weddings -- I just got engaged on July 7th! Although I’ve only had the bling on my finger for a few months, however, my fiancé, Z, and I refuse to let wedding-planning stress control our relationship over the next 12+ months. Here are my tips on how we’re planning to make this next year stress-free.


It all started a few weeks after we got engaged. Once the champagne bottles stopped popping and the phone stopped ringing, all of the questions began rolling in: So, where are you getting married? When? How many people do you think you’ll invite? Our loved ones were just excited for us, but the questions were only stressing us out. What the heck do we know about planning a wedding?

One day, Z and I caught ourselves bickering over some wedding detail (that I don’t even remember). Our little argument was not even a full month after we got engaged. Halfway through the quarrel, we looked at each other . . . and admitted this was crazy. Being engaged and planning our wedding together is supposed to be one of the happiest times in our lives. So why the heck were we fighting?

Right then and there, we vowed to not let the wedding stress get to us. So far, here’s what we’re doing to keep that vow in check:
  1. Listen to people’s advice, but don’t always take it. It’s OK to say “Thanks for the advice, Mom” and move on. Parents, soon-to-be in-laws and basically everyone you see between now and your wedding day will have advice for you. Listen politely, but don’t forget about your own wants and needs. 
  2. The stress is in the details. Personally, Z and I care mostly about the food and music at our wedding. So, we have chosen to spend most of our planning time on those two details. The flowers and favors? We know our loved ones would be happy to pitch in when it’s time to finalize those details. Focus on what matters to you most, and let others help with what remains.
  3. Keep it simple. Who’s ever going to notice if there are satin bows on the chairs? No one. I promise you. The fewer details you have to think about or pay for the better. 
  4. Get a good wedding planner. I should clarify: We don’t plan to get one of these, but just about every venue has a wedding coordinator or catering manager, at least. Make sure the place you want to get married has a good one -- we’ve already encountered a few that we know will only make our wedding planning that much more stressful. Their job is to make your wedding planning easier, so scope out a good one. 
  5. Have fun. Seems obvious, doesn’t it? But I know many, many brides-to-be who didn’t have a minute of fun until their weddings were half over. Afterall, your wedding day is a celebration of you and the love of your life -- don’t let the stress ruin this significant time in both of your lives. 
Of course, being 100 percent stress-free -- in general -- is next to impossible, but keeping these five tips in mind while you plan your wedding can greatly lessen the stress . . . for everyone involved.
Congratulations to all the soon-to-be brides reading this post, and here’s to a [mostly] stress-free wedding!

10.09.2012

Guest Post: A Recap Of Our Wedding

From Meghan of Travel, Wine, and Dine...

Congratulations, Megan and Jeff! 

How do you recap a wedding in a single blog post? It’s virtually impossible to wrap up all of the wonderful moments of Megan and Jeff’s October 6, 2012 wedding in just a few photos and words, but I am honored to have the opportunity to try.


The setting: Megan and Jeff’s autumn wedding was held at The Estate at Moraine Farm in Beverly, MA, which, in addition to being a gorgeous venue for events, is a working farm with a CSA, and a property with a lake and hiking trails, as early bird wedding guests Daisy and I discovered. The day itself was a little cloudy which only made the greens and early-fall reds, yellows, and oranges pop. 

The incredible outdoor space lent itself to every aspect of the wedding from the ceremony, held in front of a little red tea house, to the lake-front cocktail hour, to the tented reception, complete with a path made of twinkling candles in mason jars, lighting the way later in the evening. 


The details: I could write an entire post on the tiny details that made Megan and Jeff’s wedding so spectacular. I knew, from behind the scenes, all of the planning that they put into this magical day, and it was fun to see it all come together.

A fall-themed, farm-to-table menu with food from local sources, including from Moraine Farm, was delicious from start to finish. Tiny cups of pumpkin soup, oysters garnished with tart apples, an unforgettable salad with pears and goat cheese, and entrees that reflected the season (including out-of-this world spaghetti squash and some of the most tender pork I have ever tried) made for a filling and memorable meal for all.

And, of course, because we all know Megan loves dessert, there was a sweet display of mini desserts like s’mores tartlets, cupcakes, and donuts, the final (and to some, most important) course not to be outdone by the rest of the beautiful food.


The love: Setting, decorations, food, and music all made for a fun night for wedding guests, but of course, the most special part of the day was the love. From the moment we first saw Megan and Jeff until we said goodbye, they did not stop smiling. Megan even noted during the reception that her face hurt from smiling, which made me smile even more. 

Even when a little sprinkle came down during their ceremony, their faces were lit up with joy and love, and we were all in the moment, fully witnessing the commitment they made to one another. 


Everyone had a blast celebrating the love of these two fantastic people, dancing until the last possible minute, our faces and feet weary in the best way possible. 

They met as neighbors, thanks to a chocolate lab puppy, and they left Moraine Farm as husband and wife, surrounded by love and support and ready for a much-deserved Italian getaway. I am thrilled for them (very jealous!) and looking forward to many years of friendship, food, and fun with them. 

Please join me in congratulating the happy newlyweds!

12.10.2011

Guest Post On Confessions Of A Chocoholic

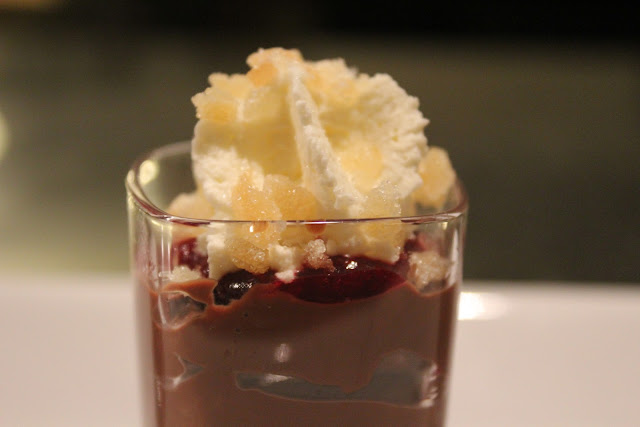
Mini cranberry-ginger chocolate pudding parfaits

Want the recipe for these mini cranberry-ginger chocolate pudding parfaits? Head over to Confessions of a Chocoholic where I'm guest posting today!

11.12.2010

Guest Post: Taco Dinner With All The Fixings

I'm away on a cruise right now, and I've asked some of my favorite local bloggers to write guest posts for me. Below, Emily from A Cambridge Story shares a recipe for tacos with plantains. Emily and I finally got the chance to meet at the I Can't Believe It's Not Butter event last month. It was great to get to know her in person after discovering so many random coincidences we have through reading her blog -- we live down the street from each other, we both have labs, we both went to boarding school for high school, we're the same age, and so on. I hope you enjoy her post! And please check out Emily's blog too!


My husband, Christopher, and I love making Mexican-inspired foods at home. Recently, we made one of our best tacos dinners to date. Maybe it was the 85-15 beef that I begrudgingly bought (I usually prefer leaner meat) or the cinnamon and cayenne carrots that we prepared. Whatever the reason, this meal was seriously a winner!


Taco Dinner with all the fixings

1 package of ground beef (or meat substitute)
1 onion diced
1 packet of taco seasoning (or make your own with chili, garlic, onion powders, cumin, red pepper flakes and paprika!)
1 plantain sliced into 1/4" rounds
1 package of Spanish rice (or, again, make your own with tomatoes and chili powder!)
3 carrots diced
1 tablespoon butter
1 teaspoon of ground cinnamon
1 teaspoon cayenne pepper
1 avocado diced
3 tomatoes diced
3 oz of sharp cheddar grated
4 taco shells

This recipe is pretty fool proof (always a plus!) First, cook rice. We use a rice cooker but the stovetop works just fine as well.


Brown ground beef and onions in a pan. Incorporate taco seasoning.


Salt and pepper the plantains and cook in a pan with some cooking spray until slightly brown. Flip and brown other side.


Blanche carrots in pot of hot water until slightly tender. Then, transfer to a pot with butter, cinnamon and cayenne pepper until carrots are cooked through.


Prepare toppings...


... and serve!


Not only was this meal simple but it incorporated a variety of textures and flavors. My favorite part was definitely the carrots - the cinnamon and cayenne paired perfectly, reminding me a bit of Mexican hot chocolate.


What do you serve with tacos? Do you focus on flavoring and enjoying the meat - or do you like to add all kinds of toppings?

11.11.2010

Guest Post: Cappuccino Toffee Brownie Cookies

I'm away on a cruise right now, and I've asked some of my favorite local bloggers to write guest posts for me. Today, Jen from Beantown Baker is sharing a recipe for some delicious brownie-like cookies. Jen bakes just as much, if not more than, I do. I'm always inspired by her recipes. We met way back at the Eggland's Best event, ran into each other at Myers + Chang, went on an incredible baking trip together, and most recently attended the Pie in the Sky kickoff party together. I hope you enjoy this recipe, and please check out Jen's blog when you have a chance!


Hi Delicious Dishings readers! My name is Jen from Beantown Baker. I am an engineer by day and a baker by night. I live with my Hubby and two cats in a tiny Boston condo. Hubby serves as my official taste tester for all the treats that I make in the kitchen. While I mostly blog about delicious baked goods, you'll also find savory meals, occasional travel or Boston posts, and even giveaways! The number one all time favorite thing I've made since I started blogging would have to be these Oreo Cupcakes. They're awesome. Enough about me, let's get on to these cookies.


When we were on our Boston blogger field trip to King Arthur Flour, I grabbed some cappuccino chips from their store. At the time I had no idea what I would use them for but they were unique enough that I had to have them. Then the other day I was in the mood for a chocolate cookie. I hit up my Google Reader to see what I had starred in there. That's when these cookies popped up. And I figured I'd use my cappuccino chips because they would pair well with toffee and chocolate.


Everyone really liked these cookies. In fact they were more like brownies. That's what Hubby and I ended up calling them. Whatever you call them, they're awesome. If you don't have cappuccino chips, use whatever you have on hand and I promise you'll love them!

Cappuccino Toffee Brownie Cookies - adapted from Megan's Cookin', originally from The King Arthur Flour Cookie Companion - makes 3 dozen
Printable Recipe

8 oz. bittersweet chocolate, coarsely chopped
2 Tbsp unsalted butter
3/4 cup light brown sugar
2 eggs
2 tsp vanilla extract
1/2 tsp baking powder
1/8 tsp salt
1/4 cup flour
1 cup toffee bits
1 cup cappuccino chips (or semi-sweet chips)

Preheat oven to 350 degrees. Lightly grease (or line with parchment paper) two baking sheets.

In the microwave or in a saucepan over very low heat melt the chocolate and butter together, stirring until smooth. Set the mixture aside to cool to lukewarm.

In a medium-sized bowl, beat together the brown sugar, eggs, vanilla, baking powder, and salt. Beat in the melted chocolate, then stir in the flour, toffee bits, and chocolate chips.

Drop the dough by the tablespoonful onto the prepared baking sheets. Bake the cookies for about 12 minutes or until the tops are cracked and dry, but the cookies are still soft to the touch. Don’t overbake these; they’ll become firm as they cool.

Remove the cookies from the oven and let them cool on the baking sheet for 10 minutes, then transfer them to a rack to cool completely.