3.29.2010

Bertolli-Inspired Chicken Parm-Arrabbiata With Spinach Linguine


Through the Foodbuzz Tastemaker program -- which gives me access to free samples of products from time to time -- I recently received two jars of Bertolli pasta sauce.


Now, don't get me wrong, I love to make my own sauce, but I don't always have time. I usually keep a couple of jars of Newman's Own Roasted Garlic Sauce in the pantry for last-minute dinners, but because I had the Bertolli on hand, I used that where I would normally use my standby jarred sauce... in my standby quick dinner: chicken parmesan. I'm planning to be a little more creative with the Four Cheese Rosa sauce, but the Arrabbiata sauce provided just the kick my chicken parm needed. It took a very familiar meal and added a spicy twist to it. It also added the flavors of red peppers, which I love and don't often find in a pasta sauce.


Chicken parm is my standby meal because I usually have all the ingredients for it (chicken, flour, eggs, bread crumbs, salt and pepper, parmesan, mozzarella, sauce, pasta, and olive oil), and it's very simple (bread, saute, top, and eat).


I start by thawing out boneless, skinless chicken breasts. Sometimes, like on this particular night, they don't thaw fully by dinnertime. When that happens I set them (still in the package) in a bowl of cold water. This is quicker than letting them thaw in the fridge, but when I'm even more impatient, I'll cut the chicken into smaller pieces and bread it while it's still slightly frozen. I even pound out the chicken pieces to make them a little thinner and decrease their thawing time even more. By the time I'm done breading and ready to start cooking it, the chicken is usually completely thawed.

And while I bread the chicken, I always have my sauce heating in a small pan and my pasta water boiling. It's important to think about your timing. You don't want your pasta done way before the chicken so it sits there getting cold, clammy, and gummy. You also don't want to be waiting for water to boil while the rest of your meal gets cold. I usually start the water boiling right away and then drop the pasta in when the rest of my meal is just minutes away from being ready.

With sauce warming, water on its way to a boil, and breaded chicken at the ready, you can consider your cooking options. I like sauteeing the in olive oil to ensure that the bread crumbs get brown and toasty.


I also like to use an ovenproof pan so that when I finish cooking the chicken, I can just top it with the sauce and the cheese and pop it right in the oven under the broiler, just long enough for the cheese to melt.

I spoon a little sauce on each piece of chicken to get all the flavor without making the breading soggy or completely drowning the chicken.


A lot of times I mix parmesan right into my bread crumbs before coating the chicken, but I forgot this time, so I sprinkled a little on top of the sauce.


The last and most important part is to toss a generous amount of mozzarella on top of each chicken piece. 


Put the whole pan under the broiler, and let your cheese melt. Serve with pasta and extra sauce.


Do you ever use jarred pasta sauce? Come on, you can admit it. What's your favorite kind? I'll definitely use this Bertolli one again because I like the little kick it has. Don't worry. It's pretty mild -- I really don't like anything with too much of a kick -- but it's enough to make dinner more interesting. And who doesn't want that? I kind of want to try some of the Vineyard Collection sauces from Bertolli too, maybe because they're made with wine...

3.25.2010

Hello, Quinoa! Pronounced KEEN-wah


Because quinoa is fairly new to the American diet, I couldn't find any reference to it in my printed dictionary (which was published in 1976, making it older than I am -- maybe I should stop using it), in the The Oxford Encyclopedia of Food and Drink in America, in Starting with Ingredients, or in The Flavor Bible, so I really had to dig and defer to some more modern sources to give you some details about this mighty seed.

"Quinoa is definitely a superfood: A grain-like seed, it's a 'complete' protein containing eight essential amino acids...." - Food & Wine, March 2010

"A 'pseudo cereal' native to the Andes, quinoa is mild and slightly nutty, with a beautiful, pillowy texture that's a little like couscous." - Cookthink

"Tiny and bead-shaped, the ivory-colored quinoa cooks like rice (taking half the time of regular rice) and expands to four times its original volume." - Epicurious
 
What you should know: Quinoa packs a huge punch of protein, cooks up quickly and easily, and can be used in place of rice or couscous in most recipes. I like it much better than both rice and couscous, however, it does have to do battle with Israeli couscous to earn the top spot with me.
 
I've eaten quinoa out at restaurants before, but until I tried this recipe, I had never cooked it at home. This is one of those times I want to kick myself for not being on the ball. I have no excuses for why I've waited so long to make couscous at home. It's delicious, easy, and versatile. I loved it in this recipe, but I imagine many of you have more ways to use it and lots of great ideas to send my way, so make sure you leave some comments directing me to your favorite quinoa recipes. And if you have some time, give this one a try too. It's so light and fresh!
 
 
It's kind of funny and probably backward from what many of you do, but I am very experimental with my lunches (because they're just for me) and more basic with dinners (because I cook for my boyfriend too). While I love things like Israeli couscous, quinoa, and barley (great recipe coming soon), he's much happier with braised short ribs and smashed potatoes, chicken piccata, or spaghetti and meatballs. I figure I get the best of both worlds: new and fabulous things for lunch and delicious, familiar foods for dinner.
 
Because I was just making this for myself, I halved the recipe. The version below will just make two servings. I had half as a filling lunch and then had the other half for dinner with a piece of breaded and fried fish. Also, the original recipe calls for golden raisins, and I decided to leave them out (one less ingredient to purchase), but as I was throwing this together, I remembered I had a tub of currants in the pantry, so I substituted those for the golden raisins. I left out the mint because I just wasn't sure that flavor combination would work for me, and I left out the parsley as well because I didn't think it would add anything significant.
 
 
While I've told you in the past that I don't really count calories, I do pay some attention to how much fiber and protein I'm getting, and this recipe provides 9 grams of each per serving, which is half a squash! I'm definitely happy with that.
 
 
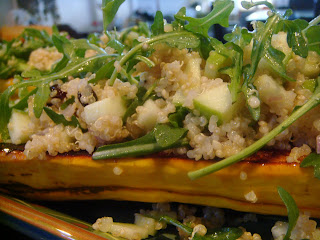
Roasted Delicata Squash With Quinoa Salad (adapted from Food & Wine)
(Print this recipe)
 
Ingredients
 
1 Delicata squash
1 tablespoon extra-virgin olive oil
Salt and freshly ground pepper
1/2 cup quinoa
1 tablespoon currants
1/2 tablespoon sherry vinegar
1/2 teaspoon honey
1 small shallot, minced
1 small garlic clove, minced
1 Granny Smith apple, finely diced
1 cup arugula


Directions

Preheat the oven to 350°. Halve and seed squash. Brush the cut sides of the squash with 1 teaspoon of the olive oil and season the cavities with salt and pepper.


Place the squash cut side down on a baking sheet and roast for about 45 minutes, until tender.


Meanwhile, in a saucepan, bring 2 cups of lightly salted water to a boil. Add the quinoa, cover and simmer for 10 minutes. Stir in the currants, and simmer, covered, until the water is absorbed, about 5 minutes.


Transfer the quinoa to a large bowl and let cool.

In a small bowl, whisk the vinegar, honey, shallot, and garlic with the remaining olive oil and season with salt and pepper. Add the dressing to the quinoa along with the apple, and toss well.


Add the arugula, and toss gently.


Set the squash halves on plates.


Fill with the salad, and serve.


On a side note, I've made a couple of recipes lately with sherry vinegar (like this lentil soup), and I'm starting to think I'm developing a small obsession with it. For some reason, it adds just the right flavor and is great for perking up dishes like this. Along with recommending that you try quinoa, I'm also promoting sherry vinegar. Get some. You'll love it.

Okay, so quinoa -- are you in or out? What are your favorite ways to use it?

3.23.2010

Put Down That Skillet, And Step Away From The Stove

I know it may seem like I'm always stuffing myself with one mini cupcake after another, followed by brownie sundaes and mac and cheese, but I actually try to eat healthfully sometimes too. Especially with the warm weather approaching I'm drawn to lighter meals. I tend to eat with the seasons -- I like warm, comforting dishes in the winter, but you're likely to find me eating fresh fruits and veggies when the temperatures start rising.

A perfectly timed review copy of Raw Food: A Complete Guide for Every Meal of the Day arrived right in the midst of our seemingly never-ending rains and inspired me to try some dishes to break free from the dreariness and prepare for the sunnier days ahead (which we got, but now we're back to rain).

Raw Food: A Complete Guide for Every Meal of the Day

I was a good sport about this book. I enthusiastically responded when I was asked if I wanted a free copy, but I wasn't exactly sure what I would find in its pages. Would there be strange things that I could never imagine eating? Weird green blended beverages? The thought of raw food immediately conjures up that scene in Baby Mama when Tina Fey's character Kate is on a date with Rob (Greg Kinnear) and they're eating a ball of raw yeast! They both look at each other and admit to being die-hard meat lovers and head off to get cheese steaks. That's kind of me.

I know that I'll never be able to convert to a raw food lifestyle -- although I've heard there are significant health benefits -- but it's something I've been curious about. I get fruit and veggie cravings and go on healthy eating sprees, and my hope was that this book would provide with me with the inspiration to make more creative fruit and veggie (and grain) dishes, as an alternative to the salad or sandwich for lunch and the usual meat and potatoes for dinner. And I thought maybe it would keep me from turning on the stove every now and again. And that's just what it did.

Here's what you can find in this book:
  • How to soak and sprout vegetables and nuts to increase their nutritional value
  • What types of kitchen tools are best for preparing raw food
  • Which foods to have on hand for use in raw recipes (I really found this section helpful.)
  • How to detox with raw foods
  • What snacks are the best energy boosters
  • How to make delicious desserts with only natural ingredients
You'll probably be shocked to learn that the first thing I tried was not a dessert recipe but a breakfast recipe for sweet breakfast porridge. One of the selling points of this book are the huge, vibrant pictures. I did my first pass-through, taking in all of the mouthwatering photos, and then I looked through again, reading everything more in depth. Something about the picture and the simplicity of this recipe grabbed me, and I knew I needed to try it out for breakfast one day. It's described as "a filling and satisfying dish that won't leave a heavy feeling in your body." While I was skeptical at first at how filling it could possibly be (it's just fruit), I was soon convinced because I couldn't even finish the whole bowl!


Sweet Breakfast Porridge (adapted from Raw Food)

Ingredients

1 pear, chopped into large pieces
1 banana, peeled and chopped into large pieces
1 apple, chopped into large pieces
1 teaspoon cinnamon
1 tablespoon flaxseed, ground


Preparation

In a food processor or blender (recipe calls for blender but my food processor is more accessible so I used that), blend the pear pieces.


Add the banana pieces, and blend.


Add the apple pieces, and blend. (The recipe explains that blending in this order prevents the mixture from getting very sticky.)


Transfer mixture to a bowl and top with the cinnamon and flax seed.


This was surprisingly hearty though not heavy. I think the pear and apple skins and the flaxseed added the slightest bit of texture that kept this from being a big bowl of mushy fruit. I could definitely see myself making this again.


The next recipe I tried was also a breakfast recipe -- and also a very simple recipe. It's a sweet, gingery berry mixture. I learned my lesson when I made the sweet porridge above, so this time I only made a half recipe. The ingredients listed below are halved from the original recipe.


Berry Breakfast (adapted from Raw Food)

Ingredients

1/4 cup blueberries
1/4 cup raspberries
1/2 banana, peeled and sliced
1/2-inch piece of ginger
1 tablespoon hazelnuts, coarsely chopped (really wish they were toasted!)
1 teaspoon cinnamon
Honey, to taste

Preparation

Place the fruit in a bowl, and grate the ginger over it. Garnish with hazelnuts and sprinkle with cinnamon. Add honey if desired.

While the berry mixture had great flavor and was really good on its own, I couldn't help thinking about what a great addition to a parfait it would be.


And so I deviated from the raw food realm and broke out some granola and yogurt and made myself a parfait. I couldn't even last two mornings as a raw foodie!


So you won't soon find me sprouting beans and quinoa or forgoing cooked foods, but I will start adding flaxseed to my breakfast, and I will try some more of these raw food recipes. At least I've added a little more fruit to my diet so far. And I'm hoping to make my way through some of the lunch and dinner recipes in the book next. It's a small start in a healthy direction, right?

There are a few drawbacks to this book, which I must mention. The author is Swedish and the book was translated to English, so parts of it read like a translation -- they're rather choppy. The whole glossary section that gives all sorts of helpful know-how about the different ingredients used in raw food is not written well enough for my standards. Complete sentences and fragments intermingle. While other people may not notice this or be bothered by it, my editor mentality prevents me from overlooking it.

And my recipe tester mentality doesn't like that the ingredients aren't listed in the order in which they are used in the first recipe I made. And in the second recipe I made, the ginger was listed as grated in the ingredients, but then the recipe directions say to grate the ginger. These things aren't a huge deal (worse would be if the recipes didn't work), but if attention had been paid to these small details, the book would have been improved and would be of a higher quality.

What are your thoughts on raw food? Have you tried any raw food recipes? Do you think I should be brave and start sprouting lentils?

3.17.2010

St. Patrick's Day, 2010


I hope you all had a wonderful St. Patrick's Day.


I took today off from work, and I'm so glad I did. Working six super-long days days a week starts to get to you after a while. A break here and there is healthy and necessary.

I don't know about where you live, but here in Boston, we've been getting rain for about a week straight, and today it was finally gorgeous out! Even though I'm a bit sick right now, I made sure to get a little time in the sun. My boyfriend and I took the puppy for a walk this afternoon, stopped at Starbucks for a beverage -- I tried the new and delicious dark cherry mocha -- and basked in the sun for a bit.

Then we went to When Pigs Fly in Davis Square and picked up some rye bread and some potato bread to have with our dinner (and to make sandwiches with later on with our leftover corned beef). Today was actually the first time I visited the Davis Square location. I've been to the stores in Kittery and Freeport, Maine, much more often on annual shopping trips to the outlets with my mom. It was always a special treat to sample the different breads and select a few to bring home. I think I kept myself from going to the Davis one for so long because I wanted the bread to still feel like a treat, rather than an everyday thing.

I toyed with making shepherd's pie or Irish beef hand pies but ultimately went with corned beef and cabbage because my cravings for corned beef hash (made from the leftovers) got the better of me and because St. Patrick's Day wouldn't feel quite the same without it. We've all heard by now that corned beef and cabbage is not a traditional Irish dish, but because I was raised eating corned beef and cabbage every March 17th, it is a tradition to me. In years past, I've made corned beef with subpar results, and this year I was determined to get it right (but still overcooked the corned beef slightly).

I bought a nice-looking piece of corned beef brisket at Whole Foods, along with a head of cabbage, a bag of potatoes, some baby carrots, and a large Vidalia onion. All of these things are necessary for a complete St. Patrick's Day meal.


About 4 hours (just to be safe) before I wanted dinner to be on the table, I put the corned beef in a large pot and covered it with two inches of water, as the package instructed. I brought it up to a boil and then left it to simmer for an hour and a half. I used the downtime to finish making dessert, prep my veggies, and relax a little.


After the hour and a half was up, I added my potatoes (cut in chunks) and baby carrots to the pot and let everything simmer together for about another half hour, until the potatoes were tender. A little while after I dropped the potatoes and carrots in with the corned beef, I sauteed my onions and cabbage in another pan. Somehow, everything was ready at the same time.


And we sat down to this amazing meal...


For dessert, I made a chocolate stout cake with the batter I had leftover after making mini chocolate stout cupcakes.


I put a pound of batter into each of three greased and floured cake pans and baked them in a 350-degree oven for about 20 minutes. Once the layers were cool, I spread ganache between them and frosted the entire cake with a thin layer of ganache to try to give myself a smooth surface to work with. I actually froze the cake to keep it tasting fresh and then took it out and put it in the fridge to thaw last night.

Today, I poured a thick layer of ganache over the whole cake, sprinkled some shamrocks on top, and piped more ganache around the bottom. I'm a tough critic, so I wish the cake had been a little more even, but I'm happy with it. And I've come a long way since I started working at the bakery. I definitely understand concepts like piping and glazing much more. Once I learn how to assemble cakes there, I'm sure I'll get much better at doing that at home too.

Oh, and we also had these pistachio cupcakes, which I made for the one who doesn't love chocolate the way I do.


Again, Happy St. Patrick's Day to you and yours! Hope you enjoyed a fabulous feast too!

3.15.2010

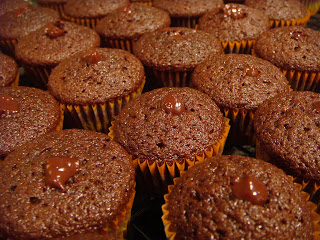
Chocolate Stout Mini Cupcakes


By now you probably know I am pretty big on holidays, especially the food aspects of them. St. Patrick's Day presents an opportunity to make traditional Irish foods or at least things that we now associate with the holiday as traditional foods. I have made black and tan brownies with Guinness for the past three years, and while I absolutely love and enjoy them, I wanted to do something different this year. After paging through The Irish Spirit, where the black and tan brownie recipe is from, and searching numerous food blogs and recipe databases, I decided to use a chocolate stout cake recipe from the King Arthur Flour Web site.


I planned to bring a dessert to my friend's St. Patrick's Day party and figured cupcakes might travel a little better than a cake, so I altered the recipe slightly to make mini cupcakes instead. The recipe yielded so much batter that after I made 48 mini cupcakes, I still made a three-layer cake! (More on that soon.)


I was planning to get some Guinness, but then I remembered I had received a bottle of Choklat Stout at a holiday party and thought that would be a perfect substitute. You can taste undertones of the stout in the moist, chocolate cake, but it's not overpowering.


Unlike most cakes that dry out as time passes, the cupcakes actually became more moist and fudgy the next day. That could partially be because for good measure, I piped ganache inside each of the mini cupcakes before piping more on top to decorate them.


Everyone at the party really enjoyed the cute and festive cupcakes. I recommend these if you're having or attending a St. Patrick's Day party. They're sure to be a crowd-pleaser!


Chocolate Stout Mini Cupcakes (adapted from King Arthur Flour)
(yields 48 cupcakes plus a three-pound three-layer cake with batter to spare)

Ingredients

Cake

2 cups stout or dark beer, such as Guinness
2 cups (4 sticks) unsalted butter
1 1/2 cups Dutch-process cocoa
4 cups King Arthur Unbleached All-Purpose Flour
4 cups sugar
1 tablespoon baking powder
1 1/2 teaspoons salt
4 large eggs
3/4 cup sour cream

Frosting (I ended up making two batches)

1 pound bittersweet or semisweet chocolate, chopped
2 cups heavy cream
1 teaspoon vanilla extract

Preparation


Place the stout and butter in a large, heavy saucepan, and heat until the butter melts.


Remove the pan from the heat, and add the cocoa powder. Whisk until the mixture is smooth. Set aside to cool to room temperature.


Meanwhile, preheat the oven to 350°F. Spray or line two mini cupcake pans.

Whisk together the flour, sugar, baking powder, and salt in a large bowl; set aside.


In bowl of electric mixer fitted with paddle, beat together the eggs and sour cream.


Add the stout-cocoa mixture, mixing to combine.


Add the flour mixture and mix together at low speed. Scrape the sides and bottom of the bowl, and mix again for 1 minute.

Fill each mini cupcake cup with about 1 heaping tablespoon of batter.

Bake one pan at a time for 12 to 14 minutes, or until a cake tester or toothpick inserted into center of a cupcake comes out clean. Remove the cupcakes from the oven and cool on a rack in the pan for 10 minutes. Then remove the cupcakes from the pans and let them cool completely on the rack. (You can continue to use the remaining batter to make more cupcakes, or you can make a cake. See the original recipe on the KAF site for directions on making a cake. I'll show you what I did with the remaining batter in an upcoming post.)


For the filling and frosting: Place the chopped chocolate in a large heatproof bowl. Bring the cream to a simmer in a heavy, medium-sized saucepan. Pour the hot cream over the chocolate, and whisk until the mixture is completely smooth. Stir in the vanilla. Refrigerate until the ganache thickens slightly, about 30 minutes.


Fill a piping bag fitted with a small round tip with some of the ganache. Then return the remaining ganache to the refrigerator to chill until it is spreadable, about 2 hours. Stir it occasionally to check the consistency. (You can always microwave it if it gets too solid.)

Gently insert the piping tip into the center of each cupcake and squeeze until you feel pressure.


Don't worry about leaving holes in the tops of the cupcakes; you'll cover these when you frost the cupcakes.


At this point I wrapped the cupcakes and put them in the fridge overnight because I wasn't bringing them to the party until the next day. (You can do all of this the same day though.) I took them out the following day, microwaved the ganache for a few seconds, and filled a piping bag fitted with a small star tip with the thickened ganache.


I piped in a swirl pattern on some cupcakes and just did a small squeeze in the centers of other cupcakes. Then the fun part: I decorated them with green shamrocks and sugars.


Then, since I was running low on ganache (and still had that whole cake I needed to frost), I made a fresh batch of ganache and decided to glaze the tops of some of the cupcakes with that. You can simply microwave the ganache you already have until it has a thinner consistency if you want to decorate your cupcakes this way.

Carefully plunge just the tops of the cupcakes into the thin ganache and twist your hand slightly as you pull the cupcake up from the ganache, so the ganache stays on top and doesn't drip down the sides. Sprinkle with green sugar before the ganache sets completely.


I don't know about you, but I'd be happy to find any of these rich, ganache-filled goodies at the end of a rainbow!


Don't forget to stop by to see my chocolate stout layer cake... and whatever I end up deciding to make for dinner. Are you making anything special for St. Patrick's Day?