5.29.2009

Honey Oat Banana Bran Mini Muffins


Now there's a mouthful -- and a scrumptious one, I might add!

My, I mean, our pantry (I have to get used to saying that since I now share one -- but more on that in a future post) is chock-full of oats and bran, the not-so-scant remnants of my granola making. I love granola, namely the Henrietta's Table recipe, but a girl can only eat so much of it before she needs a little variety. And I had temporarily reached my limit.

My taste buds and stomach cried out for something different. I still needed a high-fiber breakfast even if I were forgoing my beloved granola -- Why? Because fiber is good for you! But what could be a suitable replacement for the sweet, complex crunch of oats and nuts? Bran muffins, of course. (I know. They're not crunchy. But bear with me here.)

After giving it some thought, I decided these bran muffins must have bananas and honey in them. I also recently received some coupons from Stonyfield Farm for free Oikos Greek yogurt and knew it would be a perfect addition. Oikos is fat-free, and one-half cup has 11 grams of protein -- protein is good for you too! It's especially good for me since I've recently been getting up at 5:55 am to work out before work. Crazy, I know. If I didn't have such a dedicated workout partner -- my boyfriend -- I'd be sleeping in!

Helpful hint: Greek yogurt can easily take the place of buttermilk, as it has that nice, tangy flavor. I read that you should use half yogurt and half milk when substituting for buttermilk, but I didn't do that here.

With these things in mind, I set out in search of the perfect recipe. I found one I liked on JoyofBaking.com, but it would need some work, as it had no bananas, honey, or yogurt in the ingredient list.

I made some changes, did some simple math, and somehow ended up with some pretty tasty little muffins. I hope you like them too!

Honey Oat Banana Bran Mini Muffins (adapted from JoyofBaking.com)
Makes approx. 48 mini muffins, probably more*
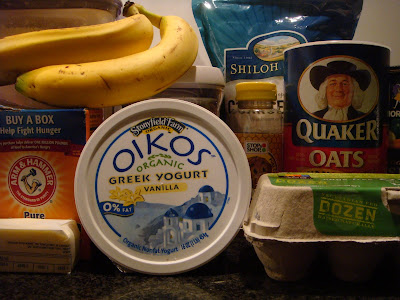


Ingredients
1 1/2 cups bran
1/3 cup boiling water
2 cups all-purpose flour
2/3 cup old-fashioned rolled oats
1 teaspoon cinnamon
1/4 teaspoon coarse salt
2 teaspoons baking soda
1 stick (1/2 cup) unsalted butter, softened
1 cup light brown sugar
2 eggs
2 bananas, mashed (very ripe or a little overripe works best)
2 tablespoons honey
1/2 cup Oikos Vanilla Greek yogurt
1/4 cup milk, as needed

Optional topping (makes enough for 24 mini muffins)
1 tablespoon brown sugar
1/4 teaspoon cinnamon
1/4 cup oats

Preparation
Preheat oven to 375 degrees.

Line mini muffin pan with paper mini muffin cups.
(Or make regular-size muffins if you prefer. I like mini foods. Think about it: Wouldn't you be more likely to snag a couple of mini muffins than one giant muffin?)

Mix the bran into the boiling water and set aside.
(I boiled the water in a measuring cup in the microwave and then just stirred the bran right into it. You could also do this in a pot on the stove, or, if you're like my mother, boil water in a tea kettle, and then pour it in a measuring cup and stir the bran in.)

In a medium bowl, mix together the flour, oats, cinnamon, salt, and baking soda. Set aside.


Place softened butter in bowl of electric mixer with paddle attachment and beat on medium speed until smooth. Add the brown sugar and continue beating until combined. Add eggs one at a time, mixing after each addition. Add the bran and beat until well mixed. Add the mashed bananas and beat until combined.


Next add half of the flour mixture and beat until combined, and then add half of the yogurt (1/4 cup) and beat until combined. Repeat with remaining flour mixture and yogurt. Then add honey and beat until everything is well mixed. Thin with milk, as necessary. (I used the full 1/4 cup.)

Make the topping: Mix the topping ingredients together in a small bowl. You may need to press with the back of a spoon to break up the brown sugar.

Scoop batter by teaspoonfuls into prepared muffin cups.


Sprinkle topping evenly over muffins.


Bake at 375 for 10-12 minutes, or until light golden brown and knife or toothpick inserted in center of muffin comes out clean. (I have a gas oven, so note that cooking time can vary depending on your oven.)

Let muffins cool in pan for a couple of minutes and then remove from pan and place on rack to finish cooling (but feel free to eat some while they're still warm).


Eat plain or with butter!

I'm actually looking forward to having a couple of mini muffins for breakfast tomorrow along with a cup of Oikos honey Greek yogurt. Maybe I'm on a honey kick right now...

*I made 24 mini muffins and then saved the rest of the batter in the fridge. I know there's at least enough to make another 24 mini muffins, and I think a little more. Sorry I don't have an exact yield!


How do you add fiber and protein to your diet? What's your favorite kind of muffin? What's your favorite brand or flavor of yogurt?

5.27.2009

Zinfandel-Braised Short Ribs


Back when I made -- er, attempted to make -- those ricotta gnocchi, I also made these short ribs. Unlike the gnocchi, the short ribs came out wonderfully -- tender, flavorful, delicious.

When I saw that this month's Daring Cooks' Challenge was ricotta gnocchi and that we had the option to sauce it however we wanted, I started going through old magazines, looking for ideas. I didn't want to do a pesto or a tomato sauce; I wanted something heartier, something to create a whole meal. I decided on this recipe from Bon Appetit because I thought the sauce from the ribs would complement the gnocchi. I even thought about shredding the rib meat into the sauce and making a sort of ragu. Of course, this whole concept fell through since the gnocchi were not servable, but the ribs, with some fresh bread, made a satisfying meal.

Due to my original plan, I opted not to make the parsnip mashed potatoes that accompany the ribs, and I cut the recipe down to serve just two of us (with a little leftover). Below is my version of the recipe, borrowed heavily from Bon Appetit.

Zinfandel-Braised Beef Short Ribs (adapted from Bon Appetit, May 2009)

Ingredients
2 tablespoons room-temperature butter, divided
6 3- to 4-inch-long beef short ribs
Coarse kosher salt
1 cup chopped red onions
3 garlic cloves, chopped
1 tablespoons chopped fresh rosemary
1/2 750-ml bottle Zinfandel (I used Ravenswood -- perfect for drinking with the meal too)
1 cup low-salt beef broth
1 tablespoon all purpose flour

Preparation
Preheat oven to 325°F. Season ribs with coarse salt and pepper. Set aside.

Melt 1 tablespoon butter in cast iron dutch oven over medium-high heat. Add ribs and sauté, tossing to brown on all sides, about 10 minutes. Transfer ribs to a plate or bowl.

Add 1 tablespoon butter to pot. Add onions and sauté until brown, about 6 minutes. Mix in garlic and then rosemary. Add wine and broth and bring to a boil, scraping up browned bits.

Return ribs and their juices to pan, arranging in single layer. Bring to a simmer, and then cover and place in oven. Braise until ribs are very tender, about 2 1/2 hours.

Transfer ribs to a clean plate or bowl. Spoon fat from pan juices (there wasn't anything noticeable to skim off when I made them). Bring juices to a boil and let thicken slightly, about 10 minutes.

In a small bowl, mix 1 tablespoon butter and flour until smooth (I found it was easiest to use a fork for this). Whisk the mixture into pan gravy; simmer until thickened enough to coat spoon. (BA recommends 5 minutes, but as I left out the parsnips, I simmered the mixture even longer.) Season with coarse salt and pepper. Return ribs to pot; spoon gravy over.


I made another short rib recipe a while ago that was pretty good -- the tomatoes in it were a plus -- but I liked these a lot better. They're a little more hands-on, as the other recipe is designed for the slow cooker, but they're definitely worth the extra time and attention. Reward yourself for that initial effort with a glass of zinfandel and this warm, comforting dinner.

Leftovers were great with some mashed potatoes the following night. Just rewarm the ribs right in the dutch oven with their juices.

5.21.2009

Easy Homemade Chicken Nuggets

Looking for a quick weeknight meal? You have to try these chicken bites I found on Aggie's Kitchen!

I love Aggie's blog for a number of reasons, and these chicken bites are definitely one of them. Check out her blog for yourself and try this recipe.

Aggie uses a method called air baking. I had never tried it but am a big fan now. You place a cooling rack inside a cookie sheet and put your chicken pieces on that. You don't end up with a crispy side and a non-crispy side this way. (I've only done this when I've needed to keep waffles warm in the oven -- it keeps them from getting soggy. I guess the same thing works when baking chicken!)


While Aggie dips hers in honey mustard prior to coating them in panko, and I know I would have loved them that way, I went a different route. My boyfriend is not a big fan of mustard -- although he didn't seem to mind it in this dish -- so I did the traditional dredge in flour, coat with egg, and then dipped the pieces in panko mixed with some garlic salt and pepper.

Aggie then says to spritz with nonstick cooking spray or olive oil. I have a few small spray bottles of different olive oils -- one flavored with white truffle, one with sesame, and the other with roasted garlic. Since I was already using garlic salt, I spritzed my panko-crusted, garlic-salted chicken with the roasted garlic olive oil. (I'm thinking next time I can coat them with teriyaki sauce and panko and then spritz with the sesame oil.) Then I baked them, oiled and aligned on the cooling rack, for about 15 minutes.

The chicken pieces were moist, the outsides crunchy, and the flavor mildly garlicky. The bites were perfectly complemented by rice and broccoli.


I'm off to the Cape tonight. Hope you all have a wonderful Memorial Day Weekend! I'll be back next week with some new delicious dishes to share!

5.19.2009

Couscous And Veggie-Stuffed Peppers


This is another one of those recipes that I knew I'd be making as soon as I saw it. You may know that I love Israeli couscous from past posts -- I've shared one recipe with parsley and shallots and another with spinach and tomatoes. It's so versatile.

This dish -- couscous stuffed peppers -- comes from the blog Charlestown Culinary, which I recently started reading.

Green peppers are stuffed with a mixture of thyme and vegetables -- carrots, onions, garlic, summer squash, and celery -- Israeli couscous, and parmesan cheese and then baked in the oven.

I followed Charlestown Culinary's recipe, making a few small changes as I went.

First, instead of cutting the tops off of the peppers, I split them in half and cleaned out the seeds. This way I ended up with four stuffed pepper halves instead of two big stuffed peppers. I intended to take these peppers for lunch this week and thought a half, along with some pita chips and hummus, would be the perfect amount.


Then instead of cooking my couscous and steaming the peppers in the same pan once the couscous finished cooking, I steamed the peppers in another pan, removed them and dumped out the water, and then sauteed my veggies in that pan. By doing this, I didn't have to spend any time waiting for the couscous to cook. The peppers were sitting pretty, waiting to be filled...


...and the veggies and couscous were done at the same time.


At that point all it takes to finish the filling is mixing the veggies and couscous together, adding in some parmesan cheese, and seasoning with salt and pepper (I skipped the Tabasco). I tried to neatly stuff each pepper with the slightly sticky couscous and veggie mixture, and then I popped the tray in the oven.


I ended up with a lot of extra filling, about enough to have filled one more pepper. But that's okay because it's tasty enough to eat on its own too!


These were the perfect size for lunch and held up well in the microwave. There aren't many things I enjoy after the microwave has had its way with them, but veggies are usually a safe bet. The peppers stay soft and the couscous pearls have that nice, chewy texture.

And while I didn't calculate any nutrition data, I'm sure all those veggies have to be good for me! I can definitely see myself making this again, maybe with some zucchini and tomatoes too.

5.18.2009

Pain Au Chocolat Cinnamon Rolls

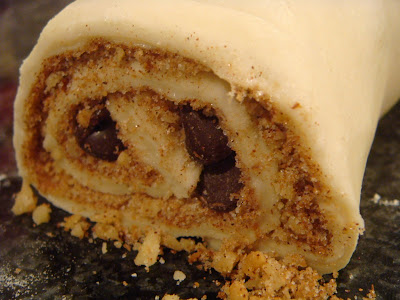
Pain au chocolat cinnamon rolls
When I read various food blogs or happen upon different food sites, I'm always bookmarking recipes I want to try. I don't always get back to everything I've bookmarked, but lately I've been making a small dent in this list. I recently made Dorie Greenspan's Chocolate Chunkers and Well Fed Network's Sugar Cookie Bars. And the moment I saw a picture of these cinnamon rolls on Serious Eats, I knew I'd be making them too.


I woke up around 8 o'clock Sunday morning, stretched, grumbled, and pushed myself out of bed, into the kitchen. I took out the puff pastry I had bought the night before and left in the fridge to thaw. Then I raided the pantry for the other ingredients: chocolate chips, walnuts, sugar, brown sugar, cinnamon, and powdered sugar (for the icing).


As I always say, a lot of cooking comes down to timing, and preparation can affect your timing. It's a good idea to read a recipe all the way through, gather all your ingredients together, and do any prep work instead of diving straight in.

While the procedure for the recipe will give you the steps in the right order, it doesn't always include the prework, which can be found in the ingredient list. The recipe calls for cooled, melted butter and toasted walnuts. So the first thing I did was melt the butter in a small bowl. Then I tossed some walnuts on a sheet of tin foil and put them in the toaster oven.

I scanned the recipe and saw that I eventually needed to spray a muffin pan with nonstick spray and place the cinnamon rolls in it to bake. I don't keep nonstick spray around, so I buttered the muffin cavities instead and set the pan aside.

With those ingredients ready and the pan prepared, it's fine to move onto following the recipe. So next I mixed the sugars and cinnamon together.


Then I gave the toasted walnuts a little spin in the chopper. (This could be done in the prep steps above too, but mixing the sugars together gave me something to do while the walnuts were toasting -- that whole timing thing.)


Once I measured out the chocolate chips, all of my filling ingredients were ready to go. I then wiped down and floured the counter and unfolded a sheet of puff pastry -- the original recipe calls for two sheets, but the puff pastry I use costs $10.99, and I couldn't fathom buying two packages. I cut the one sheet in half and rolled each half out into a square -- or something resembling a square.


Next I "brushed" my dough squares with the cooled, melted butter. I say "brushed" because I ruined my brush a month or so ago and haven't bought a new one yet, so I simply used a small spatula instead.


Now they wouldn't be very good cinnamon rolls without any cinnamon, so I generously coated the dough with the cinnamon mixture, dividing it between the squares.


Next I sprinkled on the walnuts and tossed on the chocolate chips.


And then comes the rolling. I was afraid the puff pastry would stick to the countertop, but it seems that I floured the surface enough because it came right up. I rolled each square into a log, trimmed off the ends, and cut the logs into six pieces, as the recipe instructed. Then I placed those pieces in the prepared muffin pan and baked them in the oven.


While they were baking, I made the icing -- a mixture of half and half, creme fraiche, and powdered sugar.


It was so easy to whisk these three ingredients together. I set the icing aside and waited -- as patiently as I could given the cinnamon smell wafting throughout the house -- for the rolls to finish baking.


I took the golden, puffy rolls out after about 23 super-long minutes and set them on a plate to cool slightly.


When they were still warm, I used the whisk to drizzle icing over the rolls. I iced them lightly and had a lot of icing leftover, so next time I think I'll just make a half recipe of the icing.


They're perfect with a steamy cup of coffee. This Sunday morning was particulary dreary -- think Maroon 5 "Sunday morning, rain is falling..." -- and a warm, gooey cinnamon roll, with a slightly crisp outside brightened the day and really hit the spot. Actually three of them really hit the spot.

Pain au chocolat cinnamon roll
Be sure to visit Serious Eats for the recipe. These cinnamon rolls will not disappoint, and they are quite easy to make, although a little time-consuming.

5.14.2009

Daring Cooks' Challenge: Zuni Ricotta Gnocchi


When I came across the Daring Kitchen, I was so excited to see a group called the Daring Cooks, the members of which try out different cooking challenges, and I signed myself right up. Turns out I signed up just in time for the first challenge.

But, boy, when they say challenge, they're not kidding! This may have been one of the more difficult things I've ever tried to make and one of the few things I could not make right or fix. That's right. I failed my first Daring Cooks' Challenge. But it was still fun!

I was actually really looking forward to this challenge because the chosen recipe -- Ricotta Gnocchi -- comes right out of Judy Rodgers' The Zuni Cafe Cookbook: A Compendium of Recipes and Cooking Lessons from San Francisco's Beloved Restaurant. One of my friends gave me this cookbook for Christmas, and I had yet to try anything out of it, even though I've already read it cover to cover and flipped through the recipes several times. It's one of those cookbooks that succeeds at being both gorgeous and instructive.

I followed the recipe exactly. I bought fresh ricotta at Whole Foods and drained it for what ended up being two days because I was too tired to make the gnocchi the night I originally planned to.

I took my drained ricotta and stirred and mashed it, then added the eggs, cheese, melted butter and sage, and salt. I mixed everything up. I thought the mixture seemed a bit loose, but since I had followed all of the directions, I made my test gnocchi anyways. It failed. So I tried to fix them as Rodgers suggests, by adding some beaten egg white.


But my gnocchi were still kind of goopy and gloppy. They looked nothing like the picture in the cookbook. I shaped them anyways and stuck the tray in the fridge thinking maybe they would harden and be easier to work with. No luck.


I can't even share a finished picture with you. They looked that bad. I even took the cooked ones and tried sauteeing them in some butter, so they might crisp up. This didn't even work. I guess it just wasn't my night. It's a good thing we had fresh rolls and zinfandel-braised short ribs.

My gnocchi came out with the texture of ravioli or stuffed shell filling. And it sort of reminded me of undercooked poached eggs too. It wasn't horrible, but I'd rather eat ravioli or stuffed shells. I don't see myself making this again, but I have always wanted to make potato gnocchi, and I haven't given up on giving that a try! And I definitely plan to try more recipes from The Zuni Cafe Cookbook.

Check out La Mia Cucina for the ricotta gnocchi recipe.

A little gnocchi antidote: Last year I went on a cruise in Hawaii. While onboard the ship at dinner one night, I had a waitress who insisted on calling this dish ga-notch-ee. But what's worse -- she served me tortellini. There was no tortellini on the menu, so I nicely mentioned that she might want to inform the chefs that gnocchi and tortellini are two completely different things!

5.13.2009

Chicken Paprikash


Paprika always makes me think of the introduction to The Warmest Room in the House: How the Kitchen Became the Heart of the Twentieth-Century American Home by Steven Gdula. The author recounts a time in elementary school when he was asked to name a spice. He pronounces paprika the Hungarian way like his parents do at home: "PUHP-rree-kuh." But his teacher doesn't immediately understand what he is saying and eventually guesses he means paprika (pap-REEK-a). He goes home confused and starts to wonder if it's not just his family's pronunciation but also the way they use the spice that differs from other families. And then he writes about how his parents use paprika in everything -- as an Italian family might use garlic and oregano -- and how his mother makes Chicken Paprikash, and ever since then I've wanted to make it (which has been a long time, considering I read this book a year ago while doing research for my master's thesis).

Chicken Paprikash is a dish that gains most of its flavor from paprika, which according to Cookthink, "is an aromatic spice powder made from ground dried sweet bell pepper pods." I bought a 1-pound bag of the Hungarian version at the Atlantic Spice Company in Truro, Mass., last summer, and I've been keeping it in my freezer and stealing scoopfuls from time to time as recipes have required it.


While I've used the paprika in a few other dishes (such as goulash), this is the first time I've finally gotten around to trying it out in Chicken Paprikash.

This recipe comes from the March issue of Food & Wine, in the healthy recipes section. In spite of being healthy, this dish is incredibly flavorful and delicious. And if you're not a fan of sour cream, which I'm not, you can skip that too and make it even better for you. (I'll only eat sour cream when it's cooked, baked, or mixed into things. I most enjoy it stirred up with bananas and sugar and poured over toast.)

Chicken Paprikash (adapted from Food & Wine)

My version serves 2 with leftovers.

Ingredients
2 tablespoons canola oil
1 small onion, thinly sliced
1 red bell pepper, thinly sliced
2 garlic cloves, thinly sliced
2 tablespoons Hungarian paprika
1/2 teaspoon caraway seeds
2 tablespoons flour
26 ounces Swanson chicken stock
1 bay leaf
2 thyme sprigs
salt and pepper
1 1/2 pounds skinless, boneless chicken breasts, cut into strips

Prepared rice or egg noodles -- or whatever you want to serve it with

Preparation

In a cast iron Dutch oven, heat the oil over medium-high heat. Reduce heat slightly and add onions, peppers, and garlic. Saute for about 8 minutes, or until they begin to brown.


Stir in paprika, caraway seeds, and flour, and mix until vegetables are well coated.


Then pour in the stock, toss in the bay leaf and thyme sprigs, and add salt and pepper to taste.

Bring to a boil and then reduce to a simmer. Continue simmering for about an hour, stirring occasionally.


Once the peppers have softened and the sauce has thickened, turn heat on high and add the chicken.


Cook just until the chicken is white throughout. Food & Wine recommends about 6 minutes, but this will differ slightly depending on the size you've cut your chicken strips.


Remove the bay leaf and thyme sprigs, and serve.

I served this with rice, but egg noodles would also have been a good choice. However you choose to serve it, be sure to sprinkle a bit more paprika on top, for flavor and appearance.


This made a filling, but not heavy, meal. It's great for a weeknight as long as you plan for the hour of simmering. With the chicken cut and ready to go and the sauce simmering, I was able to sprawl out on the couch for a while, getting up only to stir occasionally. It's a nice hands-off recipe, which is great because we all need a little downtime after work, but I'm not good at relaxing at the expense of a good meal. The tasty results of this meal absolved any guilt I felt from putting my feet up for a bit!

5.01.2009

Henrietta's Table Granola


Have you ever been to Henrietta's Table (Cambridge, Mass.) for breakfast? If not, you MUST go. Everything is delicious, well prepared, and fresh.

There's a brunch on Sundays that starts at noon, but I prefer to go for breakfast. Breakfast is much more affordable and lets you get your day started sooner (leaving more time for running errands, etc., while still allowing for a leisurely morning meal). So get up early, and get down there!

Breakfast is served from 7:00 a.m. - 11:00 a.m. on Saturdays and 7:00 a.m. - 10:30 a.m. on Sundays.

I've had the Buttermilk Hotcakes, Cinnamon Cranberry French Toast, Cream Chipped Beef on Buttermilk Biscuits (good but a little heavy), and Poached Eggs and Baked Harrington Ham on Anadama Bread with Hollandaise Sauce and Fresh Asparagus (and I really need to go back to try the Red Flannel Hash) -- but my favorite thing is the Homemade Granola Parfait with Berries, Apples, Yogurt and Honey.


I know -- it sounds so plain, but that granola is the most amazing granola I have ever had, and it compelled me to buy Fresh & Honest: Food From the Farms of New England and the Kitchen of Henrietta's Table, a cookbook written by Chef Peter Davis of Henrietta's Table.

I ordered the granola parfait one morning with a cranberry walnut muffin on the side. I savored every bite of that parfait, topped with a glistening honeycomb, and only made it through half of the muffin, which was also very good -- not to mention huge! (And I'm not sure, but I think the parfaits might be made to order because mine was neither soggy nor watery -- believe me, I've had some bad ones.)

So, after that amazing breakfast, once I found out the granola recipe was in Davis' new cookbook, I went right out and bought it. I wasn't even thinking about how the famous pot roast, red flannel hash, or cinnamon cranberry french toast recipes would be in there too. I focused on granola and granola only (but I am delighted that there are a ton of other recipes in there I can't wait to try as well!)

You'll have to get the book yourself for the recipe, but I can tell you it is well worth it. The granola is packed with all sorts of stuff you'd never know is in there. I figured it was brown sugar and oats and not much more. But there's bran, wheat germ, pumpkin seeds, hazelnuts, sunflower seeds, molasses, and so much more!


The yield is three quarts, so I decided to just make one-third. The recipe is very simple -- almost a little too simple. Had I the opportunity to copyedit this cookbook, I would have questioned whether the hazelnuts should be whole or chopped, instead of just listing hazelnuts. But because I couldn't remember any whole hazelnuts in the granola when I had it at the restaurant, I decided to chop mine.

It also assumes some knowledge on the part of the cook, and you'll want to be prepared for that. The recipe calls for clarified butter, so make sure you know how to make it and have it ready to use with the rest of your ingredients. It's actually very easy. Just melt more butter than the recipe calls for over medium heat. You'll see a foam form on the top. Scoop or strain this off, and then pour the butter off through a strainer into a bowl or measuring cup, and use that in the recipe.


Clarifying the butter is the hardest part -- and it's not even that hard. Other than that, you just mix everything together.


Then you spread it on a pan or two and bake it in the oven, stirring it around from time to time.


The sweet and nutty granola was perfect with some yogurt drizzled with honey and fresh berries. I used strawberries, blackberries, and blueberries. And if only honeycombs weren't $10.99 at Whole Foods, I would have bought some to top my parfaits with. It would have come pretty close to what is served at Henrietta's Table.

I made this the other night and when my boyfriend got home from his softball game, he immediately started sniffing around the kitchen to see what delicious baked good I had made. He was disappointed to learn it was "only granola." The cinnamon smell lingering in the house had led him on. He claims he doesn't like granola -- I don't know how that can be possible as not all granolas are the same. But I'm sure if I hadn't used the g-word and had sprinkled the granola mixture over apples to make an apple crumble, he would have eaten it. It's that good. Keep this in mind if you have any granola dissenters around.

And a side note: There was a recent article in Slate about whether to buy certain foods or make them from scratch at home, based on which is more economical. Granola came out as one that could be more economical to purchase depending on the brand, but with a recipe as perfect as this, who cares? If it costs a little extra to make it from scratch, it is well worth it!

Do you make your own granola or purchase it? What's your favorite recipe or store-bought brand? And how do you like to eat granola -- plain, with yogurt...?