Okay, so if you've been following along, on Sunday, we revealed the Daring Bakers' challenge: vol-au-vents. It was an incredibly fun challenge. You can see my post about the finished product here.
Yesterday, I shared the recipe and method for making puff pastry with you.
Today, you'll see how the vol-au-vents are made from that puff pastry. Below are the instructions from the Daring Bakers' challenge, as well as some notes and pictures from me.
Forming and Baking the Vol-au-Vents (instructions from Steph of A Whisk and a Spoon)
Need
Well-chilled puff pastry dough (recipe below)
Egg wash (1 egg or yolk beaten with a small amount of water)
Line a baking sheet with parchment and set aside.
Using a knife or metal bench scraper, divided your chilled puff pastry dough into three equal pieces. Work with one piece of the dough, and leave the rest wrapped and chilled. (You can repeat the whole process with the other two pieces, depending on how many vol-au-vents you want.)
On a lightly floured surface, roll the piece of dough into a rectangle about 1/8 to 1/4-inch (3-6 mm) thick. Transfer it to the baking sheet and refrigerate for about 10 minutes before proceeding with the cutting.


(This assumes you will be using round cutters, but if you do not have them, it is possible to cut square vol-au-vents using a sharp chef’s knife.) For smaller, hors d'oeuvre sized vols-au-vent, use a 1.5” round cutter to cut out 8-10 circles. For larger sized vol-au-vents, fit for a main course or dessert, use a 4” cutter to cut out about 4 circles. Make clean, sharp cuts and try not to twist your cutters back and forth or drag your knife through the dough. Half of these rounds will be for the bases, and the other half will be for the sides. (Save any scrap by stacking -- not wadding up -- the pieces: They can be re-rolled and used if you need extra dough. If you do need to re-roll scrap to get enough disks, be sure to use any rounds cut from it for the bases, not the ring-shaped sides.)
Using a ¾-inch cutter for small vols-au-vent, or a 2- to 2.5-inch round cutter for large, cut centers from half of the rounds to make rings. These rings will become the sides of the vol-au-vents, while the solid disks will be the bottoms. You can either save the center cut-outs to bake off as little "caps" for you vol-au-vents, or put them in the scrap pile.
I also used cookie cutters to get different shapes for the middles and caps. I used apples, stars, and hearts. I knew I'd be making an apple filling, and I thought apple caps would just be adorable for that. And I ended up using a slightly larger outer ring (I think 2" or 2 1/4") because my smallest inner ring was 1" not 3/4".

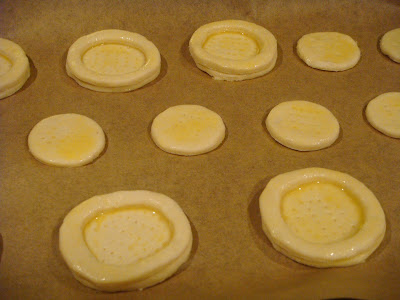
Dock the solid bottom rounds with a fork (prick them lightly, making sure not to go all the way through the pastry) and lightly brush them with egg wash. Place the rings directly on top of the bottom rounds and very lightly press them to adhere. Brush the top rings lightly with egg wash, trying not to drip any down the sides (which may inhibit rise). If you are using the little “caps,” dock and egg wash them as well.


Refrigerate the assembled vol-au-vents on the lined baking sheet while you pre-heat the oven to 400ºF (200ºC). (You could also cover and refrigerate them for a few hours at this point.) This is important. My last batch may have gotten a little too warm and didn't rise as well as the rest.
Once the oven is heated, remove the sheet from the refrigerator and place a silicon baking mat (preferred because of its weight) or another sheet of parchment over top of the shells. This will help them rise evenly. Bake the shells until they have risen and begin to brown, about 10-15 minutes depending on their size. Reduce the oven temperature to 350ºF (180ºC), and remove the silicon mat or parchment sheet from the top of the vol-au-vents. If the centers have risen up inside the vol-au-vents, you can gently press them down. (A tart tamper works well for this.)


At this point, I let mine cool and then I froze them until I was ready to fill them a few days later. You can then follow the directions below to bake the frozen ones, though you may need to tack on a couple of minutes. If you have fillings that you want warmed, put those in the frozen vol-au-vents before you bake them.

Continue baking (with no sheet on top) until the layers are golden, about 15-20 minutes more. (If you are baking the center “caps” they will likely be finished well ahead of the shells, so keep an eye on them and remove them from the oven when browned.)
Remove to a rack to cool. Cool to room temperature for cold fillings or to warm for hot fillings.
Fill and serve.
Next up: The fillings! And also, if you have leftover puff scraps from shaping the vol-au-vents, don't throw them out! Stack the pieces, wrap them in plastic, and toss them in the fridge. I'll give you a fun idea of what you can make with those scraps very soon.
